Quick guide - How to collect Consents and Preferences?
A quick starter guide that will walk you through the steps on how to collect consents and preferences of your users
We understand that efficiency is key for you. Therefore, we've designed our platform to let you transition from initial login to actively capturing customer consents and preferences in just six easy steps. Our user-friendly interface ensures a smooth and intuitive process.
All the steps described below can also be completed using our well documented API .
If you do need any support during this process please contact our Support Team.
Use-Case
Before we start with the actual steps for creating and deploying a DataGuard widget to collect consents and preferences from your customers, lets start with a hypothetical use-case so that the following steps become easier to follow and one can apply the same in the context of your business.
Business Problem
Consider the case of Acme, an e-commerce business that provides a feature for users to create accounts for faster checkouts and easy access to shopping history. As part of the account setup process, Acme requests consent from users to use their email addresses for sending updates on new deals. Additionally, Acme gives its users the flexibility to set preferences for how often they would like to receive these marketing emails.
Let's break it down for better understanding:
- Acme's aim is to create a streamlined shopping experience with personalized accounts for each user.
- During account setup, Acme asks for user consent to use their email for marketing purposes.
- Acme also empowers its users by asking for their preferred frequency for receiving these marketing emails.
Our goal is to guide you on how to effectively implement this consent and preference capture process for your organization using DataGuard's Consent & Preference Management Platform.
How to?
1. Login
To get started with the DataGuard Consent & Preference Management Platform, check your inbox for our welcome email. Inside, you'll find a link. Click this link to set up your password. Once you've created your password, return to the welcome email and use the provided URL to log in to the platform. For more information, you can read this article to get you started.
2. Define Consent Framework
To effectively implement DataGuard's consent framework, you'll need to navigate through four core components:
- Party Creation: This is the entity gathering consent and preferences. For instance, in our Acme example, 'Acme' is the party.
- Purpose Definition: Here, you specify why you're collecting user consent and preferences. In our scenario, Acme's purpose might be 'Marketing Offers'.
- Channel Specification: For each purpose, you'll need to define how you'll reach out to your users. In Acme's case, they're using 'Email'.
- Lawful Basis: In compliance with GDPR, you're required to provide a legal reason for collecting consent and preferences. [You can find more information here (Link to be provided)]
Remember, you have the flexibility to create multiple purposes tailored to your specific needs. Each purpose will require a corresponding channel and a lawful basis. For a detailed guide on how to create purposes, please refer to our step-by-step instructions here. (This should link to a separate page of consent purposes)"
Your DataGuard Consent & Preference Management application may come preloaded with a list of purposes. If you would like that, please reach out to the support team. This configuration gives you a starting point that you can amend to reflect your businesses processes.
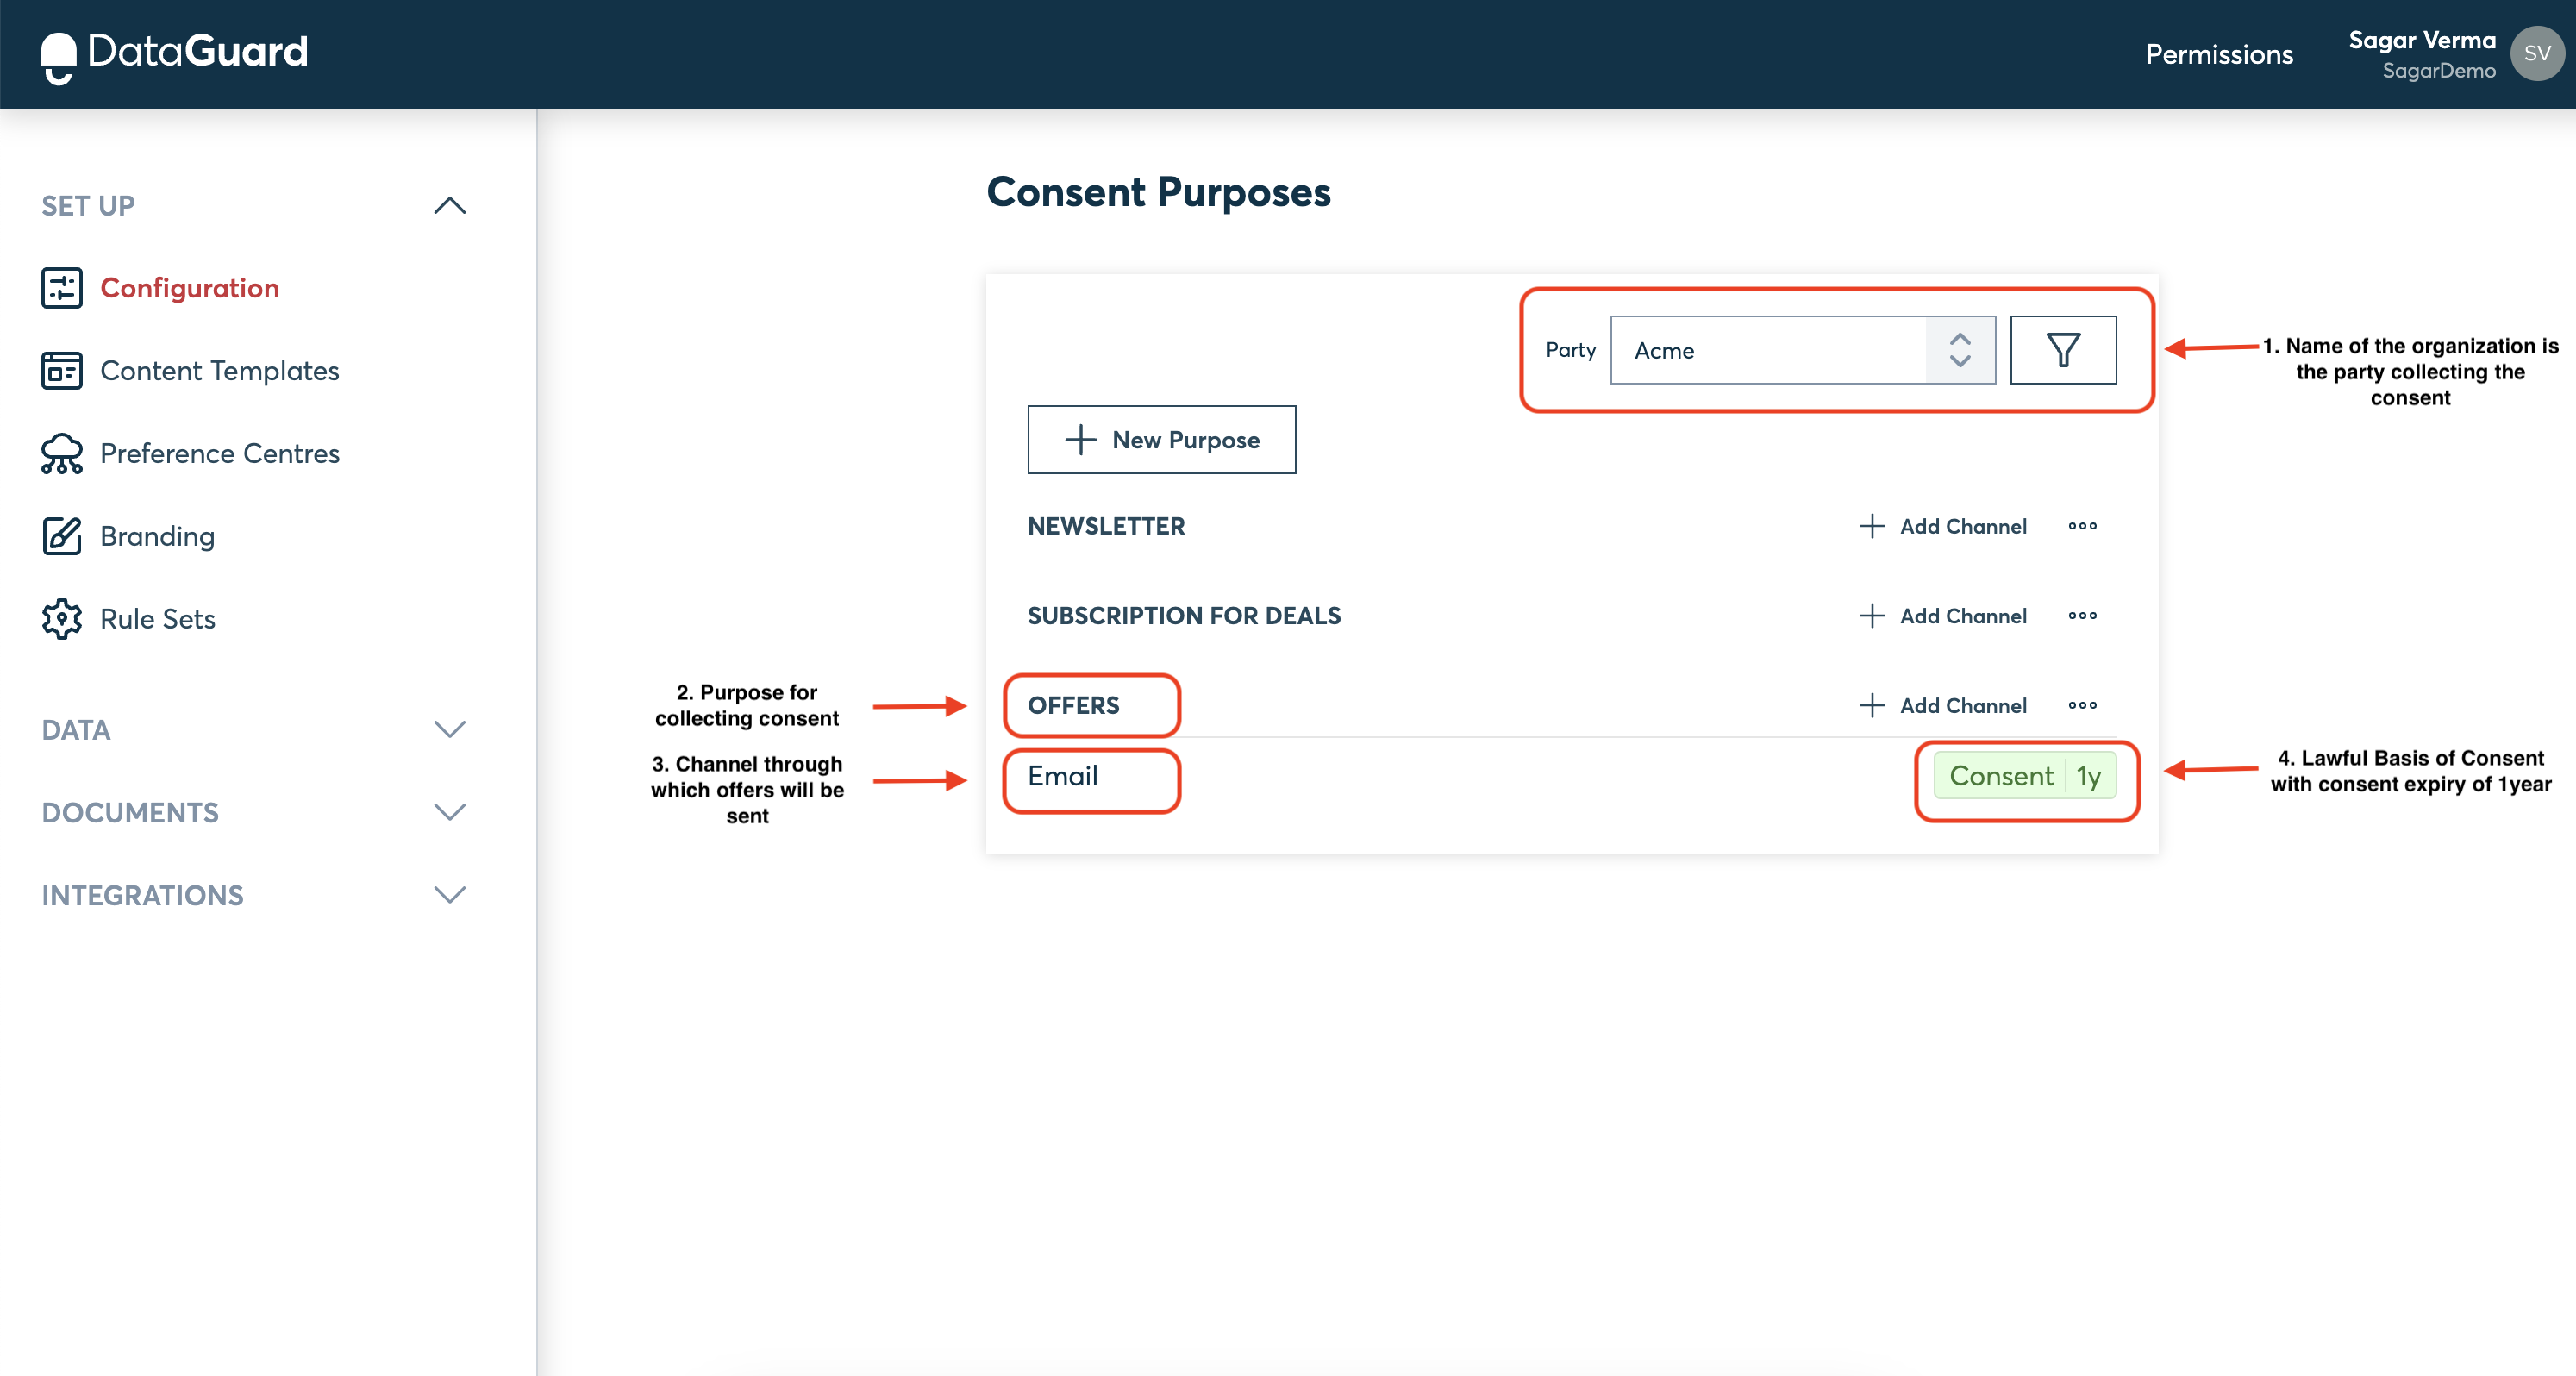
Consent Purposes
For further detailed steps on how to add new channels, give each of your consent purpose an expiry or leaving it to never expire and more, please refer to Consent Purposes
3. Create a content template
Now, it's time to craft a content template that will be used in your workflow or DataGuard's hosted preference centre to capture your users' consents and preferences.
With our platform's guided approach, you'll be ready to gather consents and preferences in mere minutes.
Before starting, ensure you have:
- Defined purposes (as we did in the previous step). This is only required if you collecting consents from your end-users.
- A URL link to your organization's privacy policy.
Let's dive into content template creation!
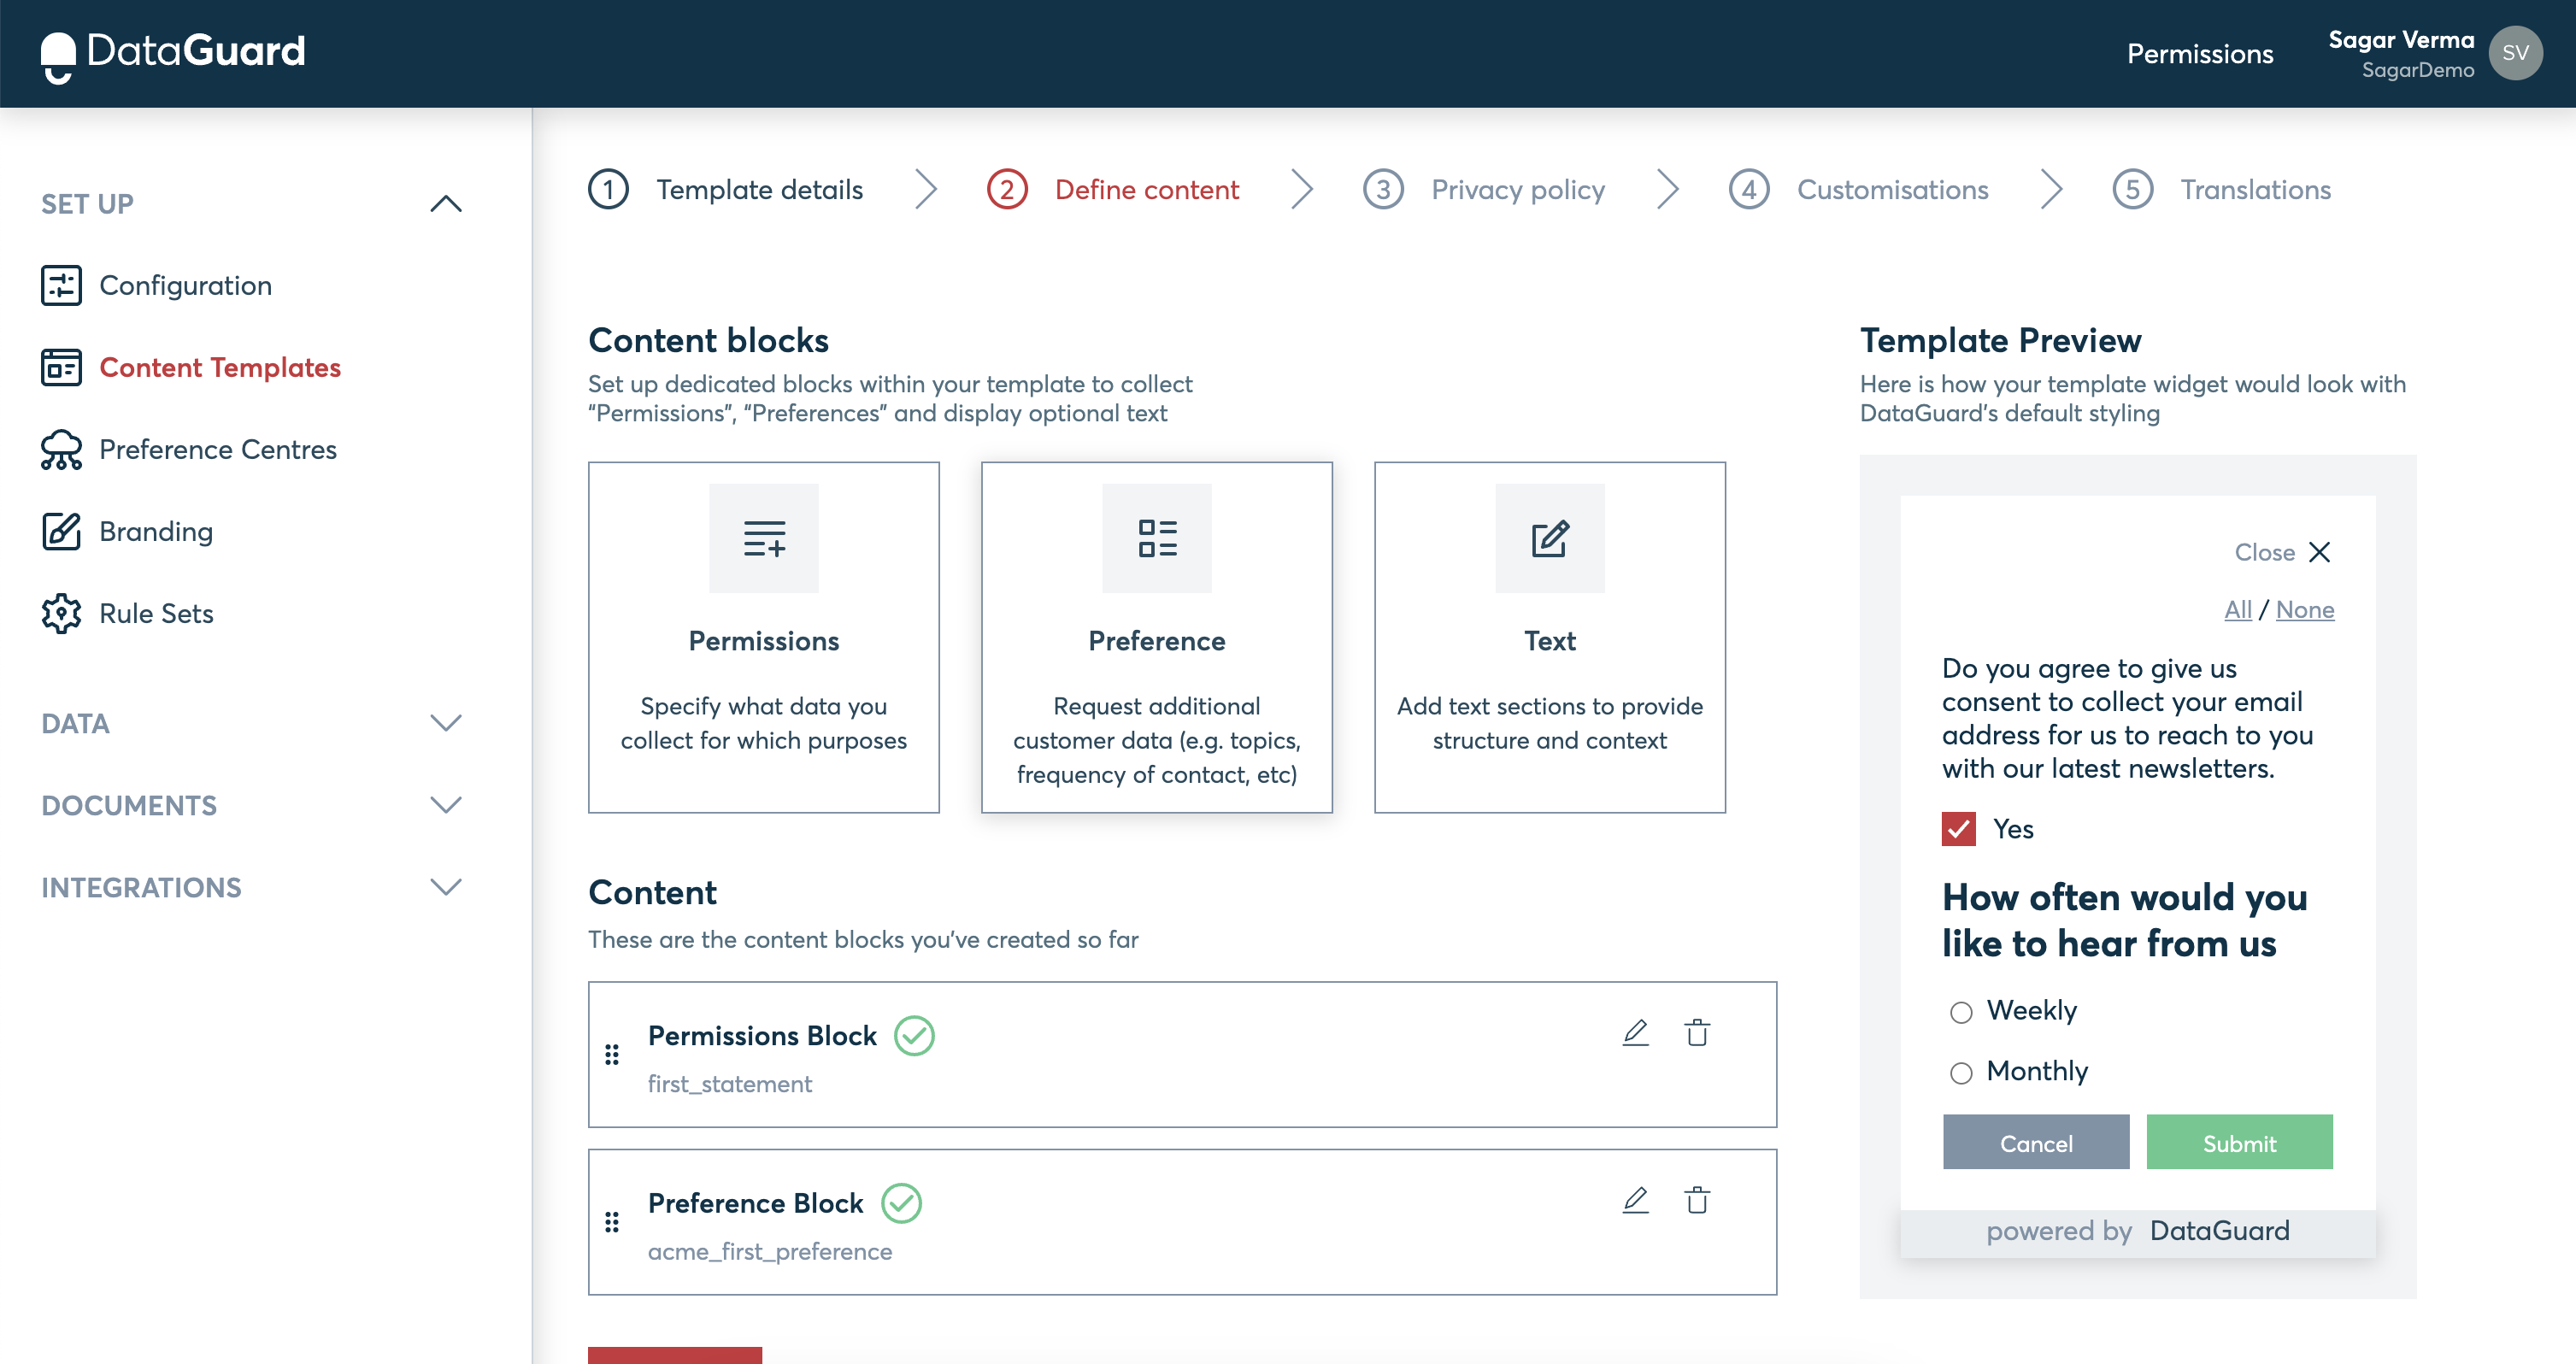
Content template is the interface that your customers will interact with for collecting their consent and preferences. The outcome of creating a content template is a widget that can be embedded in your workflow or to get started quickly with collecting consent, this widget could be used in DataGuard's hosted preference centre.
We will execute on the following steps to create a content template and the screenshots below will target our earlier defined marketing use-case.
Create a new Content Template
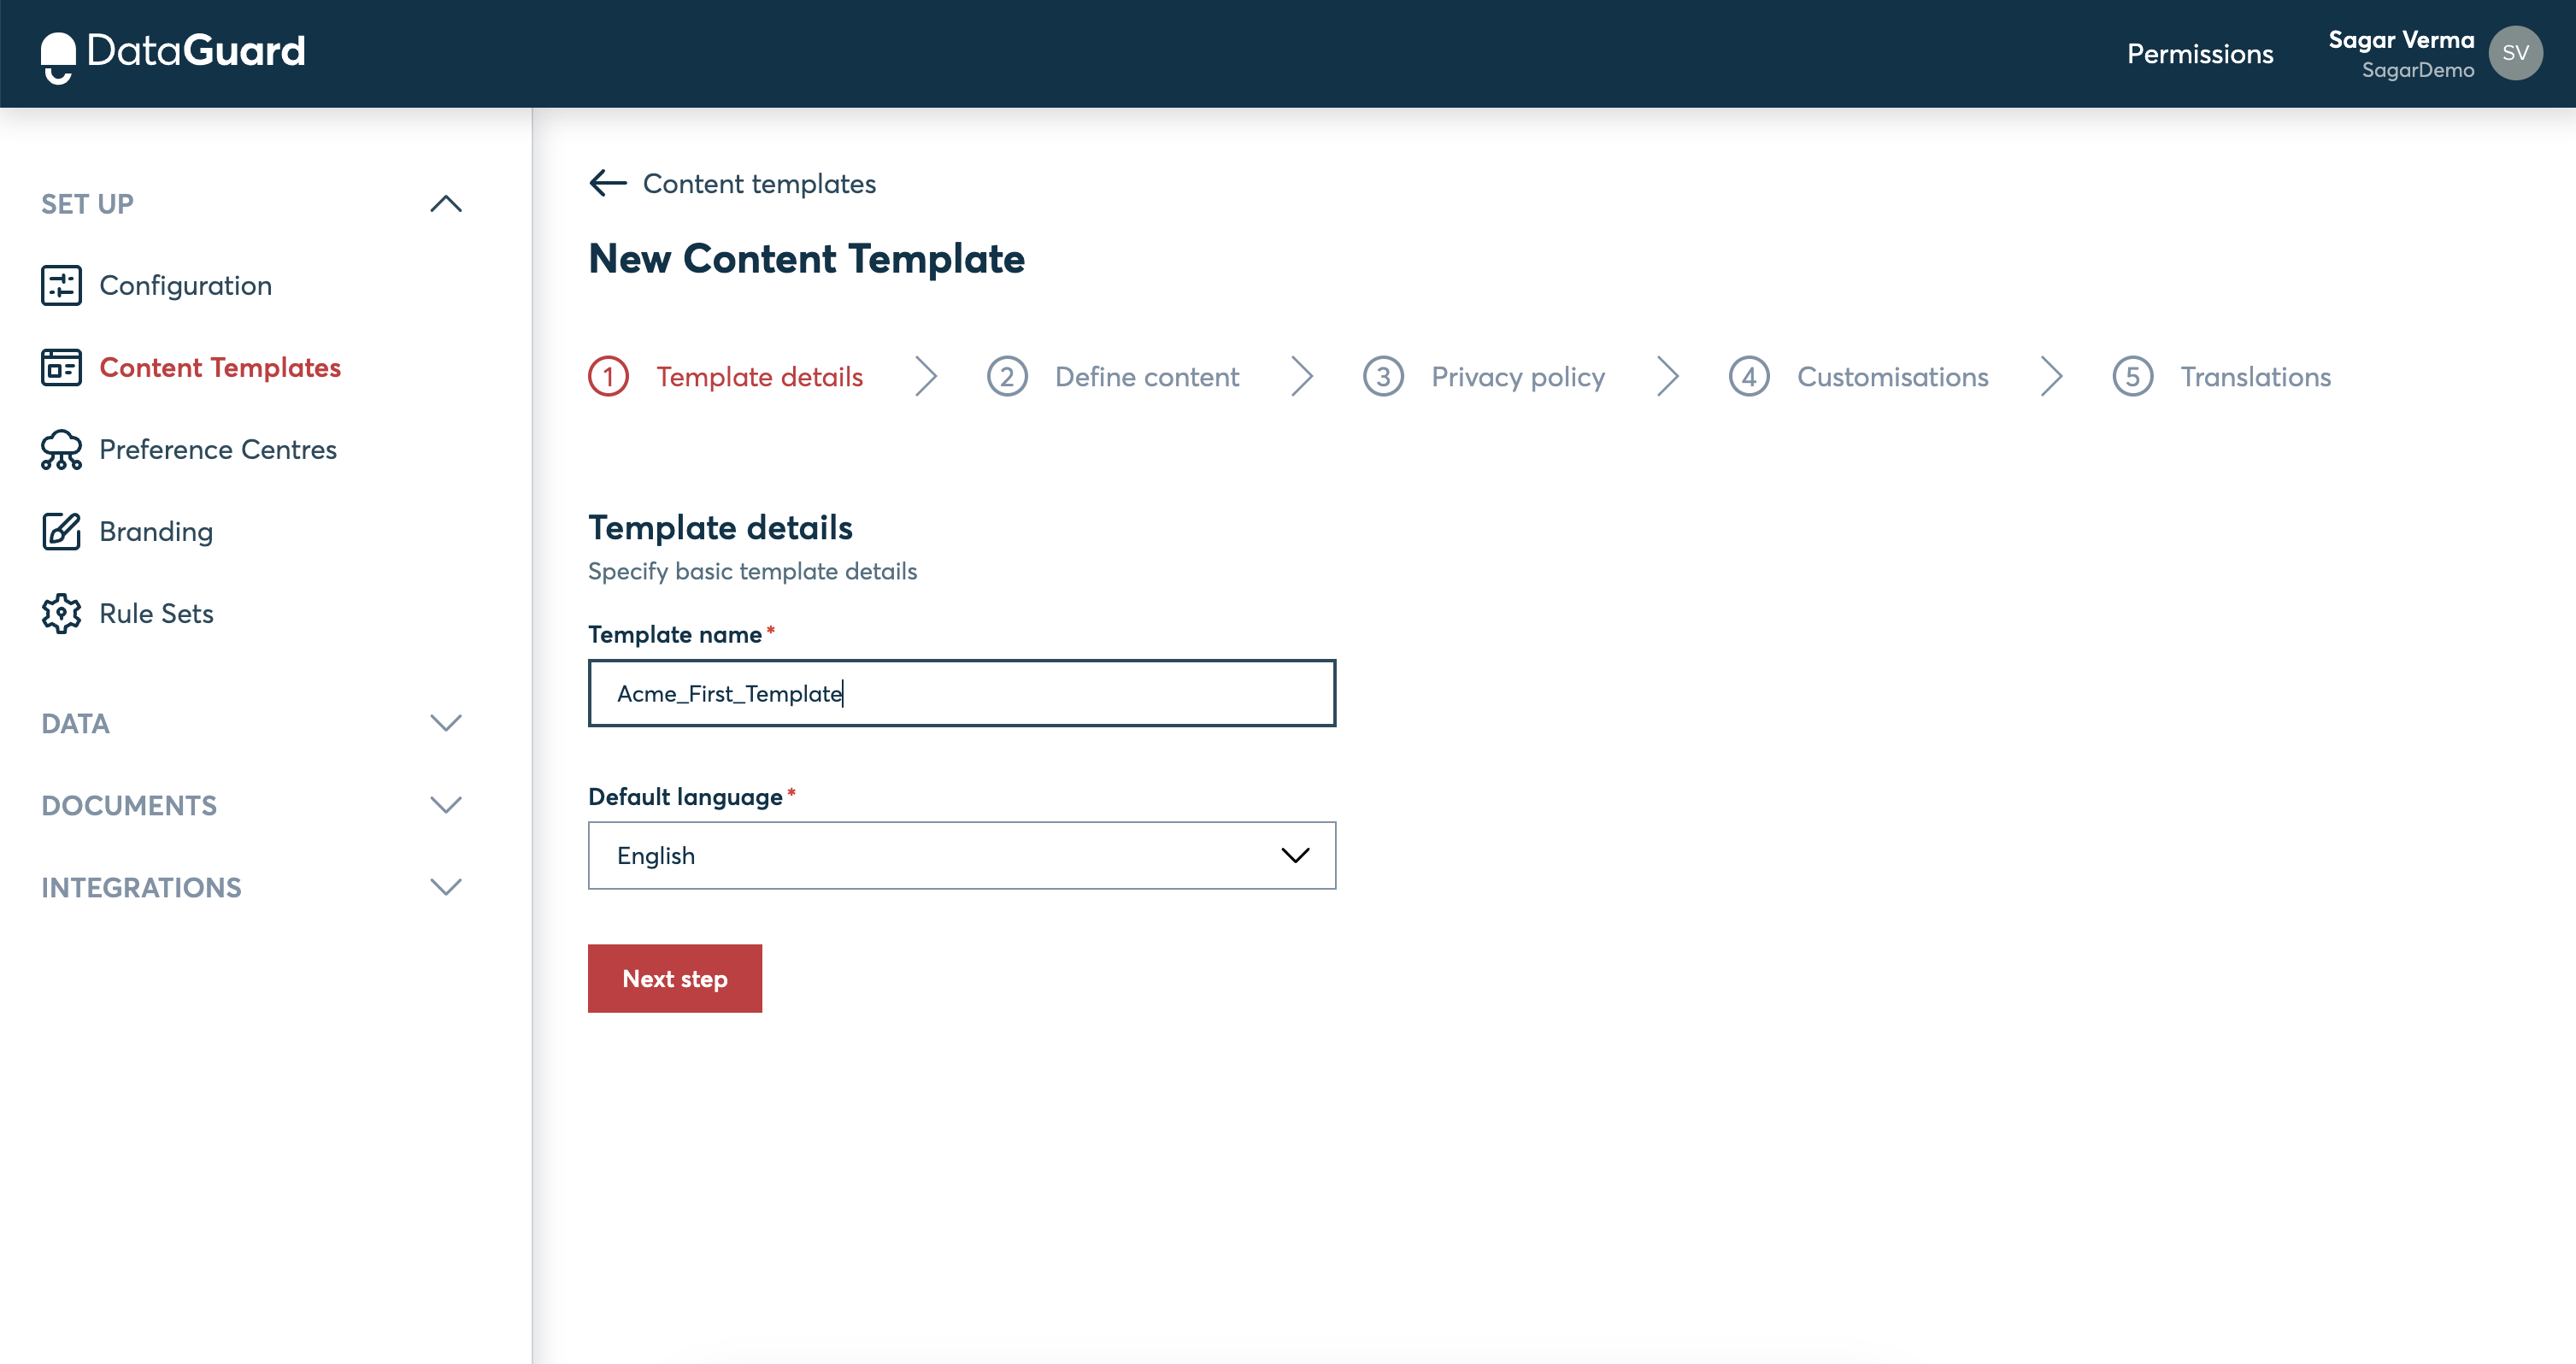
Acme's Content Template creation
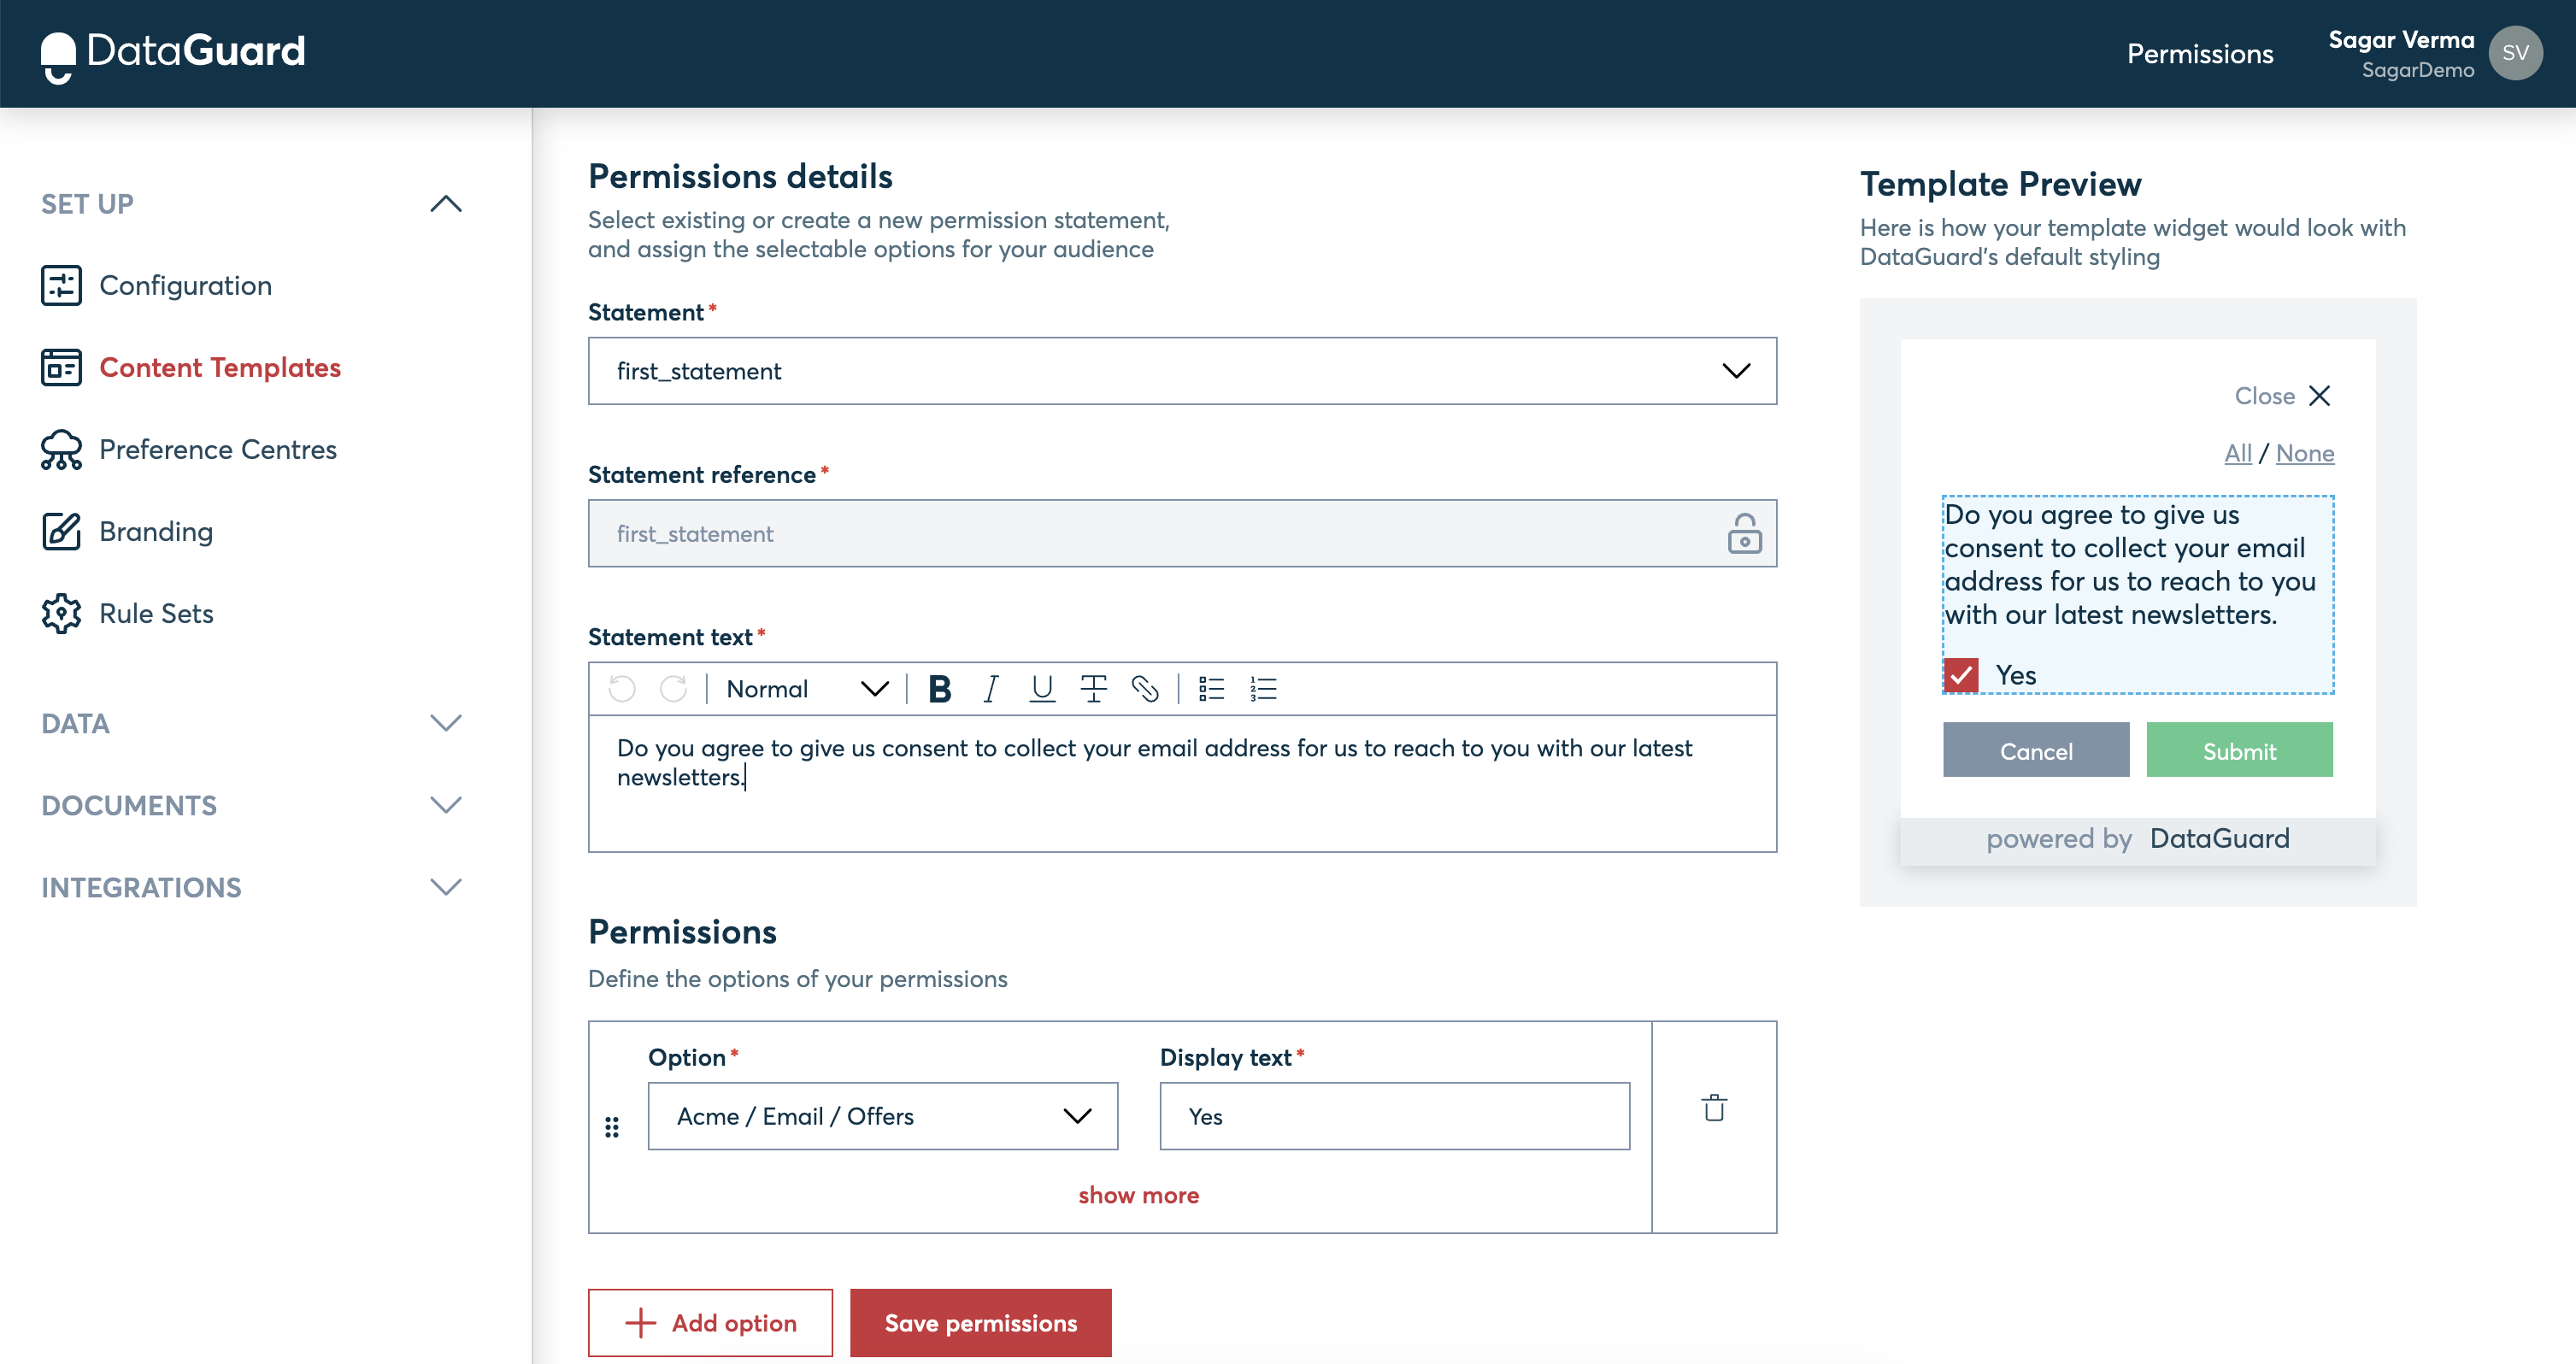
Add Permission Block: This is required if the content template is collecting consents from users. It is also where you would map your purposes to the text used in the content template for collecting consents.
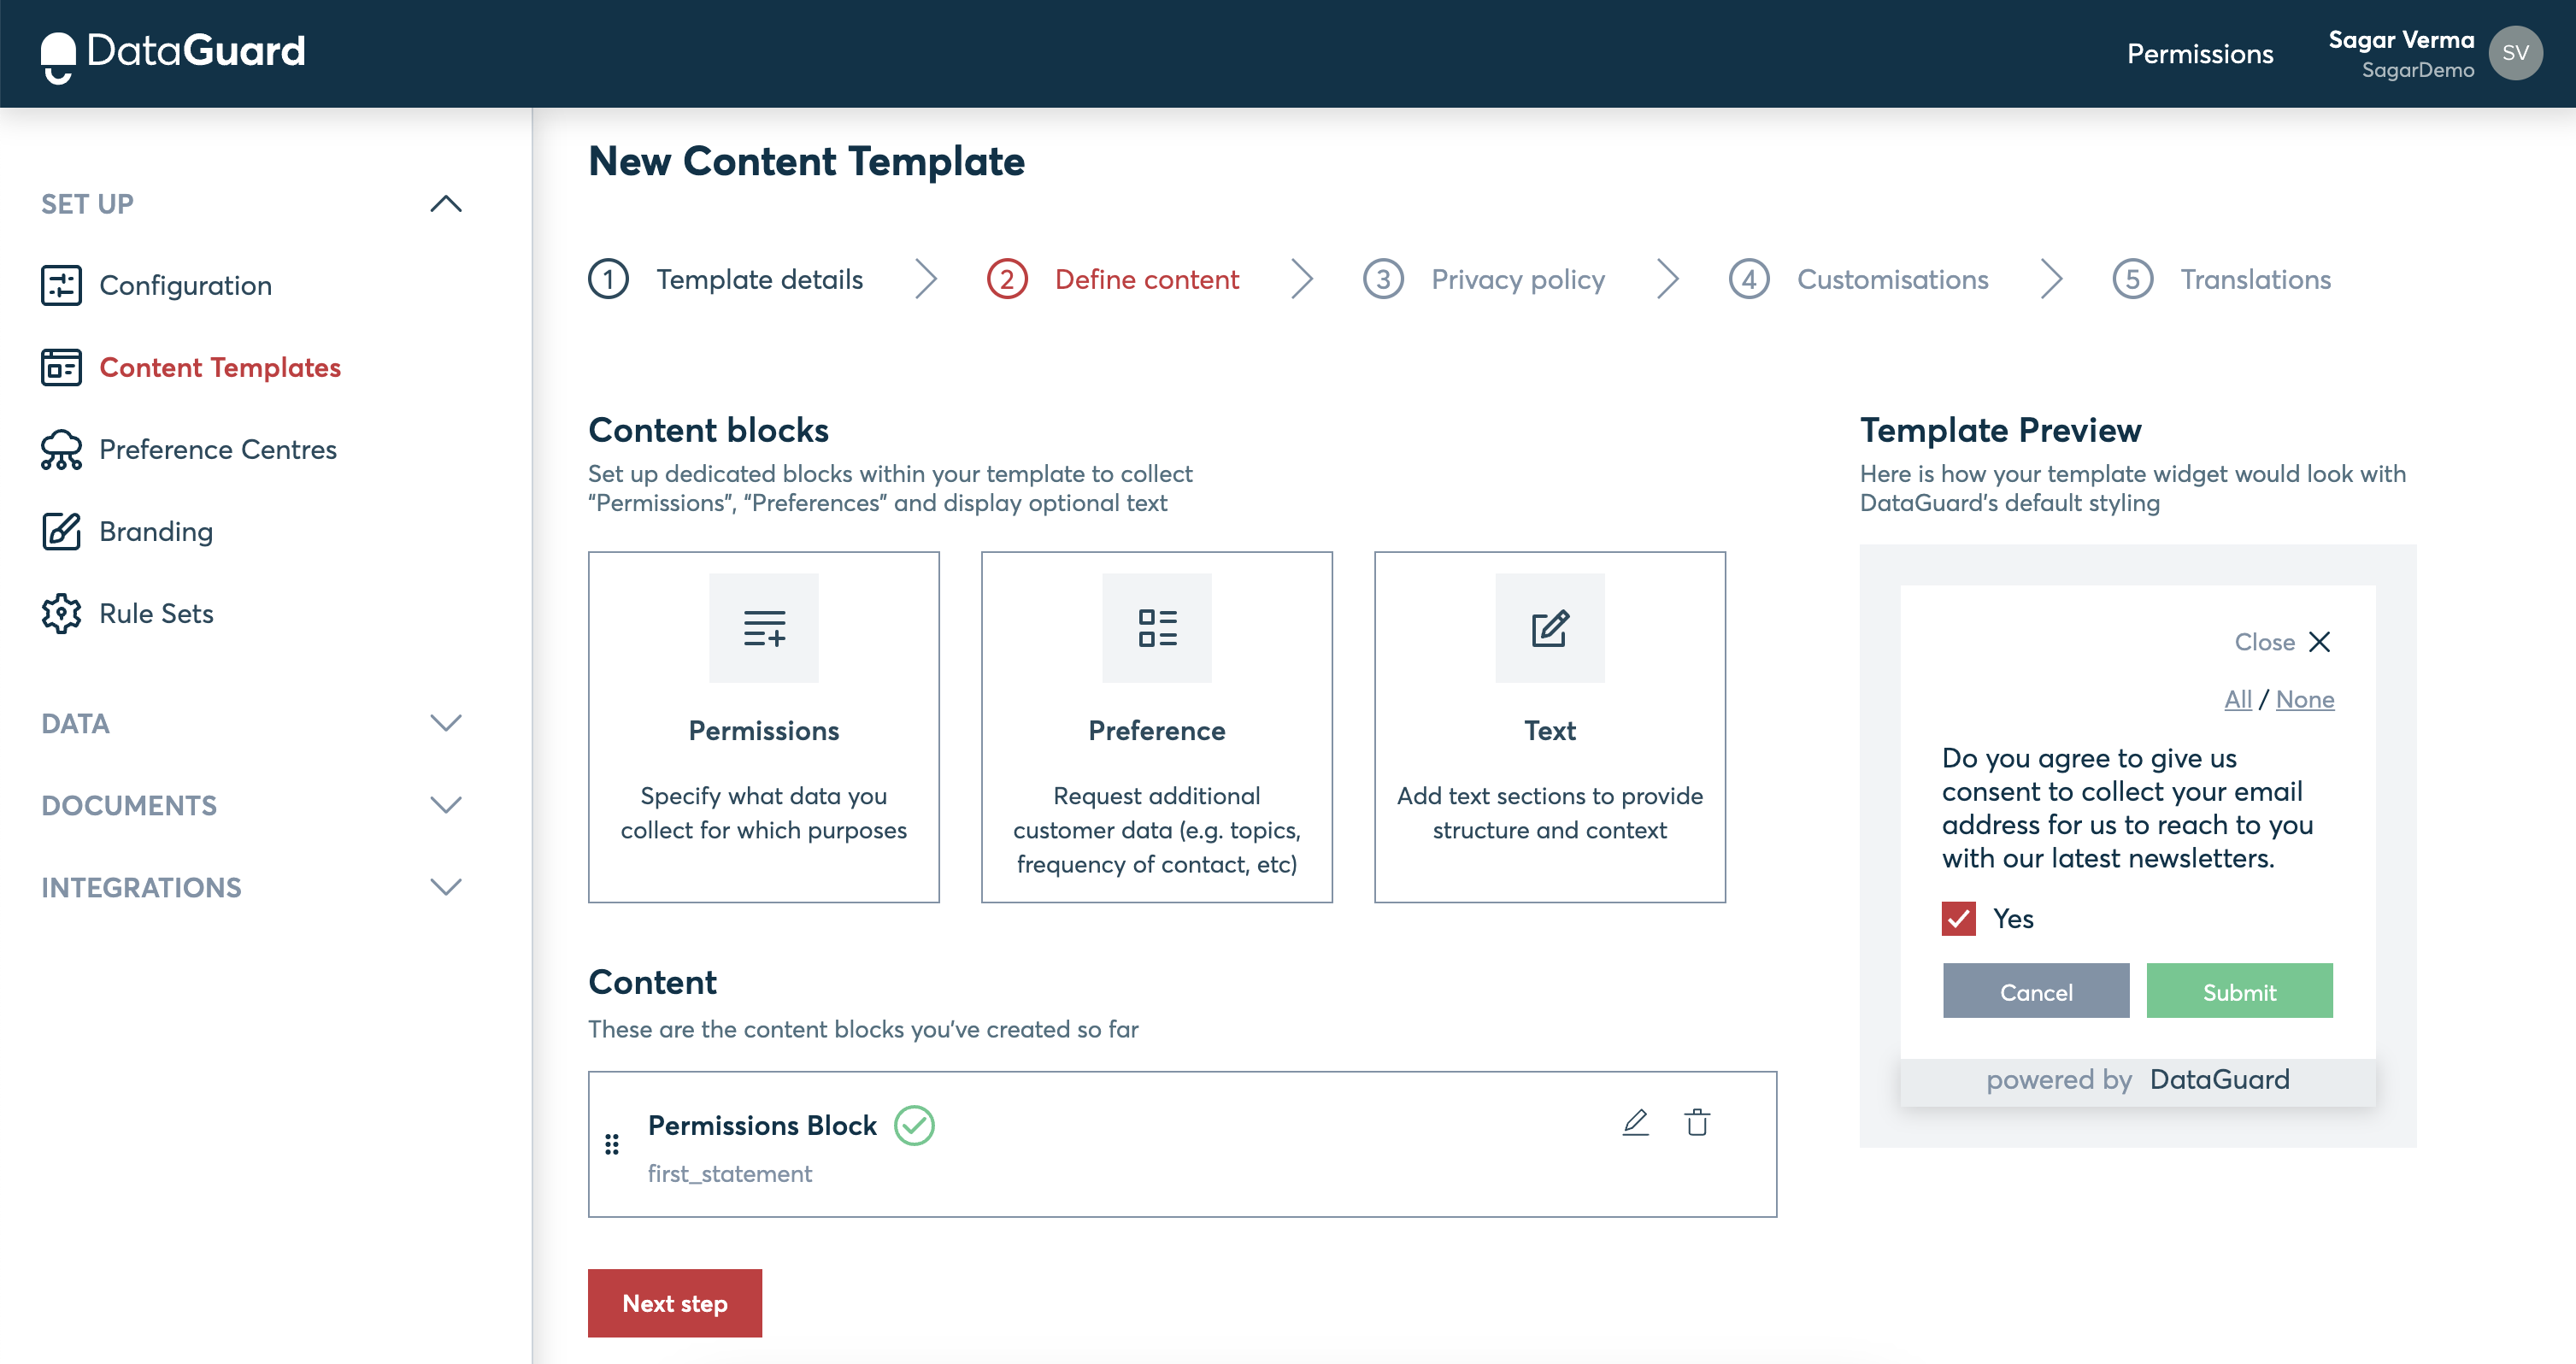
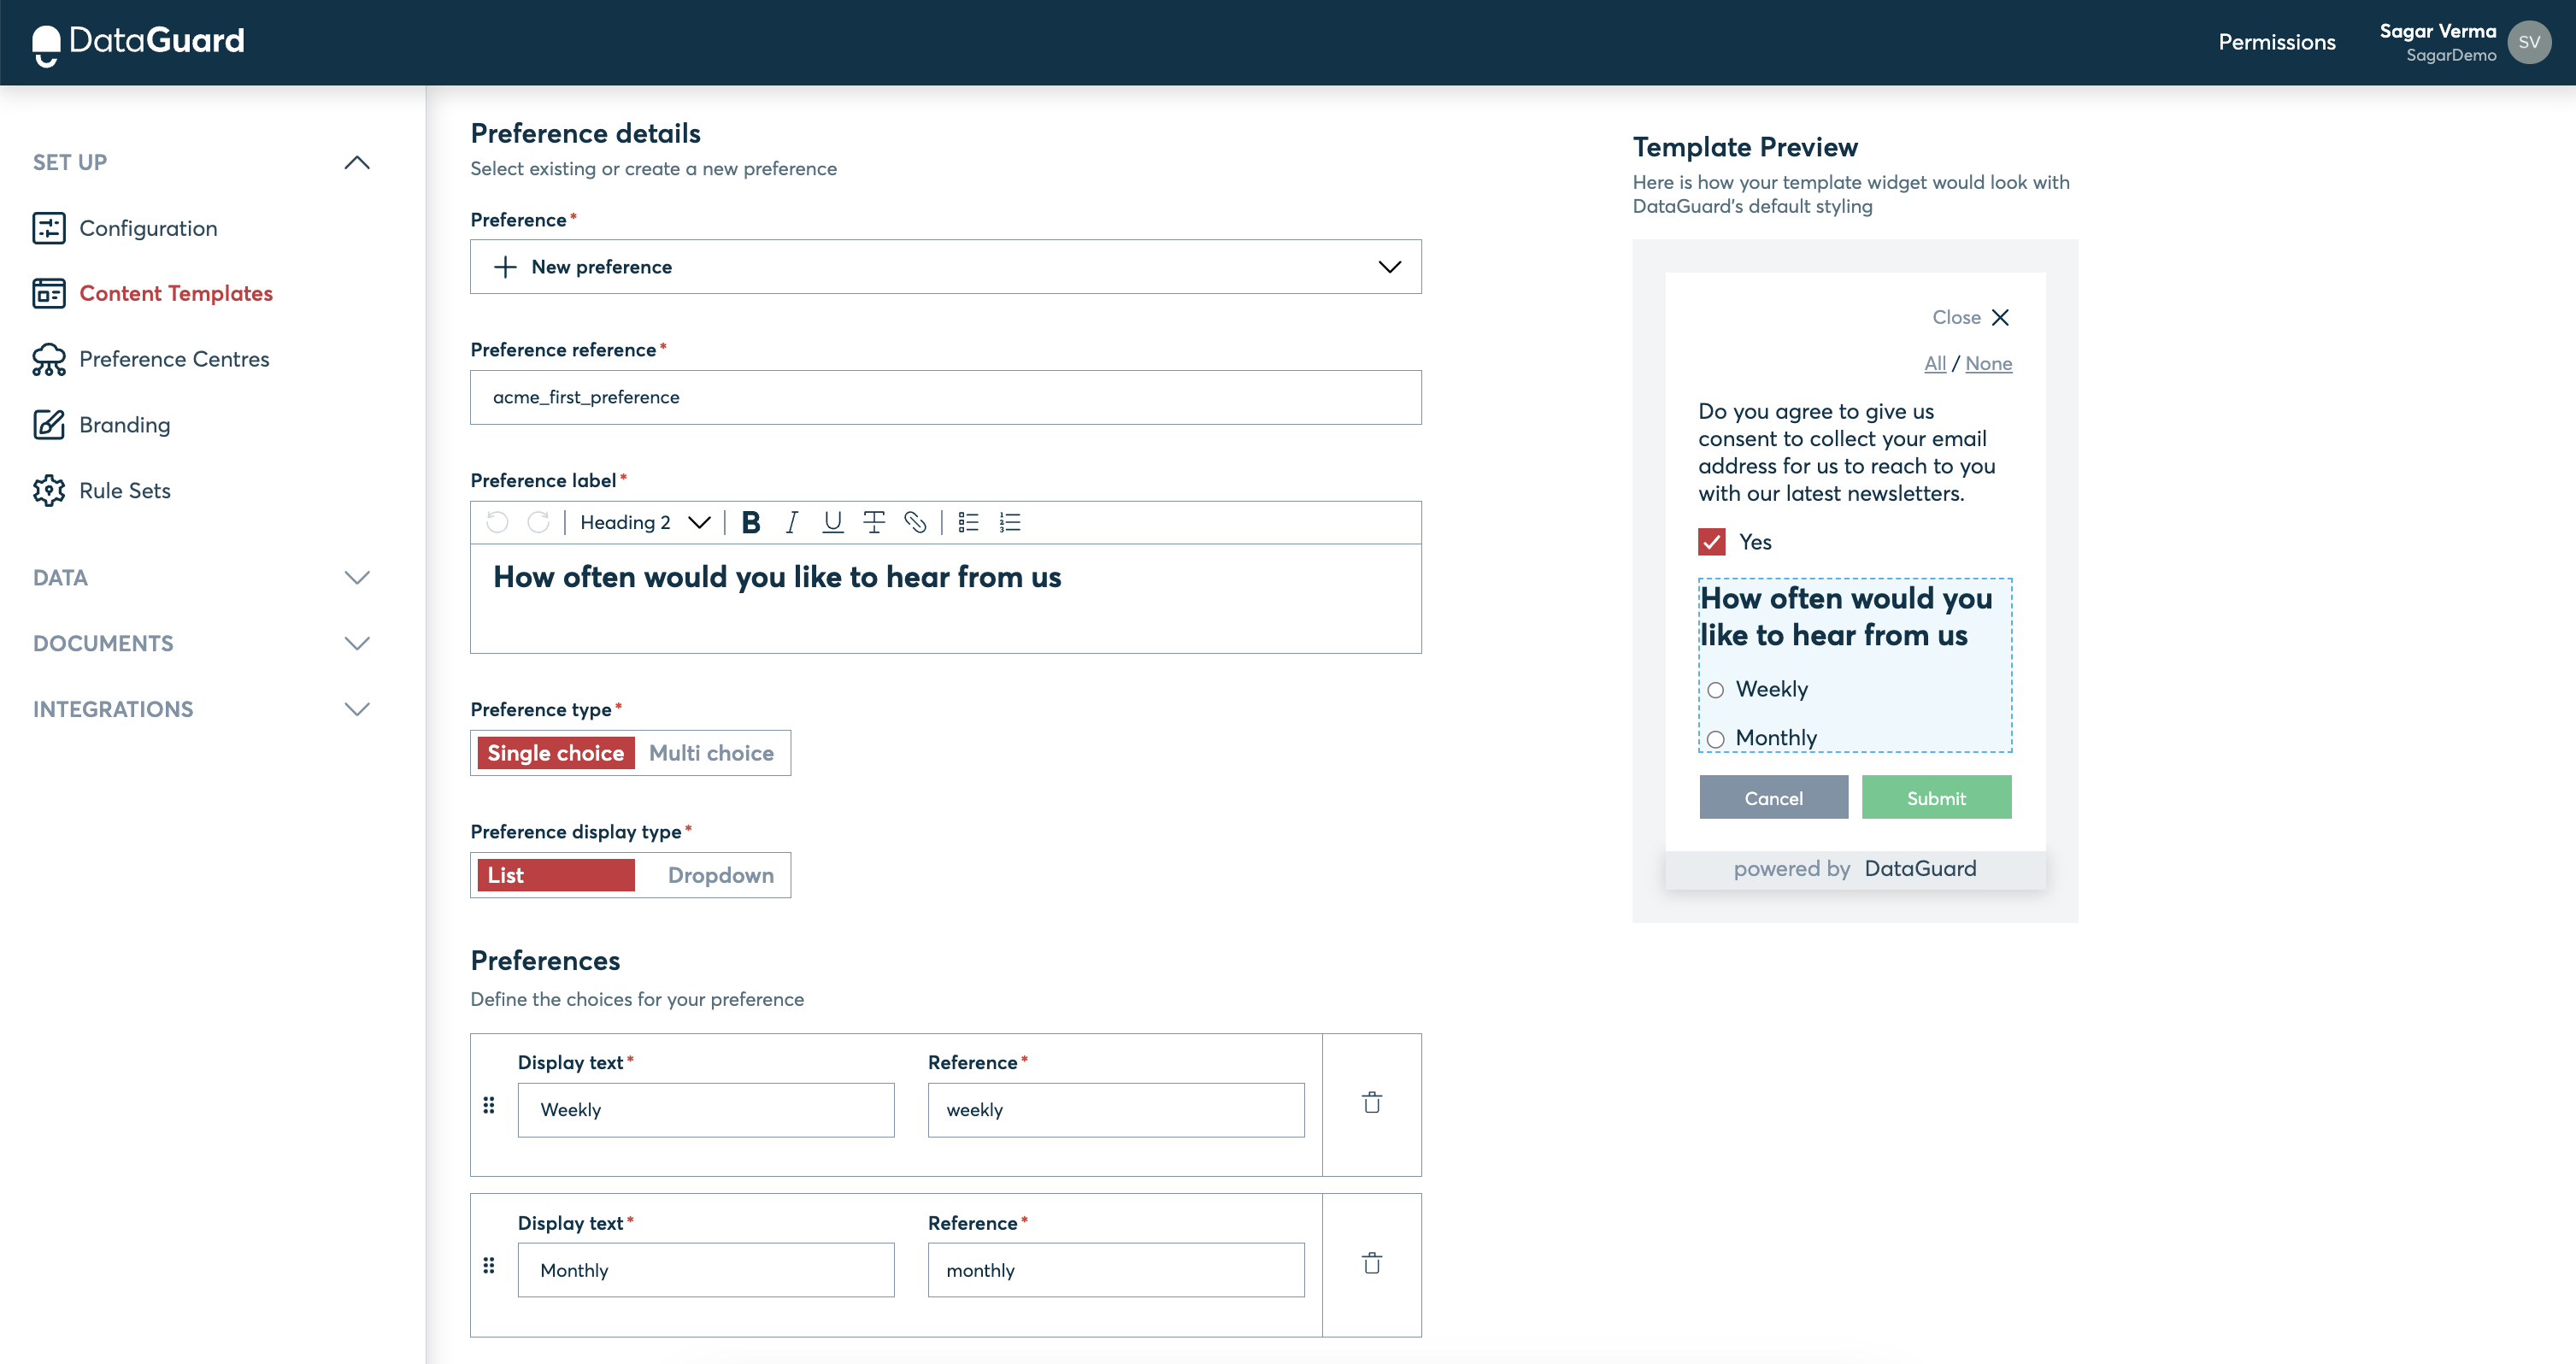
Add Preference Block: This is only required if the content template is collecting preferences from users.
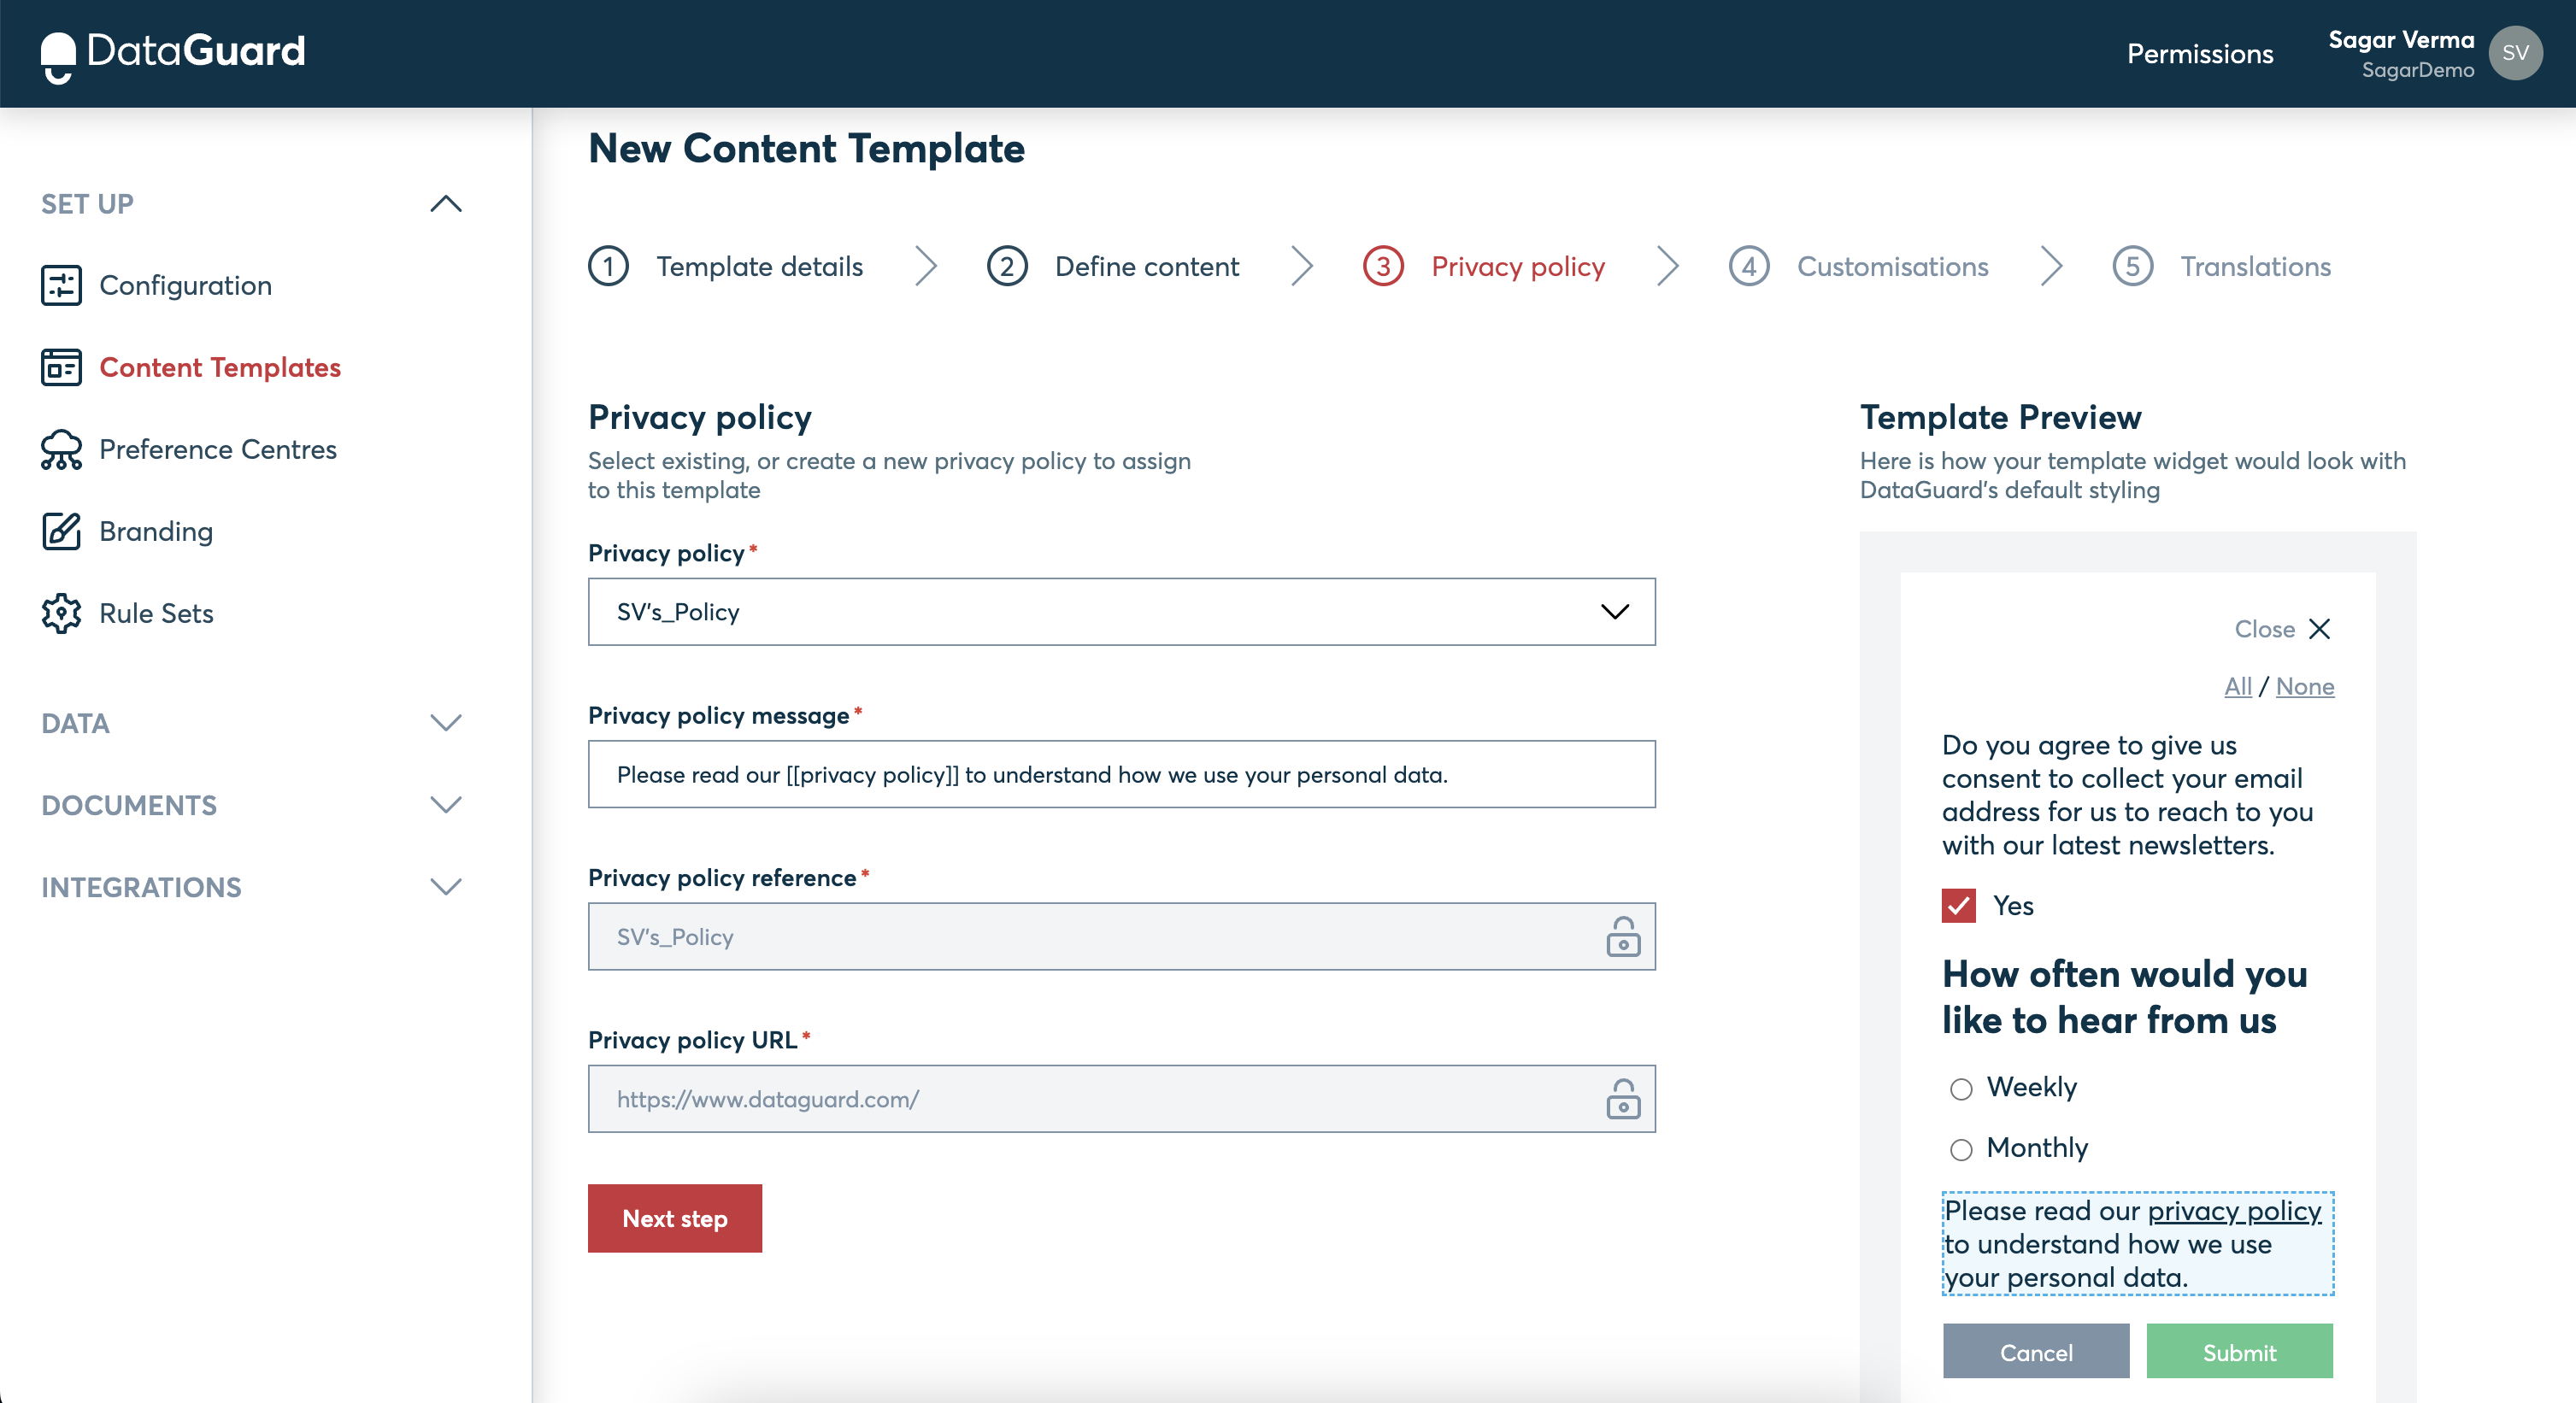
Add Privacy Policy: This is required as no consent is collected without providing users access to a business' privacy policy.
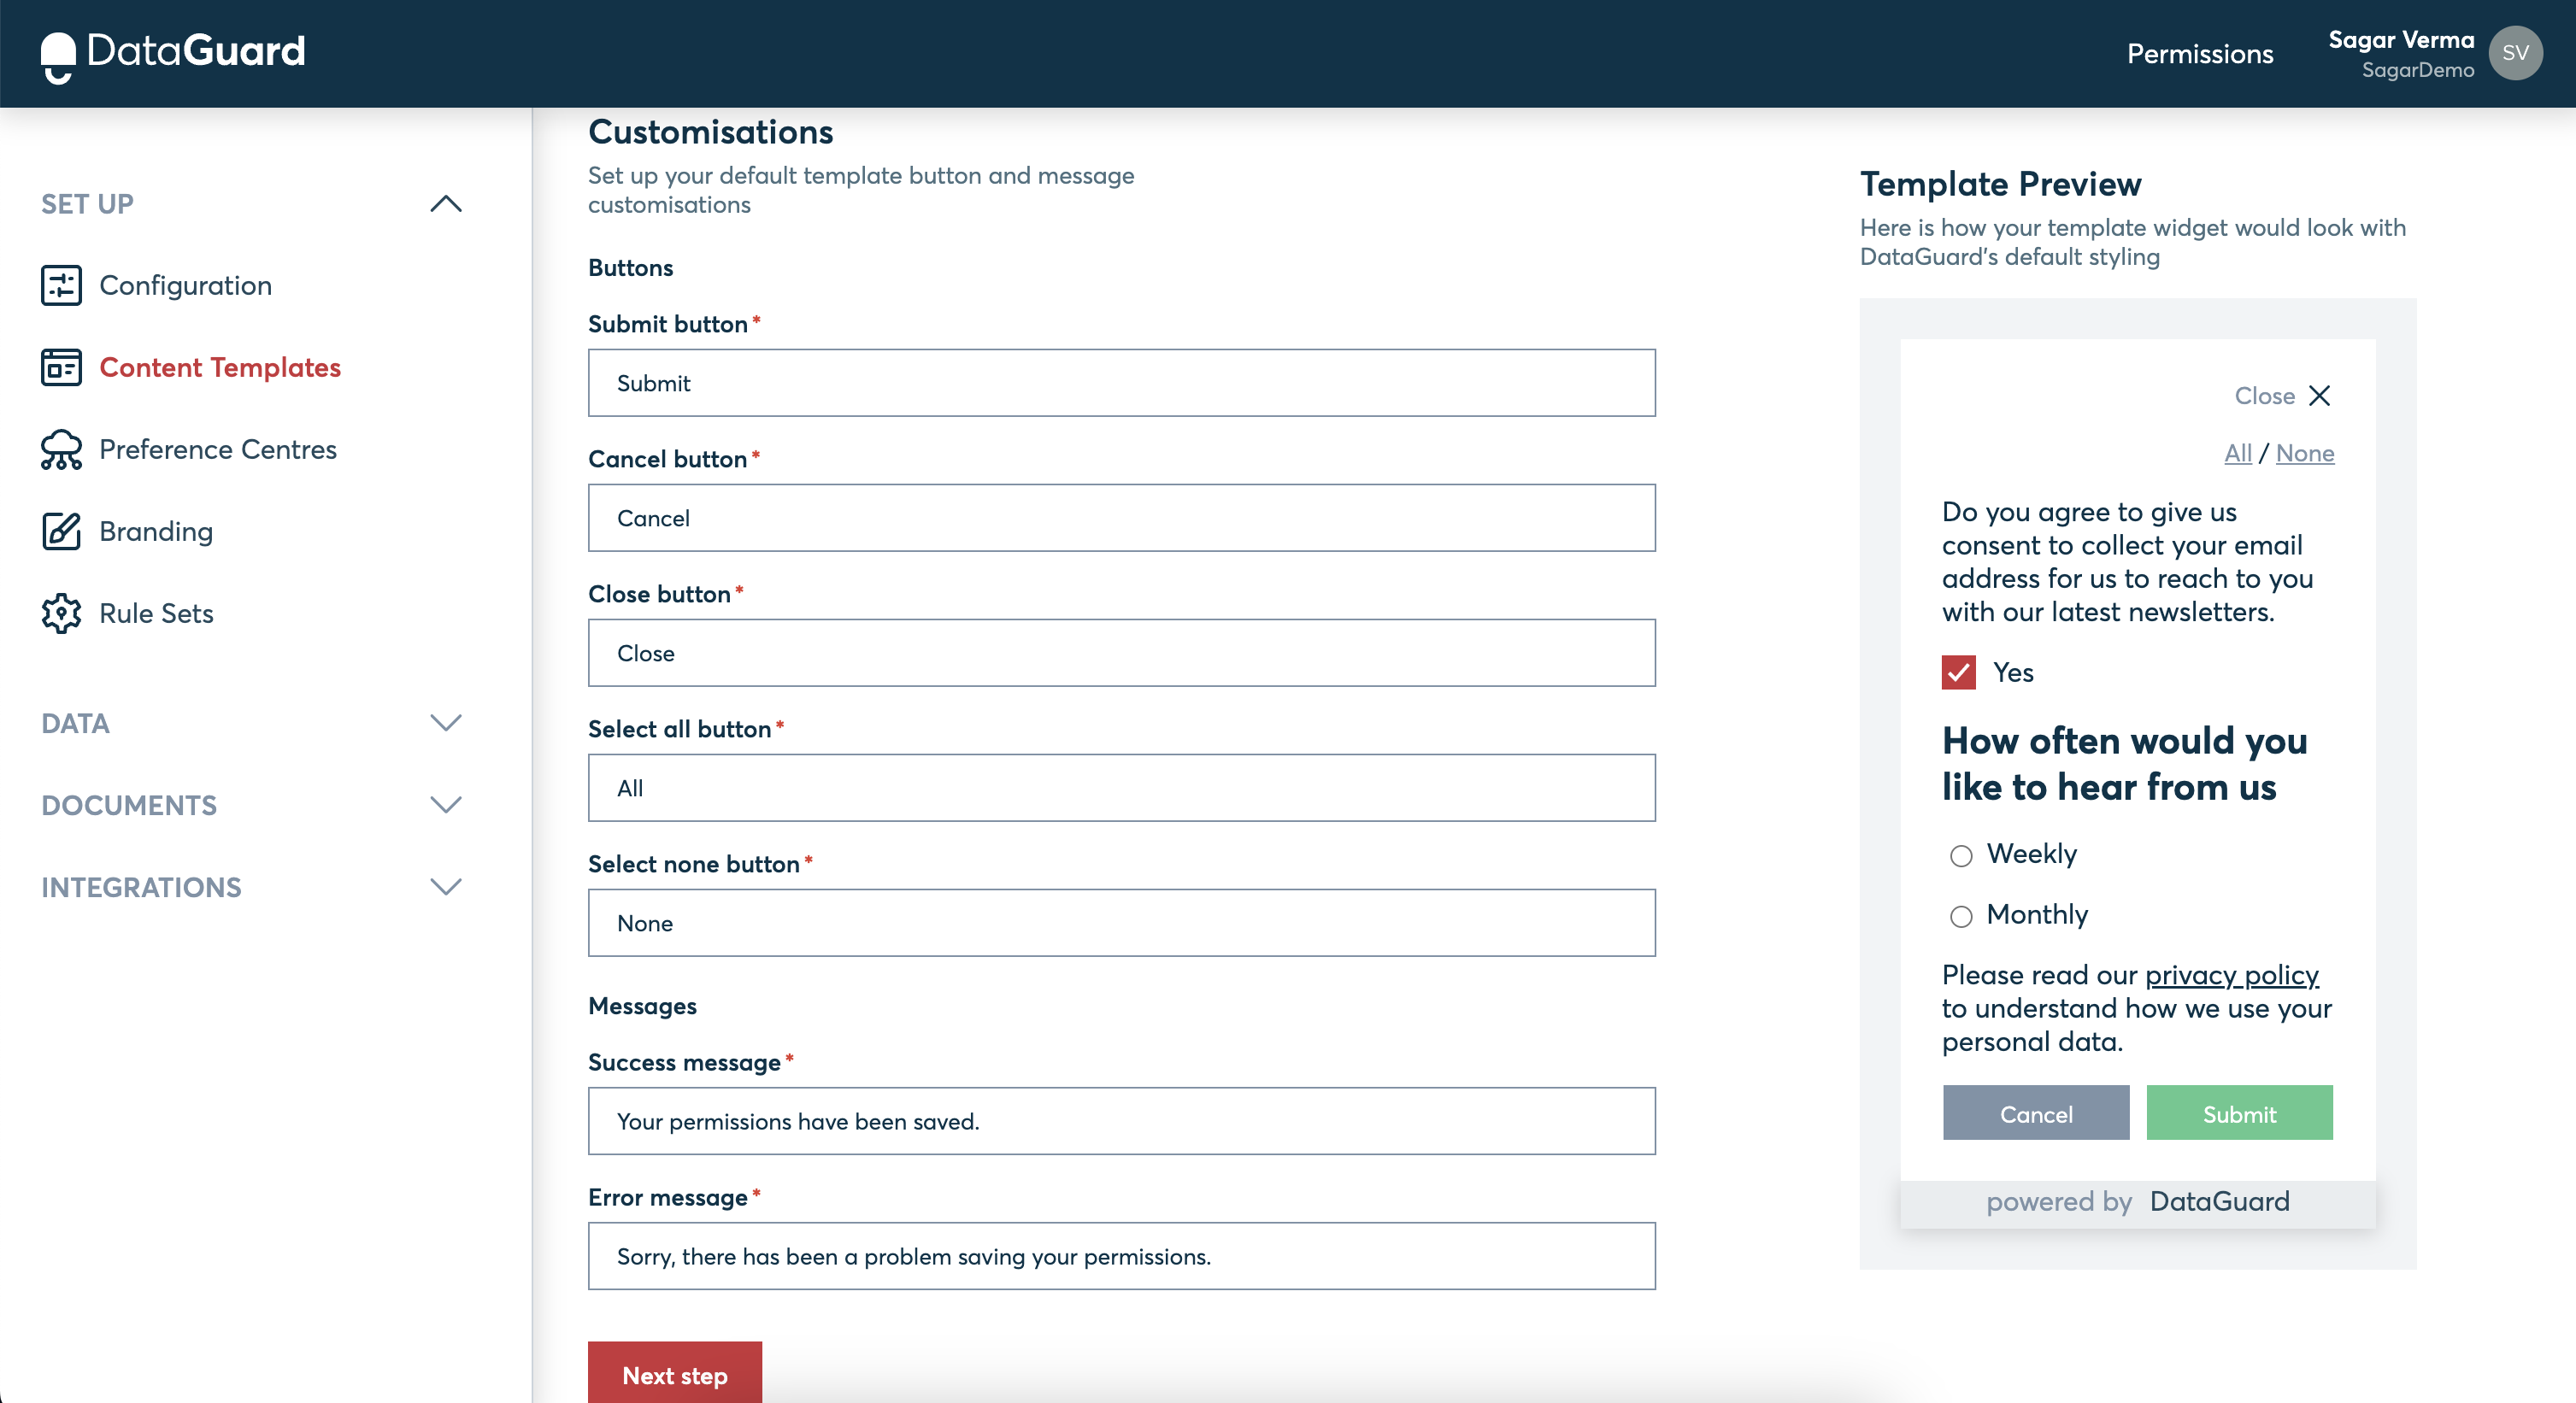
Customisation of Template: This is an optional step as some of the elements of content template could be customised as per your preferences.
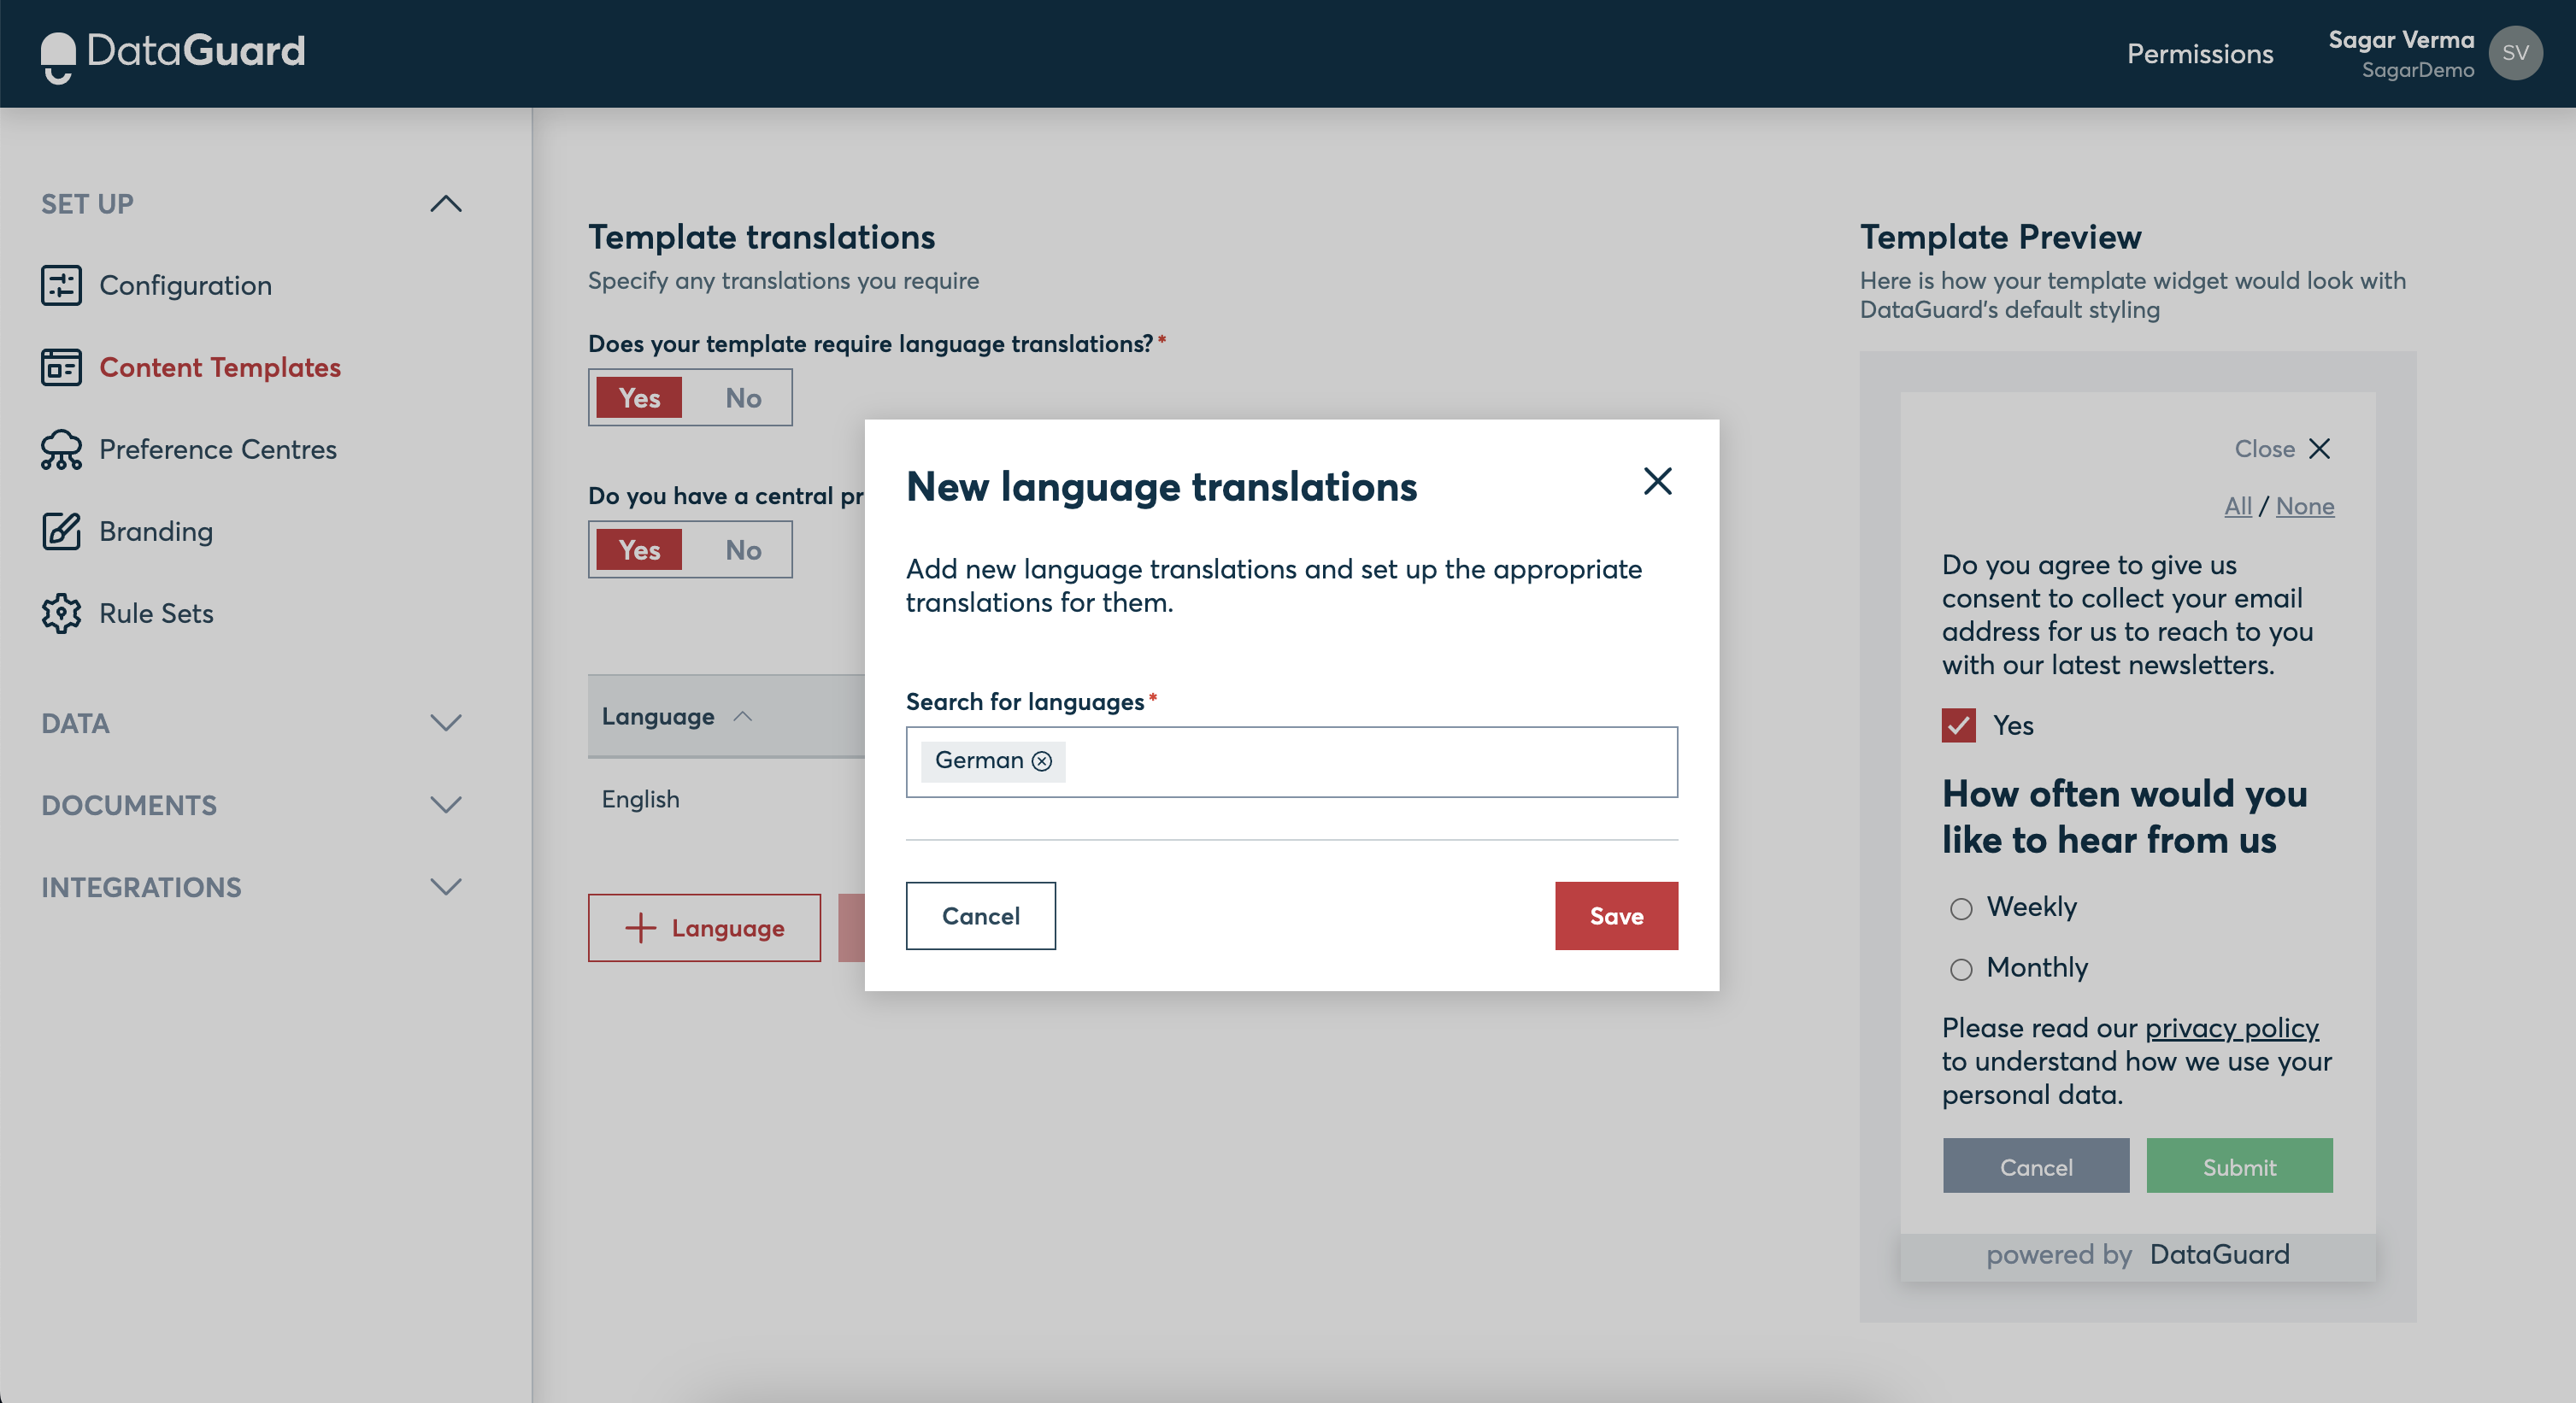
Translation: This is an optional step incase content template needs to be translated in any of the supported languages for collecting consents from users in different parts of the world.
To ensure a compliant audit trail, each transaction requires a privacy policy and a permission statement. You will need to load your documents into DataGuard Consent & Preference Management before going live. For your privacy policy, we offer the ability to link to an external URL.
4. Widget Deployment
Alright, we are very close to start collecting consents and preferences from your customers and increase opt-ins.
In DataGuard, there are 2 options how customers can use the content template that was created in the above step:
- Embed the Widget
- Preference Centre
Embedding the Widget
Completing a content template yields a widget for consent and preference collection.
DataGuard's Consent and Preference Management platform enables you to directly copy the HTML code for the widget, designed via the content template. This code can be integrated into your workflows, such as during a registration process. By combining this widget with DataGuard's intuitive API endpoints, you can be operational within hours.
To ensure the widget's aesthetic aligns with your webpage or other capture points, DataGuard provides access to the widget's CSS. Your development team can adjust this to suit your brand's guidelines.
Refer to the following screenshot to understand how to copy the code from DataGuard and incorporate it into your workflows.
[Screenshot needed]
Link to Widget deployment section of the document.
Hosted Preference Centre
With your content template prepared, you can swiftly build your own preference centre.
Hosting your preference centre on DataGuard simplifies integrations and expedites implementation. Users can then access a 'my-account'-style page to view and modify their consents and preferences.
Find comprehensive instructions on crafting your first preference centre here.
Moreover, you can customise the preference centre to reflect your brand's aesthetic. Learn more about branding your preference centre here.
Finally, you are ready to capture consents and preferences from your customers using either of the above options that have been defined.
5. Sync Customer Data
For those with pre-existing customer data wishing to capture consent, DataGuard's Data Import capability simplifies the migration process. You can retain the personal data within your original system and assign a unique identifier (referred to as an 'externalRef' in DataGuard's terms) to each customer during the data import. This allows you to transfer all existing customers to DataGuard and begin capturing consents and preferences for both existing and new customers.
Additional details on DataGuard's data import capabilities can be explored [here].
6. Integrations
DataGuard securely stores all your customers' consent and preference data, and keeps track of any changes or revocations with a robust audit trail. Thanks to our ready-to-go integrations with various third-party services, your data stays synchronized across all your CRM systems, with DataGuard acting as the central hub for all consent and preference information.
If we don't currently support integration with your chosen system, we're committed to finding a solution, whether that's developing a new integration or using DataGuard's dynamic Webhooks. These Webhooks provide real-time updates to any system downstream from DataGuard, ensuring you always have the most current and accurate data.
7. Capture customer permissions and preferences
As with adding new customers, DataGuard Consent & Preference Management offers a few different ways to record customer permissions and preferences:
Bulk customers
To record or update multiple customer's permissions and preferences at once, it's best to use the import feature.
For more information, see the Import Records, Permissions & Preferences section.
Single customer (direct)
Customer permissions and preferences can be written directly to a customer's record using the contact centre UI.

For more information see the Record Permissions section.
Single customer
Customers can directly manage their own permissions using Capture Points. For more information on customers managing their own permissions please, see the Capture Points section.
As part of creating your DataGuard Consent & Preference Management app we have set-up a preference centre that enables you to quickly provide customers with the ability to view and manage their own permissions and preferences. For more information see Hosted preference centre (Personalise+).
Salesforce Leads and Contacts
Salesforce users can create and update permissions for leads and contacts directly from Salesforce using the 'Permissions' screen.

For more information, see the Surfacing DataGuard Consent & Preference Management To Users section.
Answer customer queries (view audit)
DataGuard Consent & Preference Management maintains an immutable audit trail of all transactions, which can be used at any point to check the status of any customer and quickly respond to queries. This is found in the contact centre screen record of each customer.
Additionally, a complete record of all transactions can be exported directly from DataGuard Consent & Preference Management (see next section).

For more information, see the Pemission History (Comply+) section.
Salesforce users can view Lead and Contact history within the Salesforce app on the 'Permissions History' screen.

Advanced features
You may not have these features enabled
Depending on which DataGuard Consent & Preference Management package you subscribe to you may not have access to some of our advanced features. If you don't have access and would like to find out more please contact us
Now you're comfortable with DataGuard Consent & Preference Management's core offering, it's time to start exploring some of our more enhanced features:
Merging and splitting records
Some packages offer the ability to link records in order to better maintain a single source of truth. For more information, see the Sync Permission & Preference State section.
Subscription webhooks
As part of our commitment to industry leading systems integration, DataGuard Consent & Preference Management has the ability to push transactions and changes out to a webhook to allow for synchronisation with external systems and applications. For more information, see the Sync Permission & Preference State section.
Updated 9 months ago
You can navigate our Initial Setup guide to get clarity on how to start using the platform