Salesforce
This integration supports communication between DataGuard and Salesforce. Use this integration to synchronise consent data between CPM and Salesforce for any target (standard or custom) object, like contacts/leads. This integration includes the initial import of existing target objects from the salesforce instance and updating of target objects that hold consents and preferences.
Pre-requisites
1. Salesforce Connected App
In order to use the DataGuard Salesforce Integration, you will need to create and configure a "Connected App" within Salesforce. To be able to create this app, you need to have administrative access to your Salesforce account. Please create a dedicated Salesforce user ( "integrations" user) having administrative rights and then proceed with subsequent steps while logged in as integrations user.
Follow the steps below to create and configure the Connected App.
- Navigate to the Salesforce setup page.
- Click on Platform Tools -> Apps -> App Manager
- Click on New Connected App
- Enter an appropriate "Connected App Name" e.g. "DG CPM Integration"
- The "API Name" will be automatically generated based on the "Connected App Name"
- Enter a "Contact Email", this should be an email that can be used to contact somebody at your organisation that has administrative access to Salesforce and/or DataGuard CPM. e.g. yourself or your team
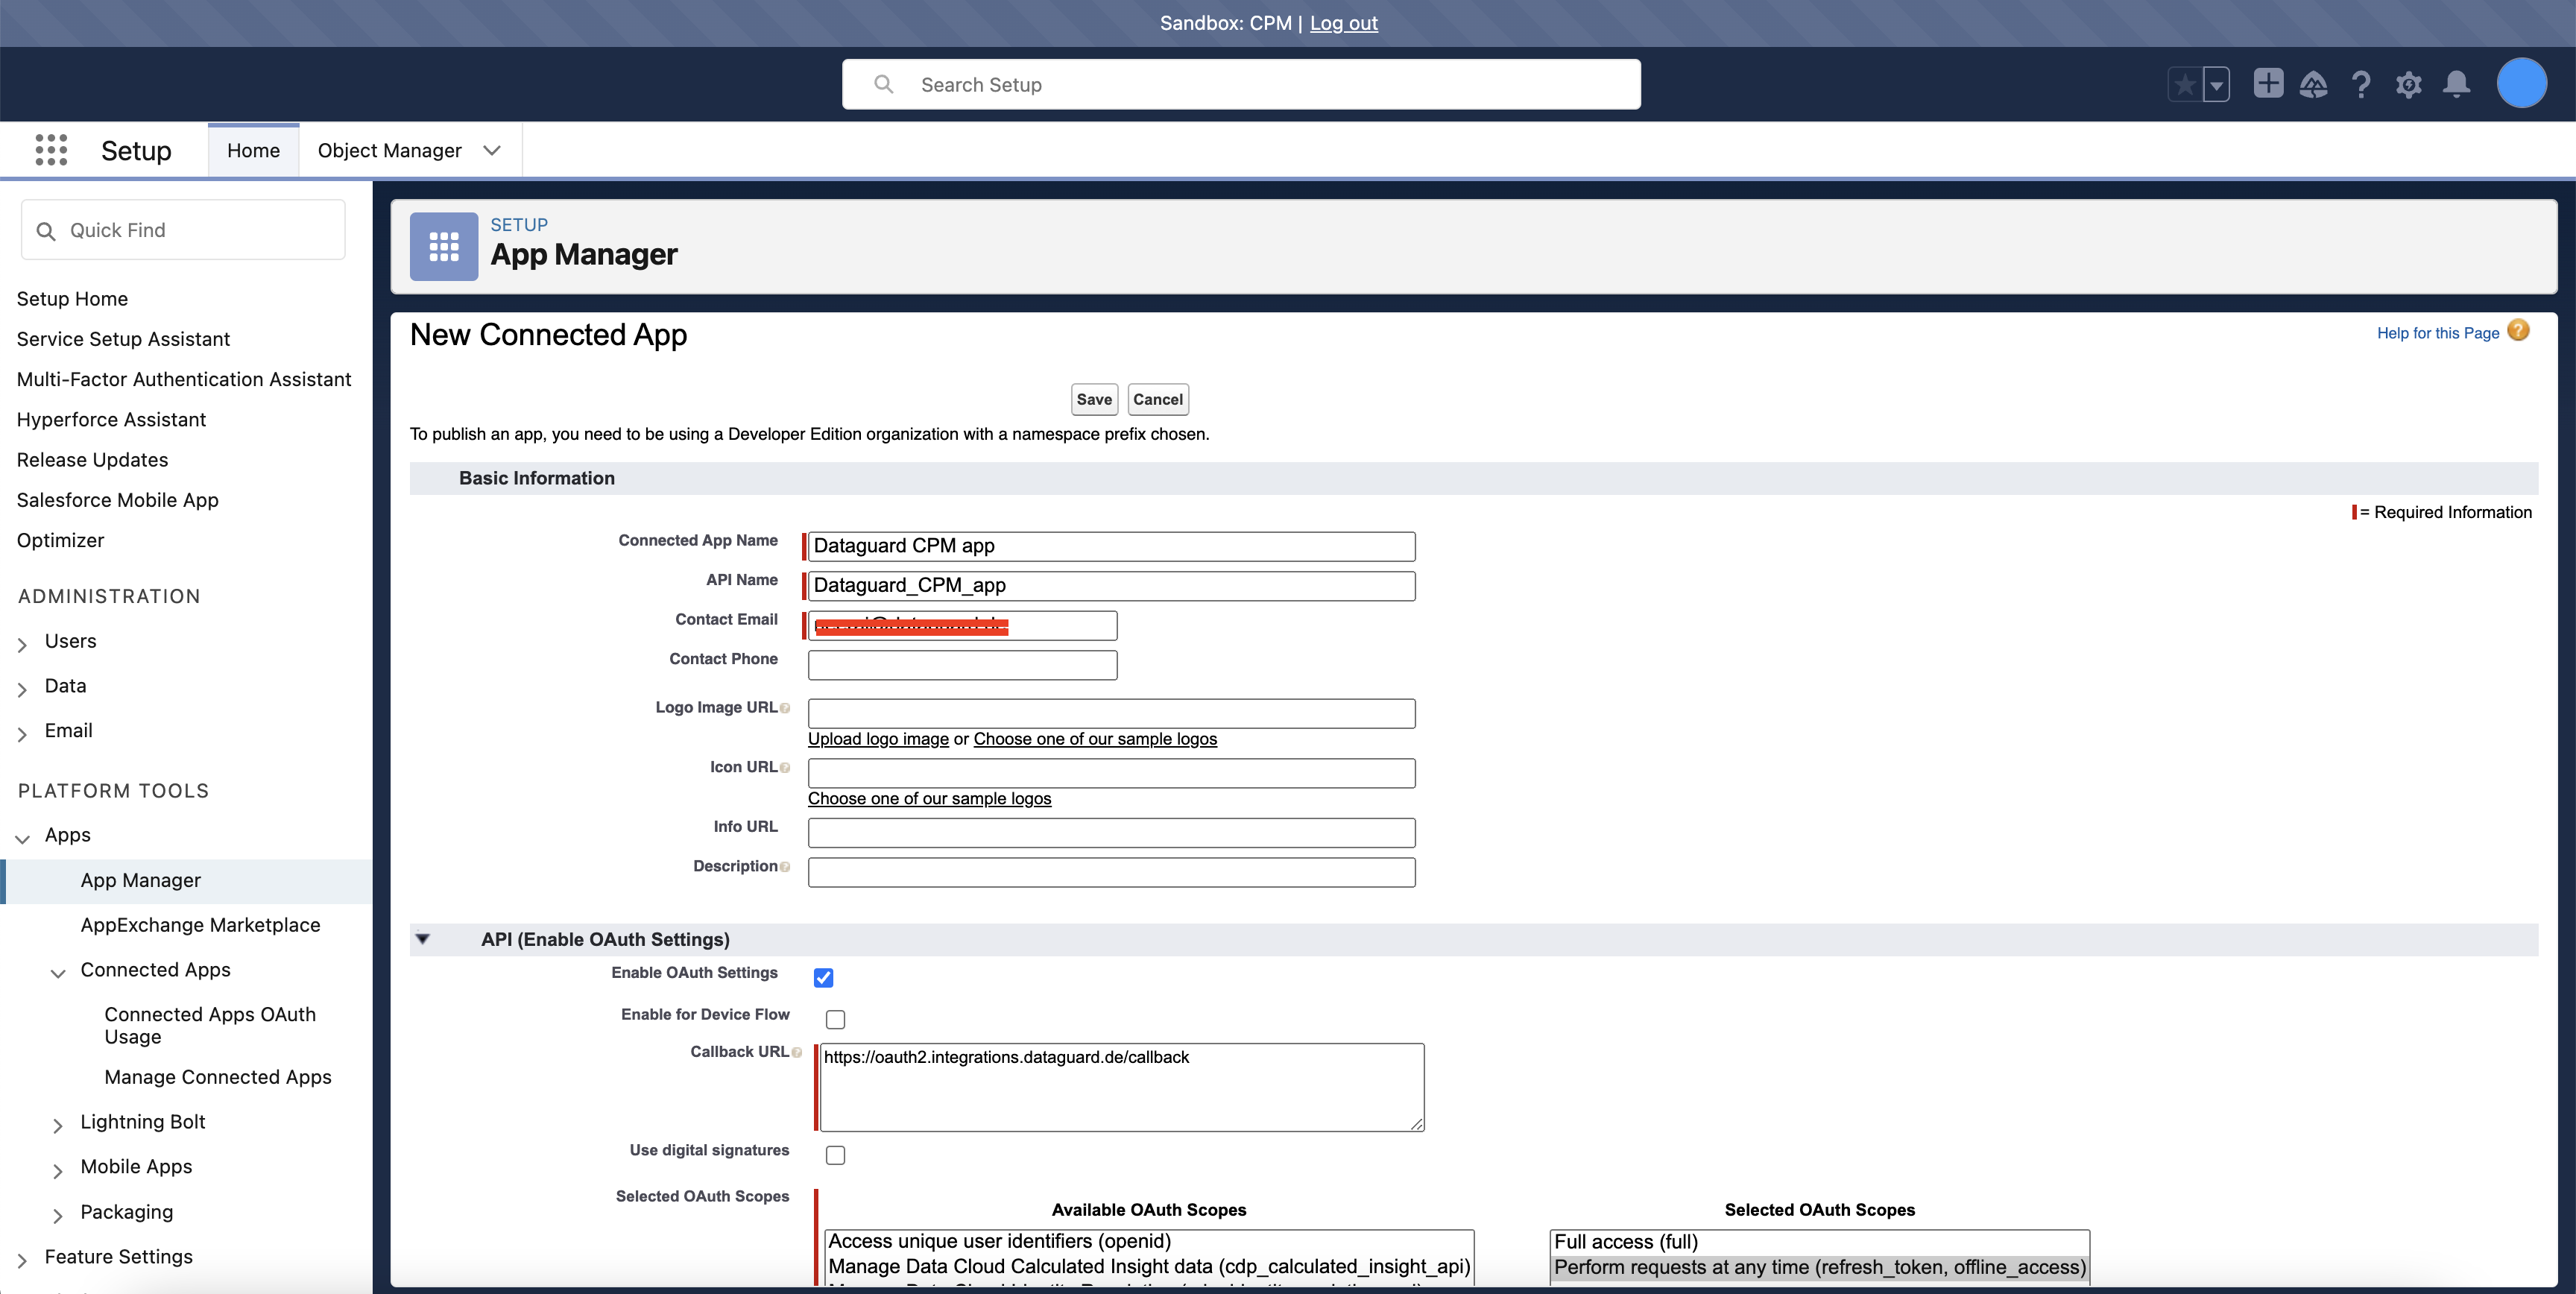
- In the "API (Enable OAuth Settings)" section, check the checkbox
- In the "Callback URL" field enter
https://oauth2.integrations.dataguard.de/callback - In the "Selected OAuth Scopes" field add the following scopes: "Full access (full)" and "Perform requests at any time"
- Below the scopes field, ensure the following checkboxes are
checked: "Require Secret for Web Server Flow" and "Require Secret for Refresh Token Flow".
And ensure that the following checkbox isunchecked: "Require Proof Key for Code Exchange (PKCE) Extension for Supported Authorization Flows". - Scroll to the bottom and click "Save"

2. Salesforce Consumer Key and Consumer Secret
Once the connected app has been created, you will be provided with a Consumer Key and Consumer Secret, you can later enter these into the Salesforce integration configuration on the DataGuard CPM admin page.

Please refer Salesforce documentation for more details:
3. Salesforce "integrations" user
Please create a dedicated Salesforce user having administrative rights. This will be later used for setting up the Salesforce connection in the configuration steps. A separate user is needed in order to avoid any unintentional updates in Salesforce and integration will ignore any changes done directly to Salesforce records from this account.
In case you want to do any intentional updates to Salesforce records directly, then you will need to logout and login again with a Salesforce user other than "integrations" user.
DataGuard CPM-Salesforce Integration
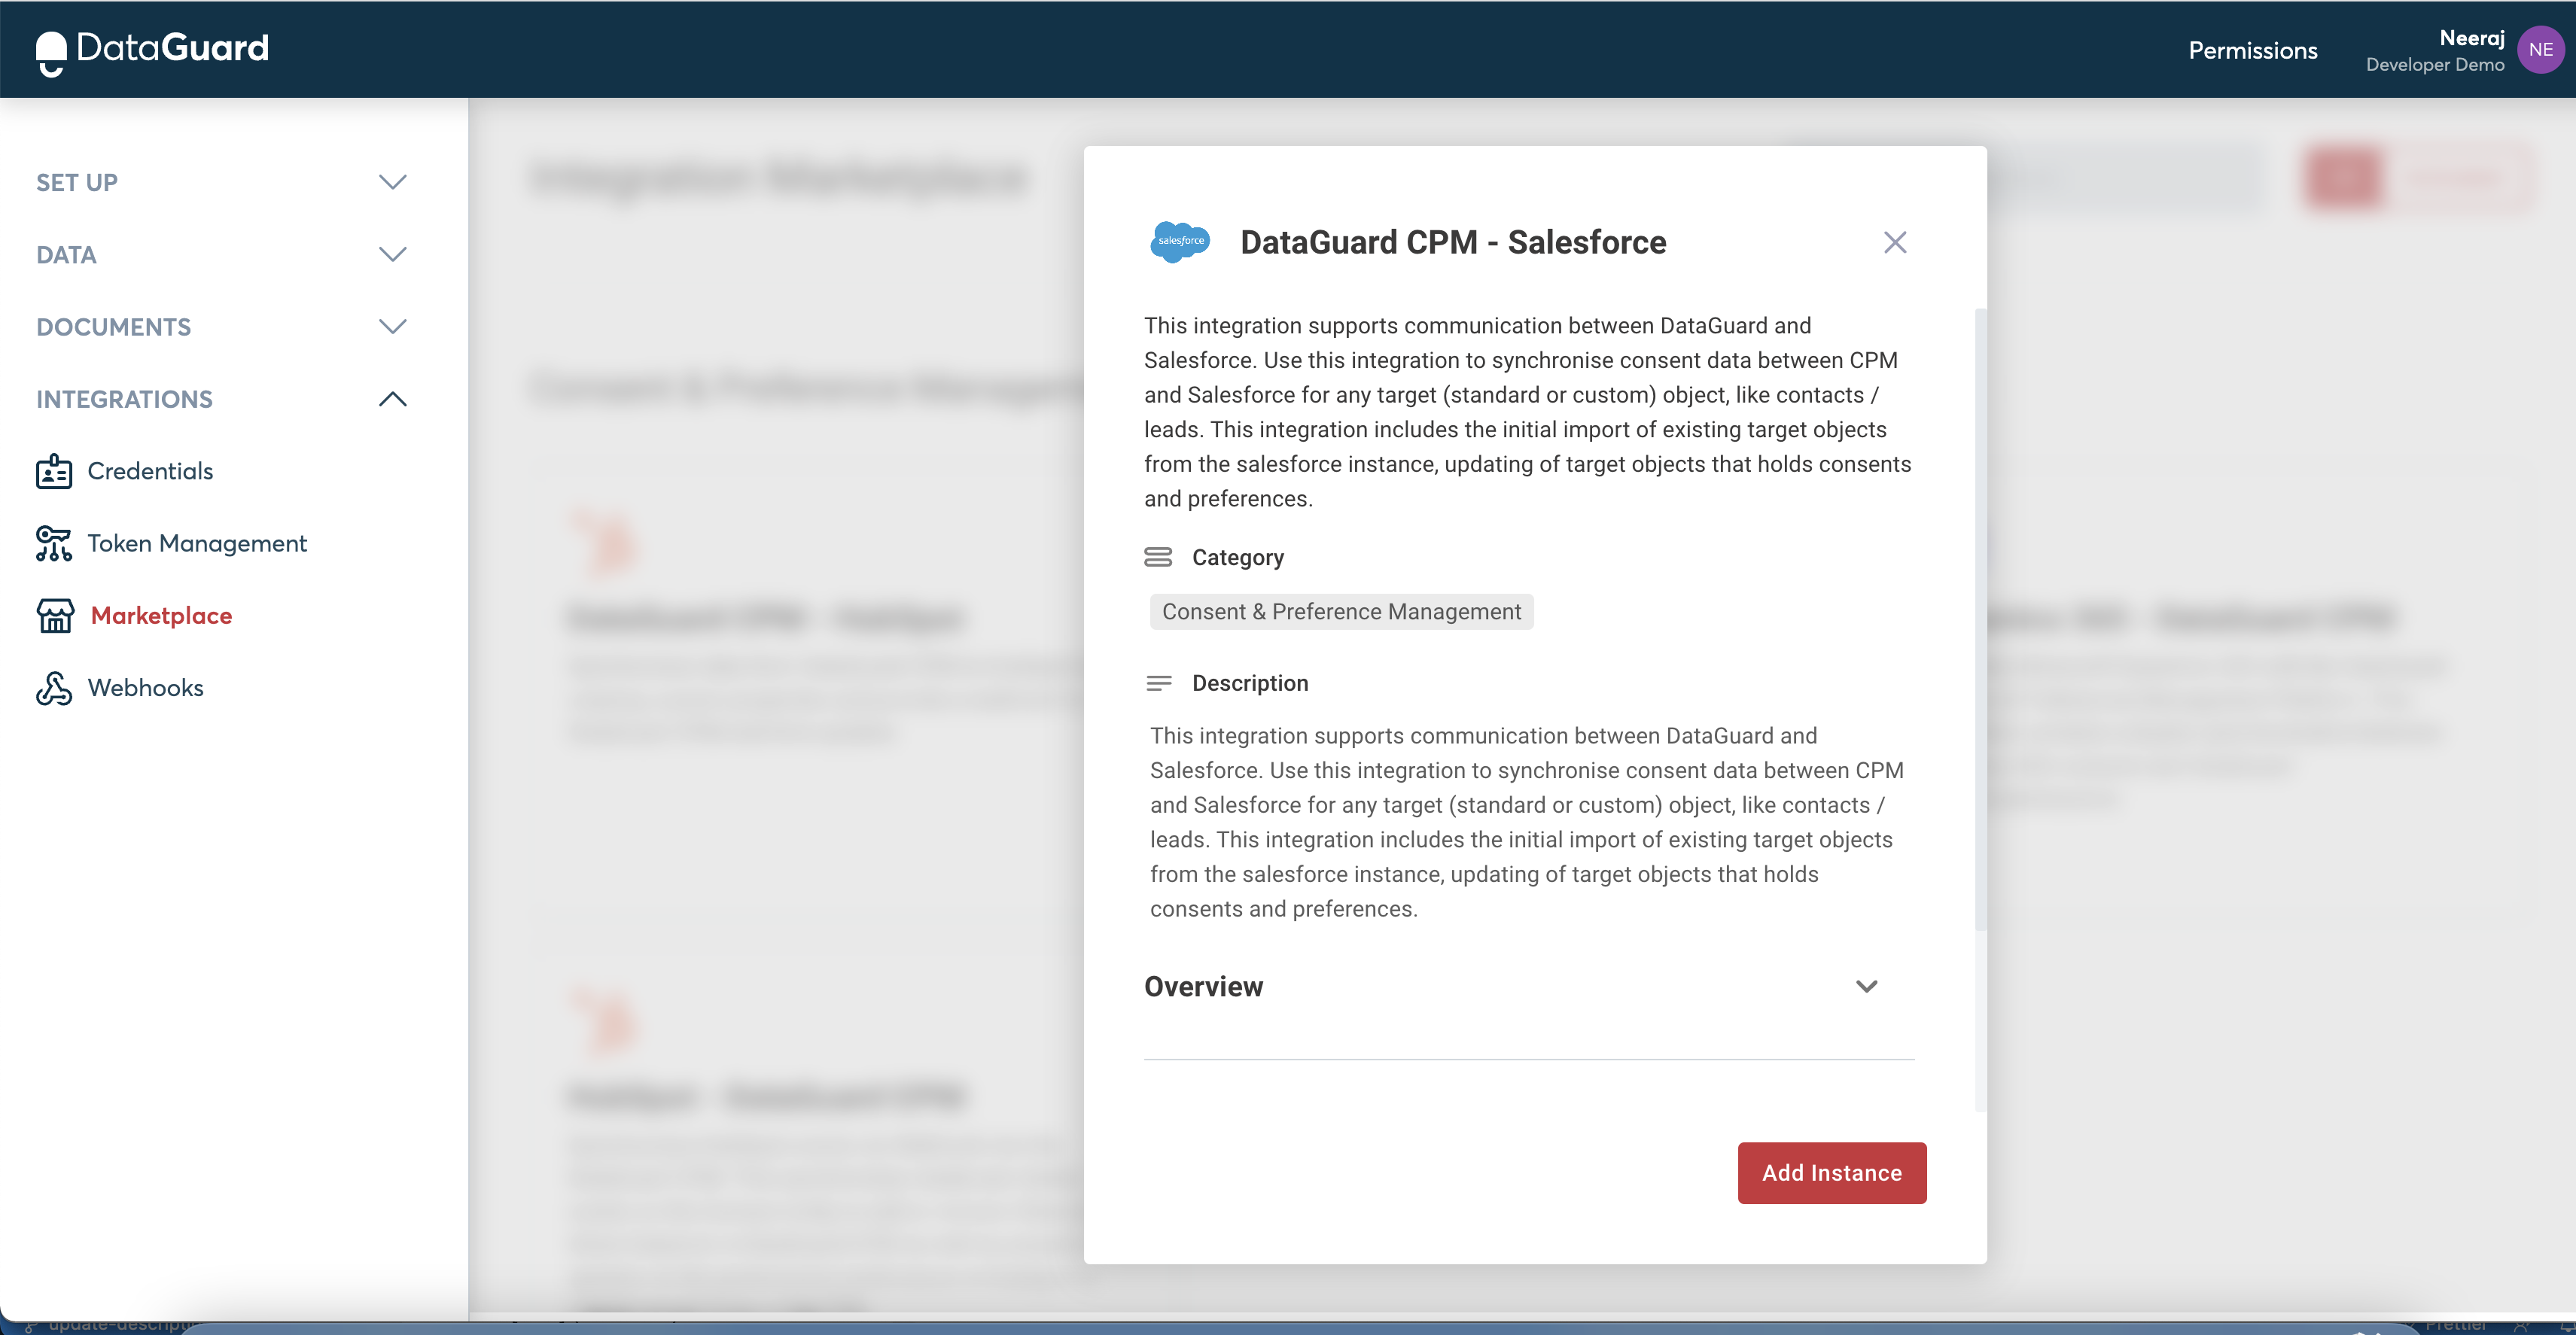
To access the DataGuard CPM-Salesforce integration feature on the platform, follow these simple steps:
- Login to the DataGuard consent & preference management platform
- Go to the "INTEGRATIONS" section-> Click on "Marketplace"
- You will land on the page containing all available integrations for your application.

Configuring DataGuard CPM- Salesforce integration
To configure the integration instance, click on the "DataGuard CPM-Salesforce" integration. It will open the popup with options to add new instances or reconfigure any existing ones.To add a new instance click on the 'Add Instance' button.
This will show up a pop-up containing the steps for configuration for the integration.
Step1: Initial Configuration
This step shows the Name, current version, description, and other details of the connector.
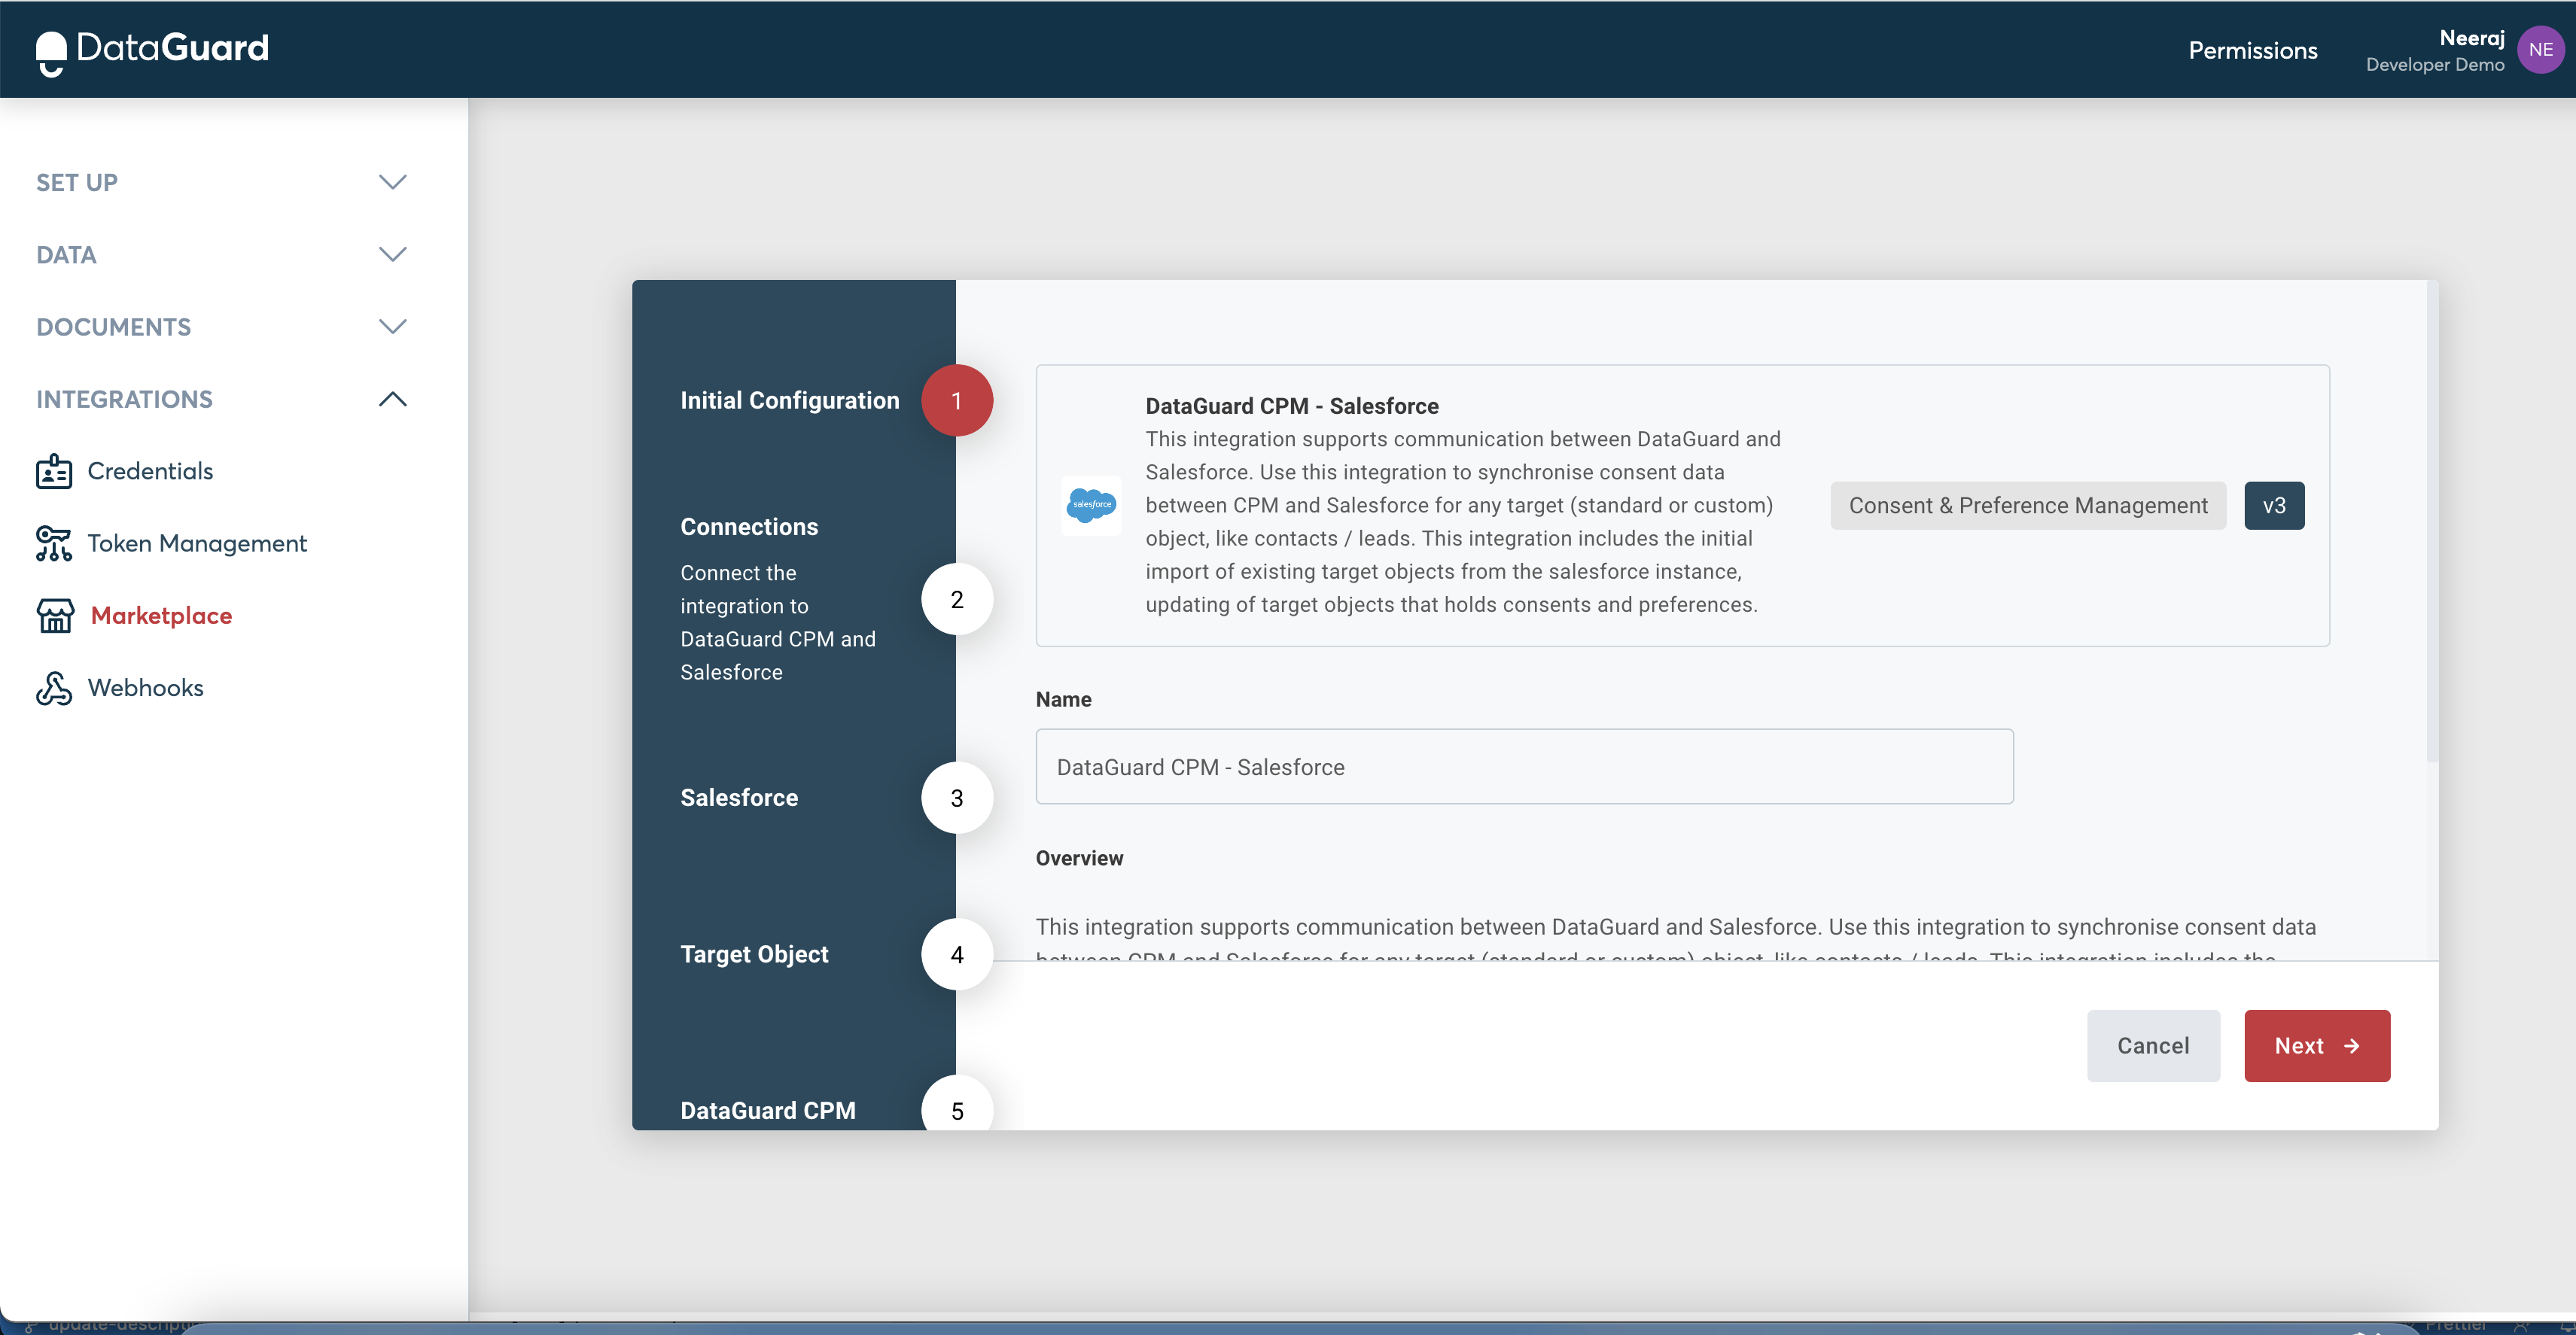
Click Next to go to the next step
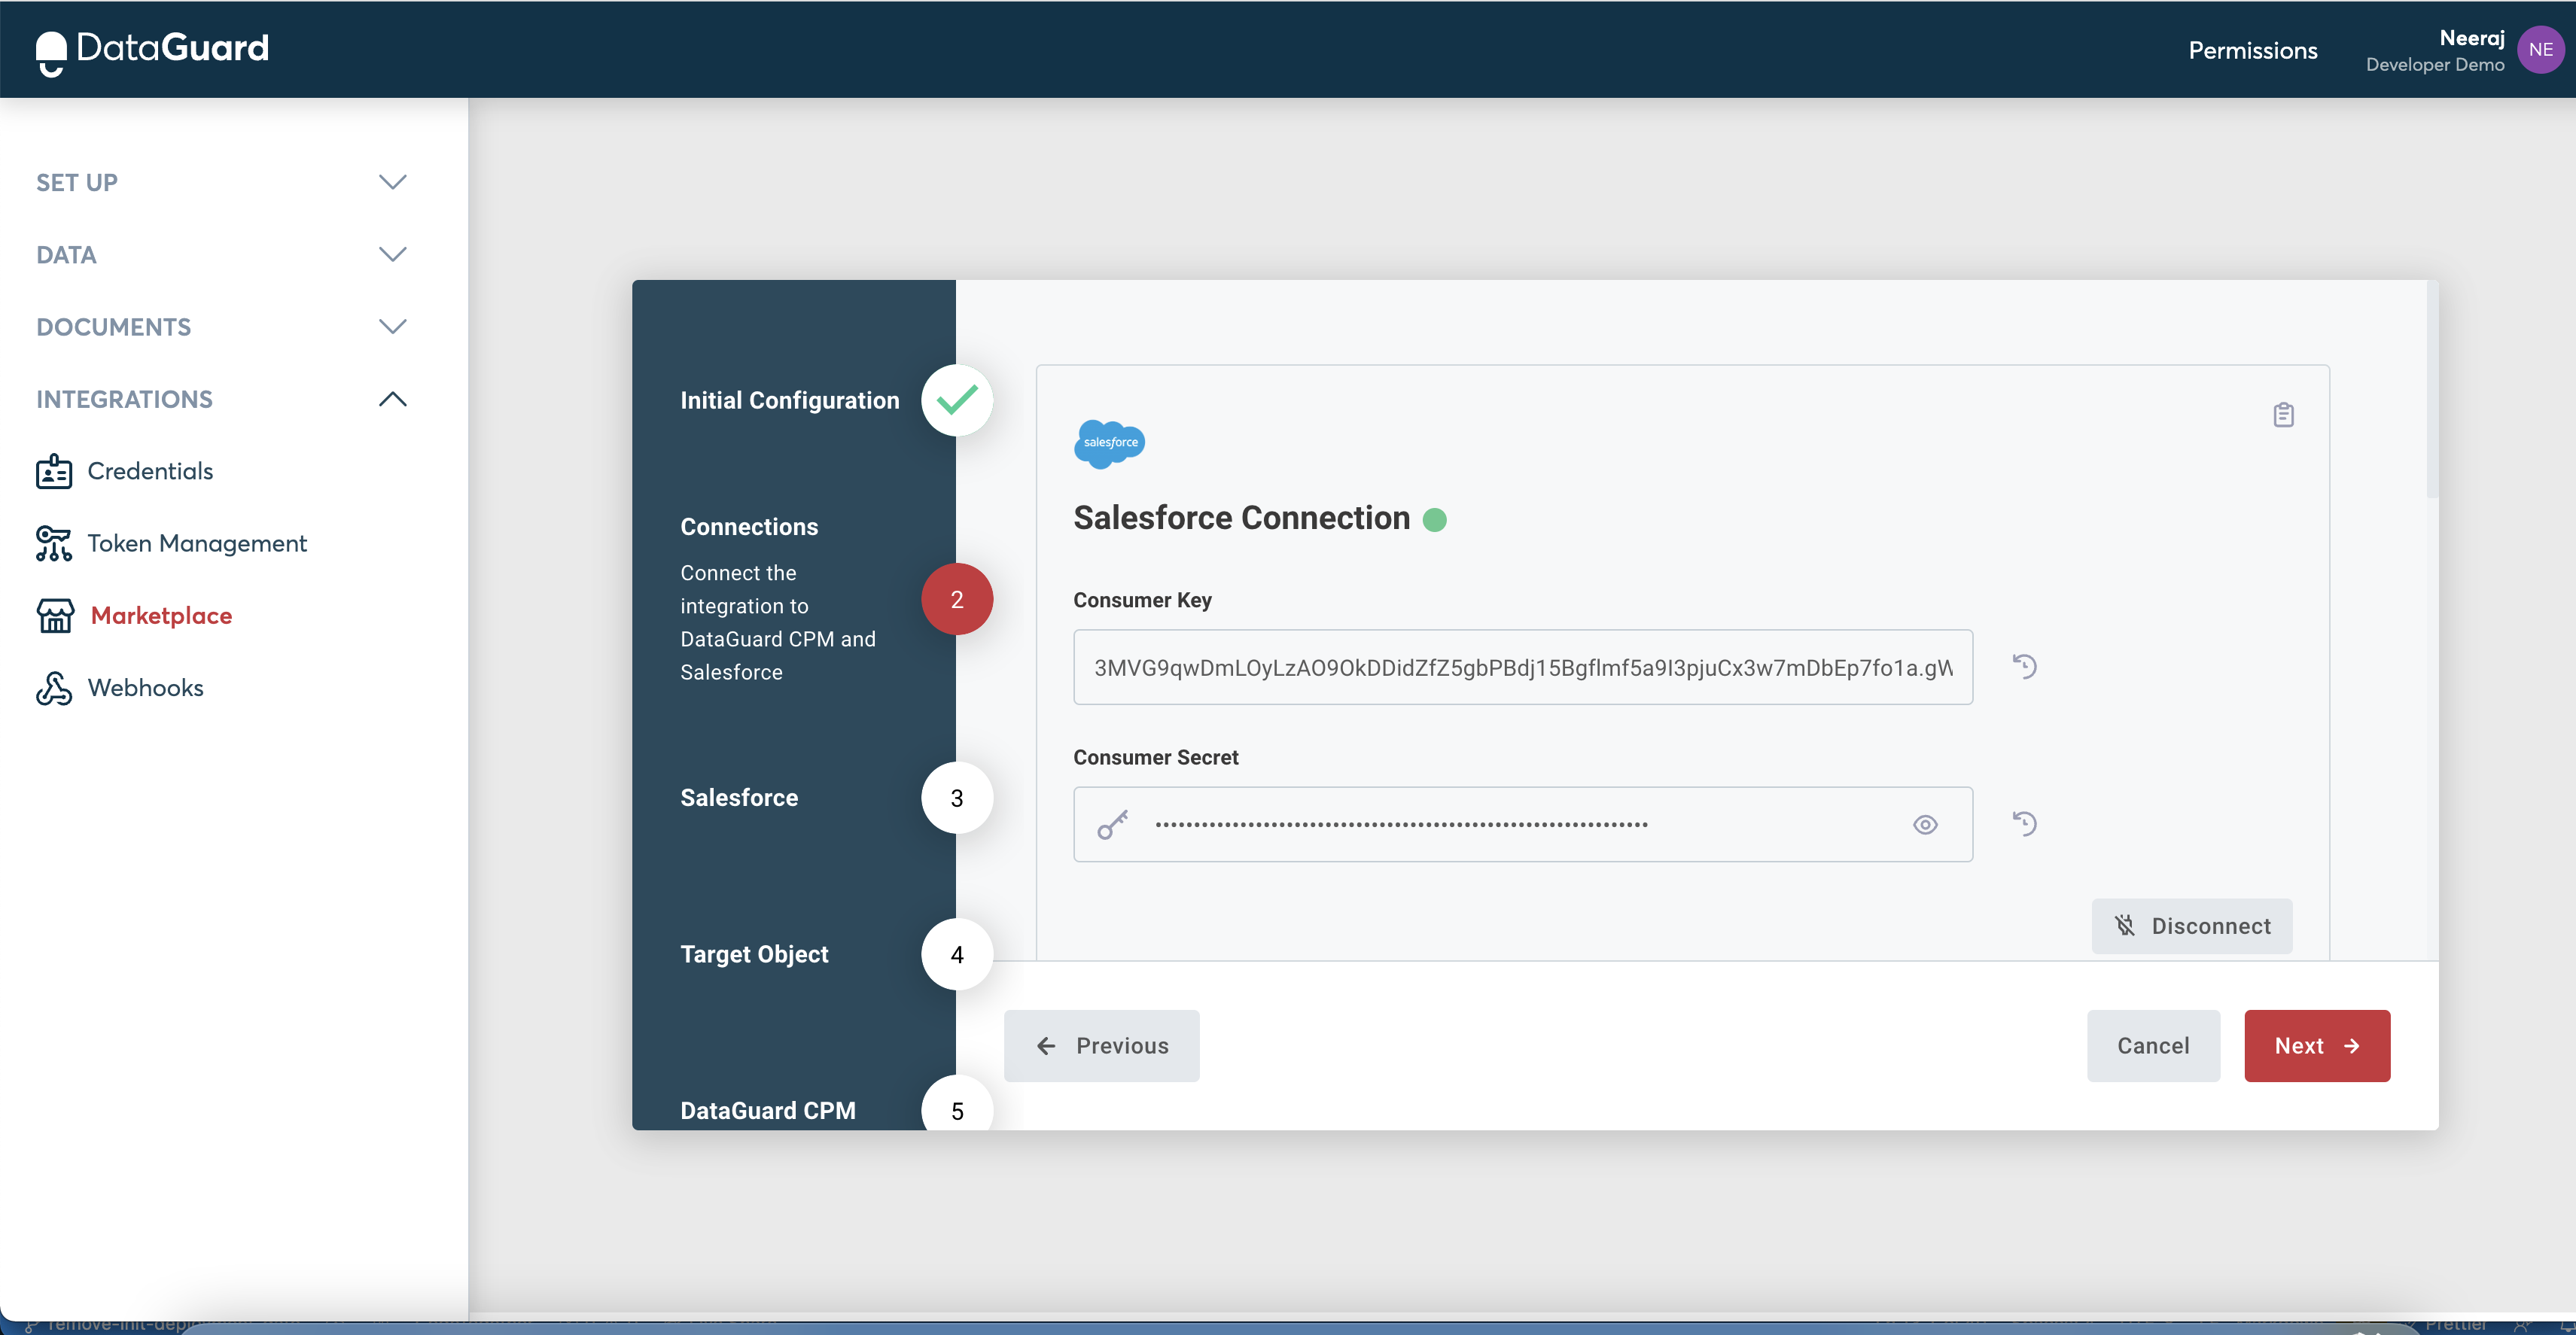
Step2: Connections
Salesforce Connection
Fill in the Salesforce connection fields in the instance configuration popup, you should already have them as part of the prerequisite in the previous step.
Consumer key(required)Consumer secret(required)Authorise URL(required)Token URL(required)Revoke URL(required)
Please Note: For connecting to a sandbox account, you have to use test urls for Salesforce connector. If you are connecting to a non-production or sandbox Salesforce account, the values for Authorise URL, Token URL and Revoke URLs should start with the pattern: https://test.salesforce.com/
For connecting to a PROD Salesforce account, the URLS would have the pattern https://login.salesforce.com/
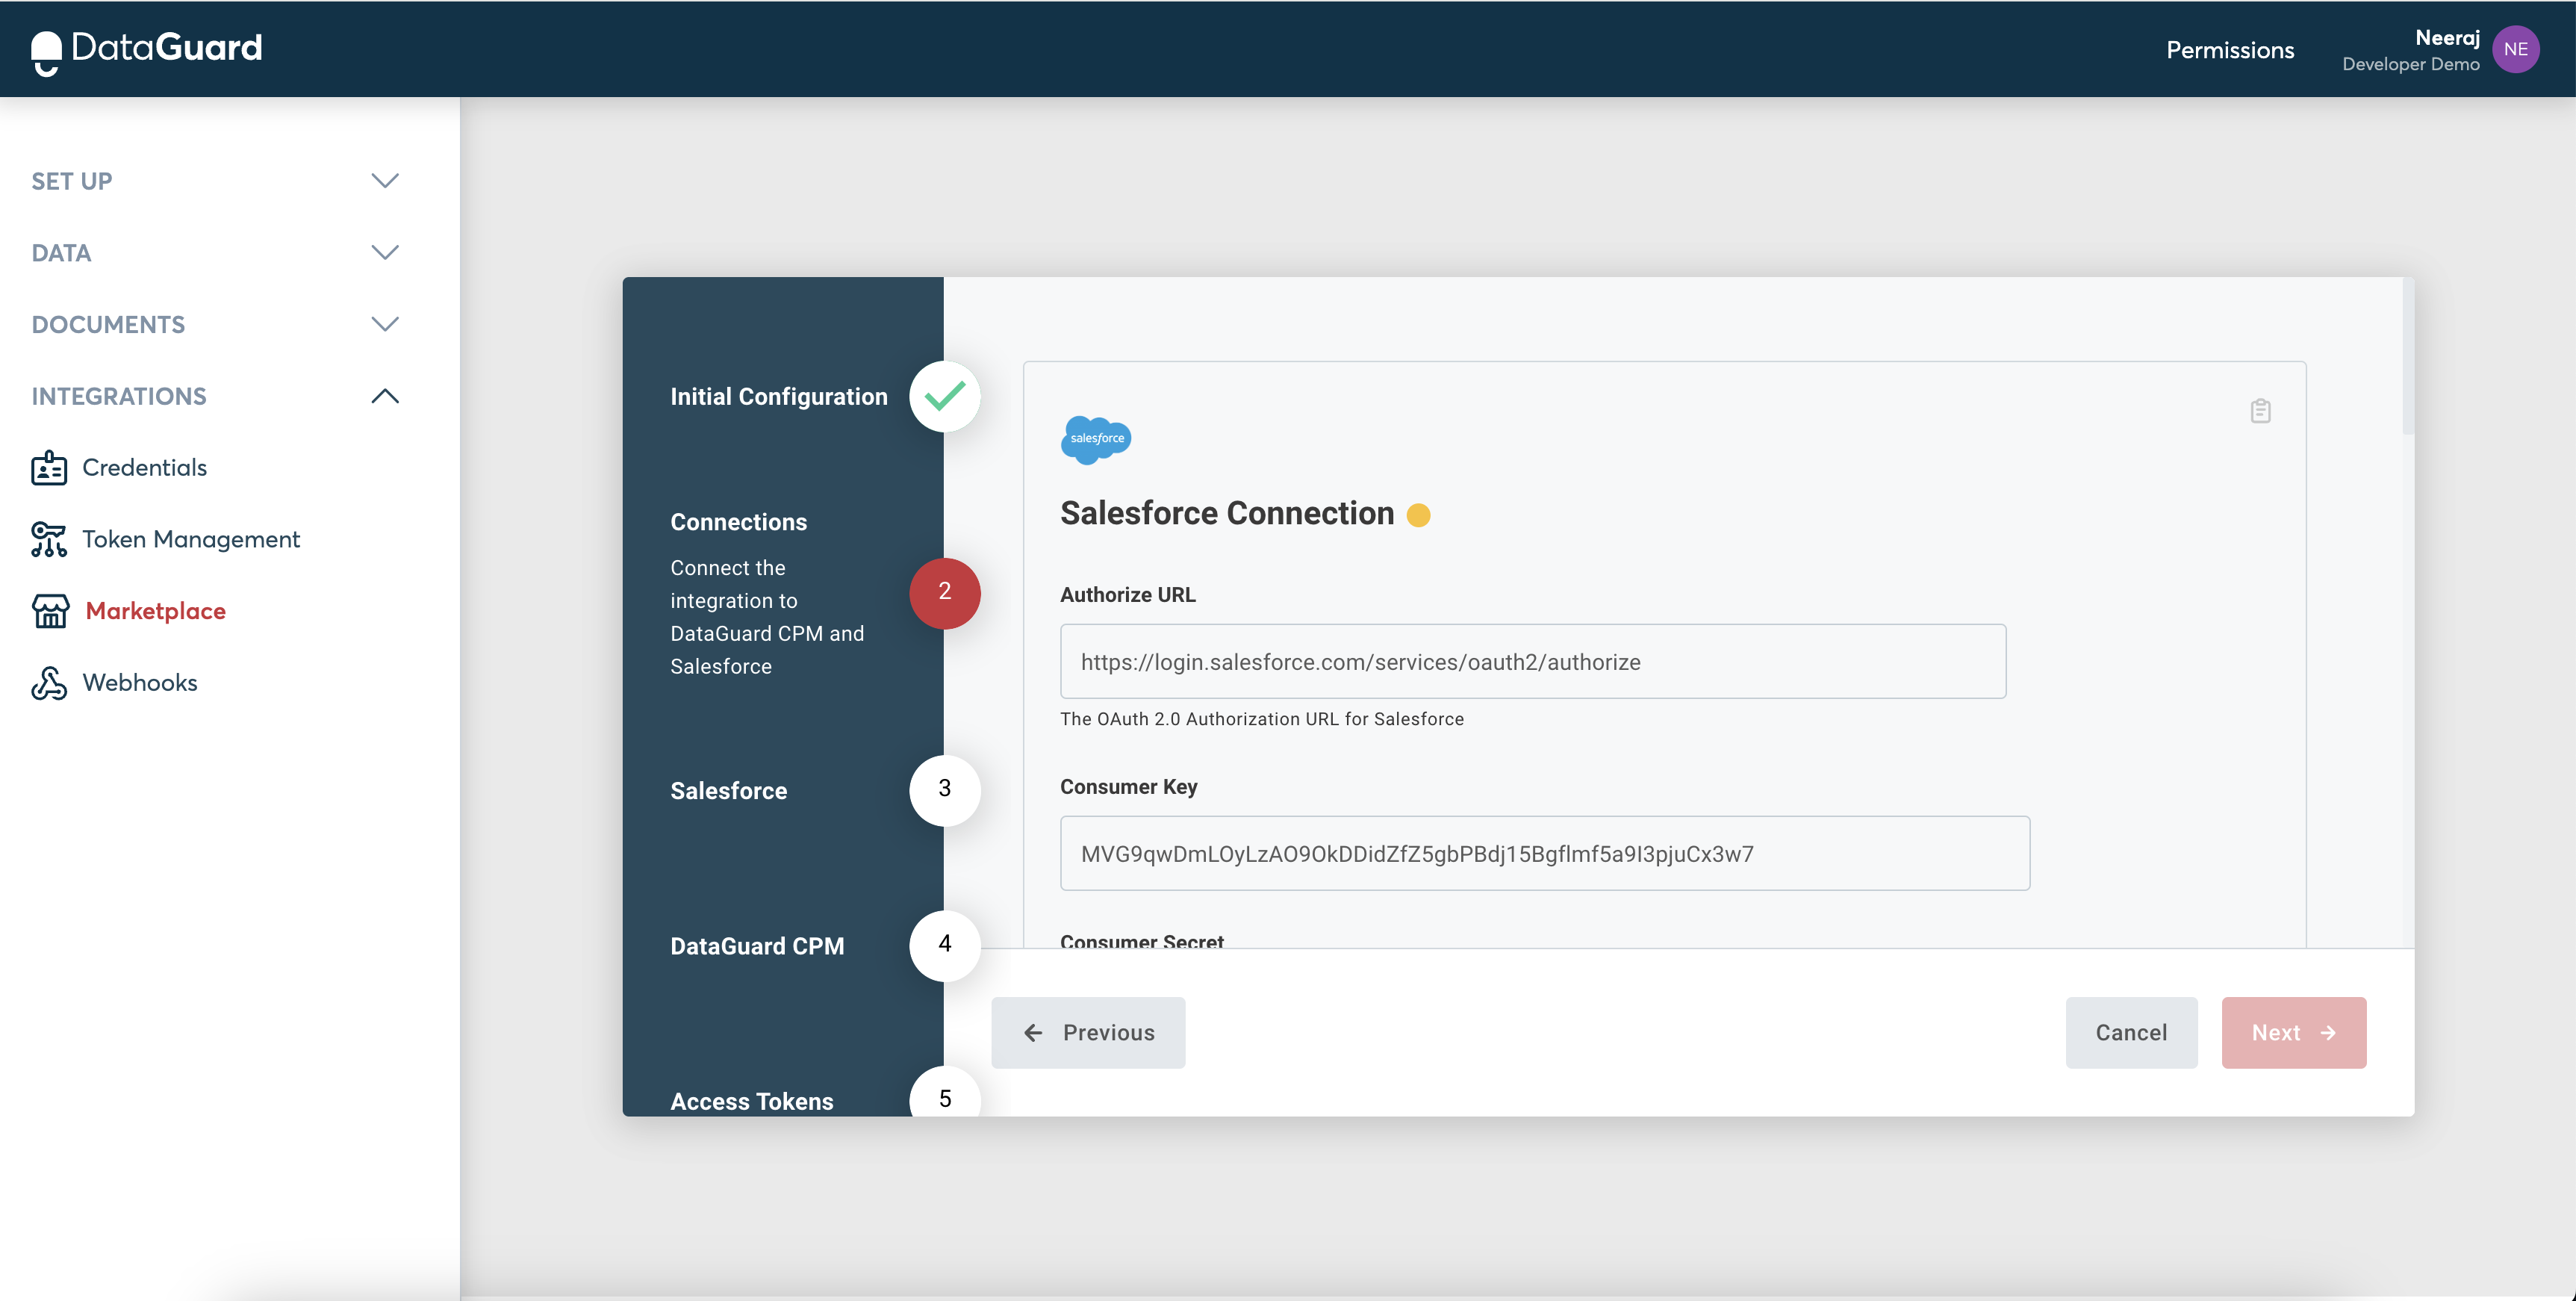
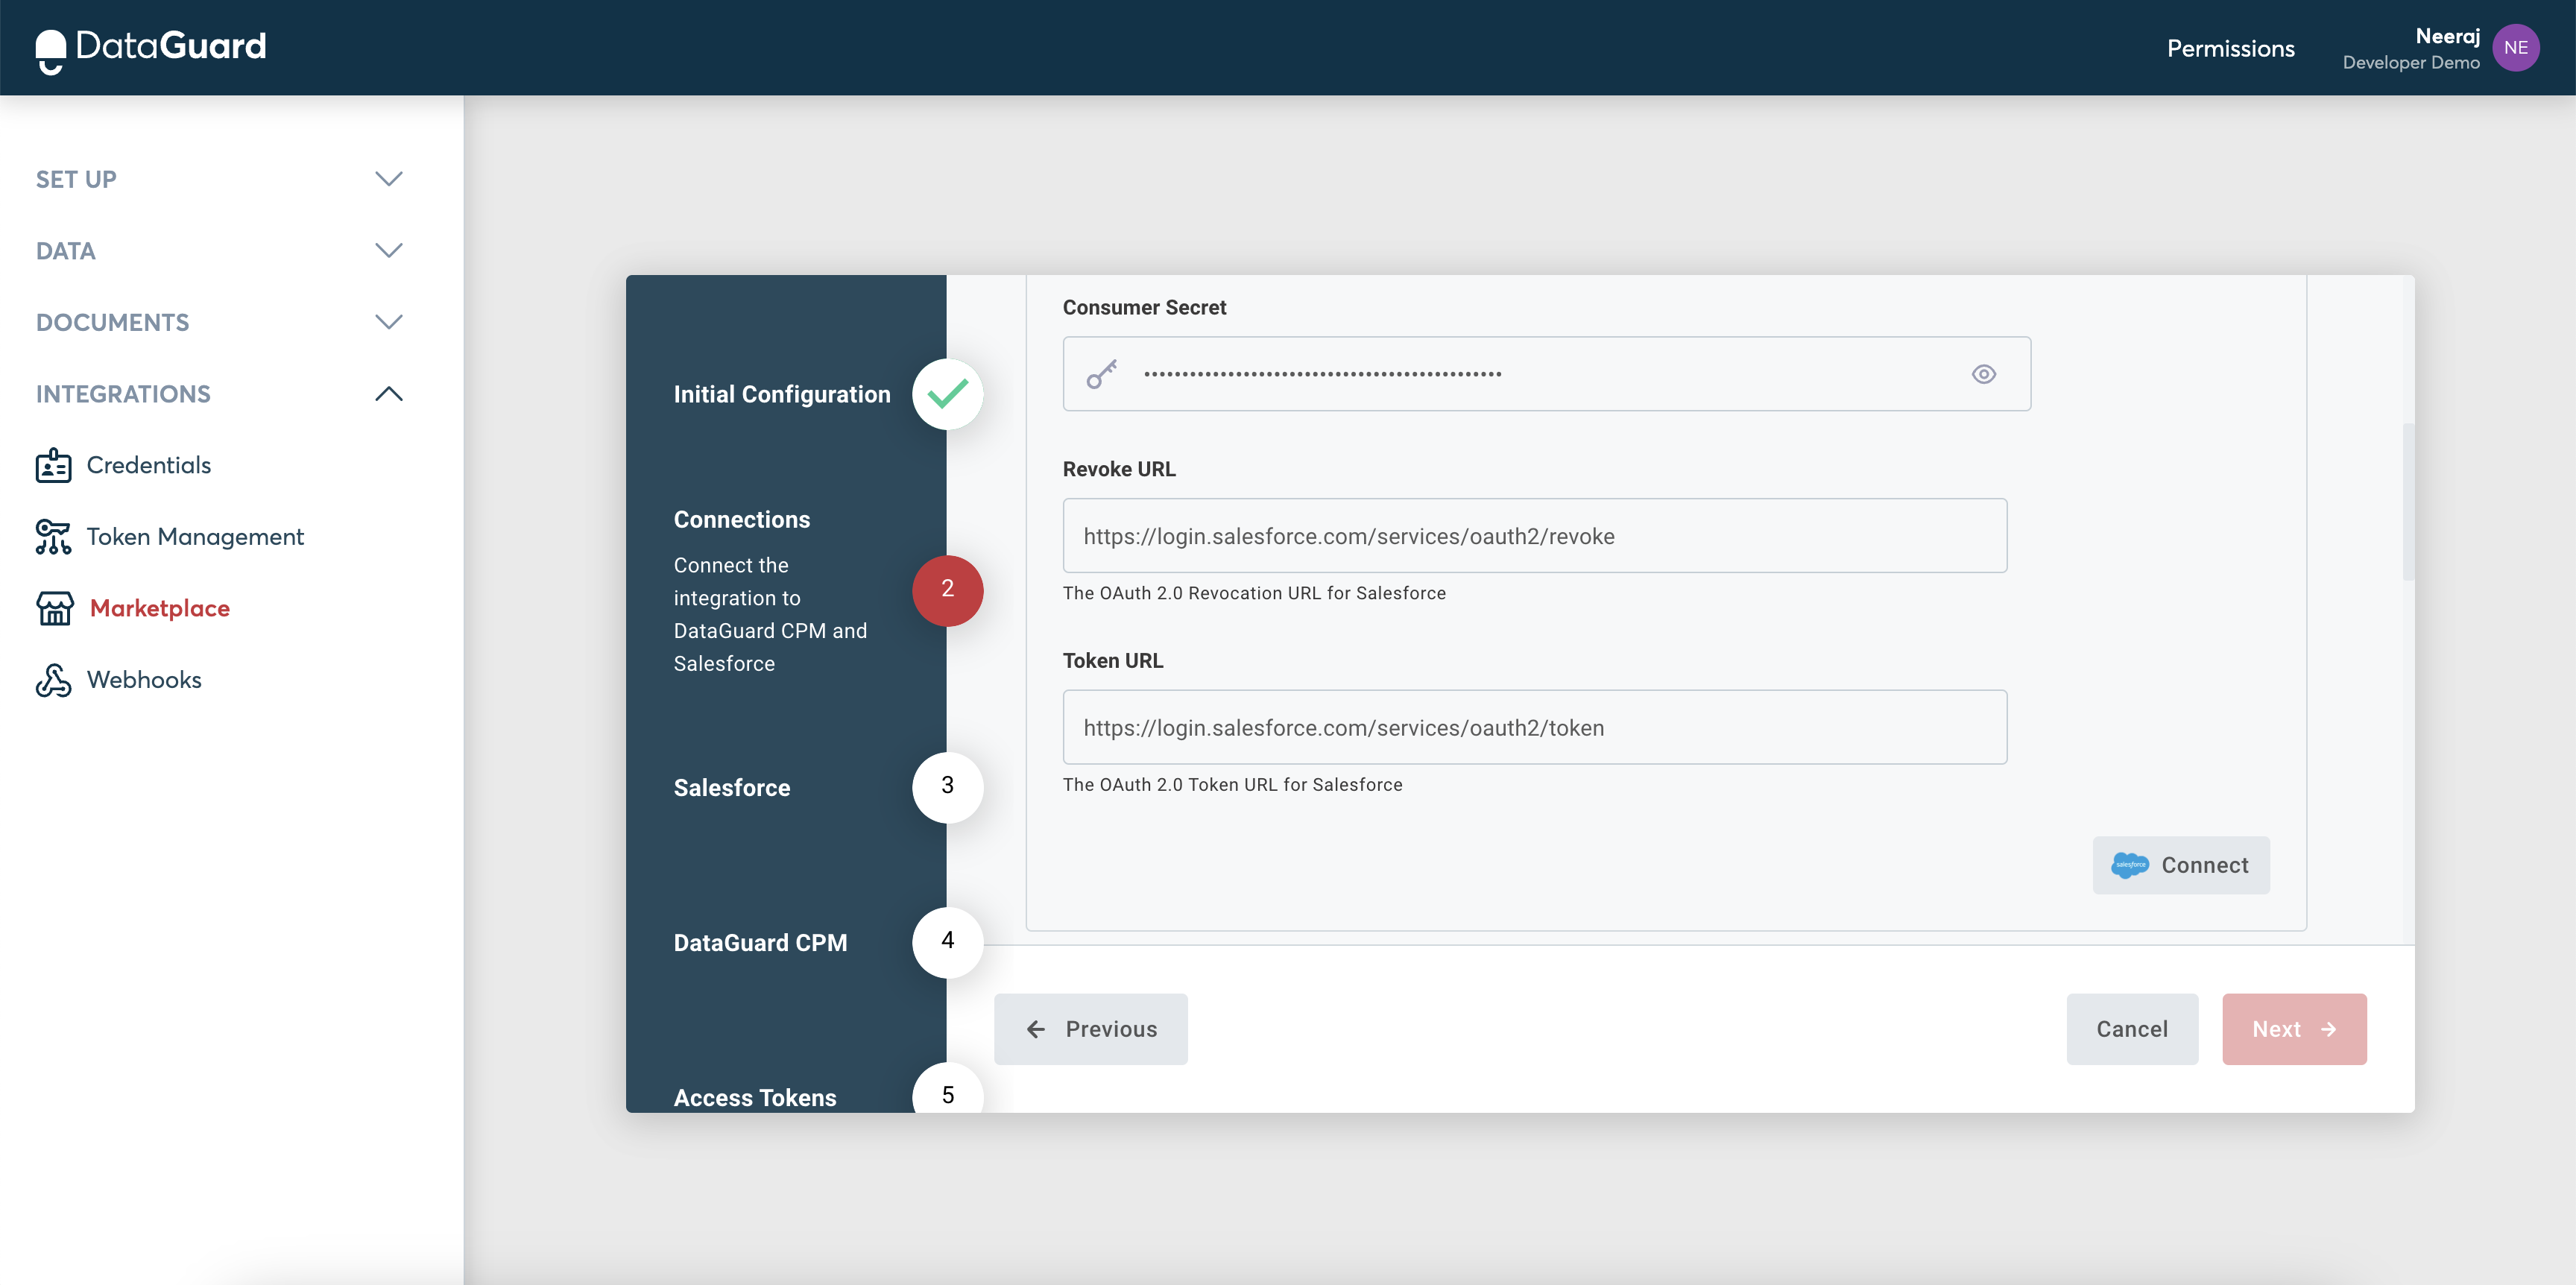
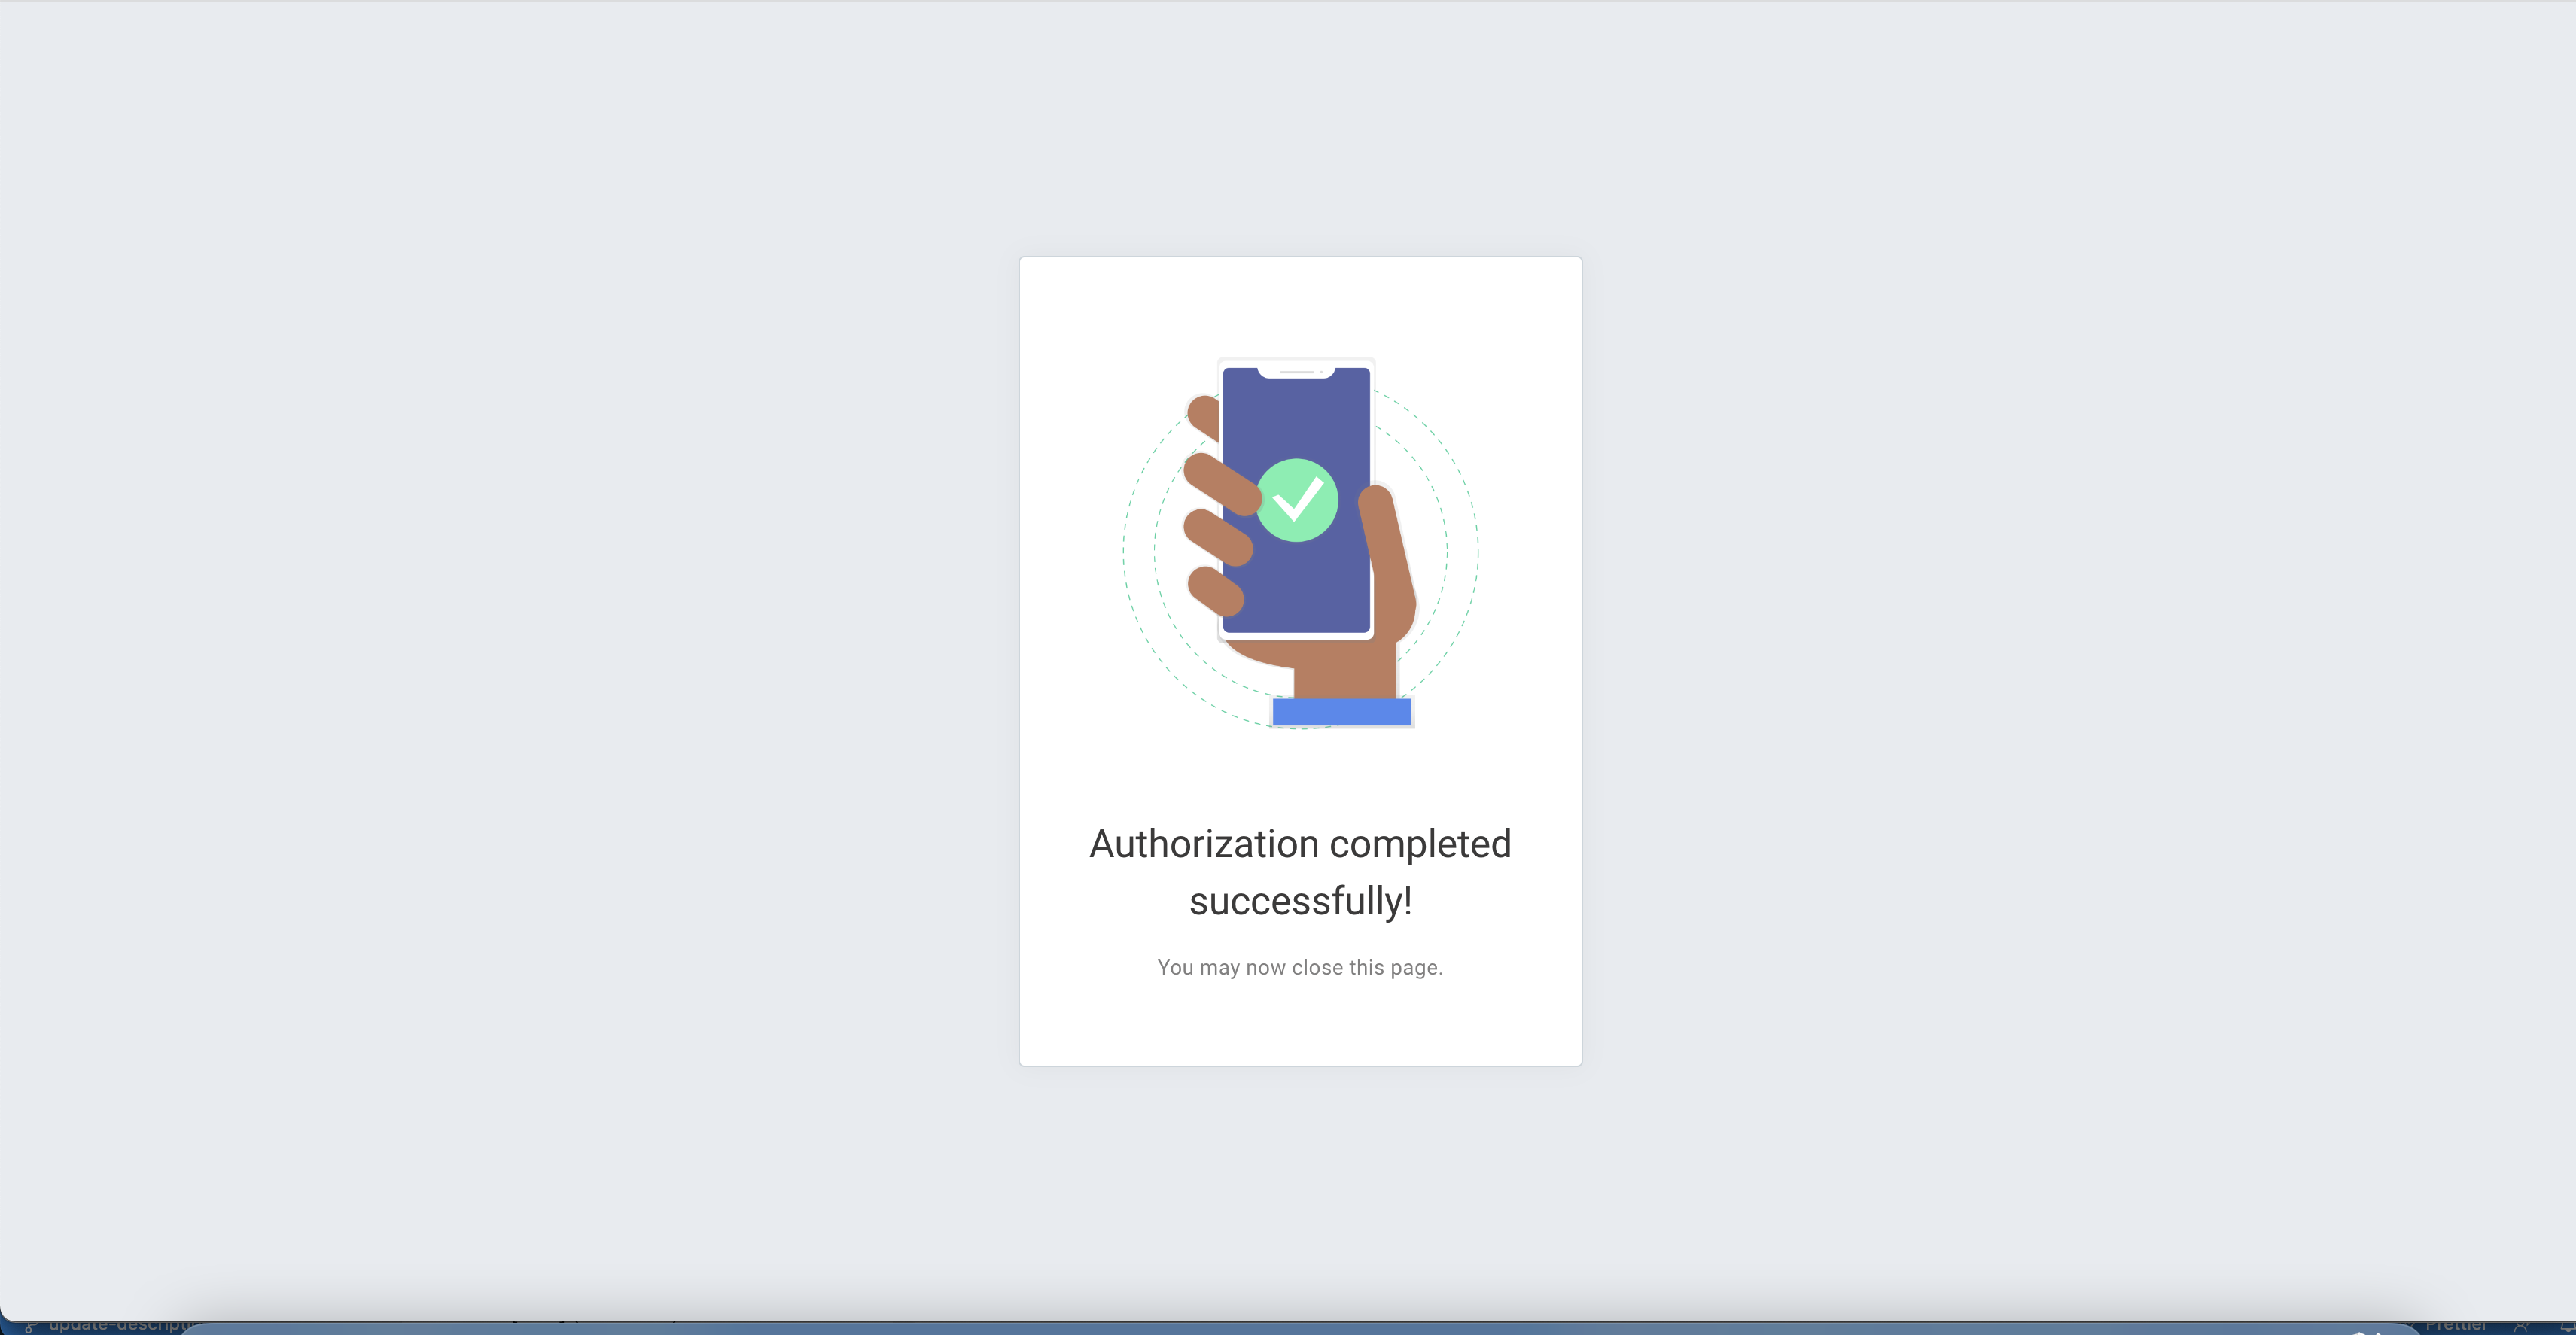
Click on 'Connect' after filling up the details. It would open a new tab asking for login or showing to have successfully connected to your Salesforce account if already logged in.
Note: Instead of using an individual Salesforce account to login, please use the dedicated integrations user that you created in the pre-requisite step.
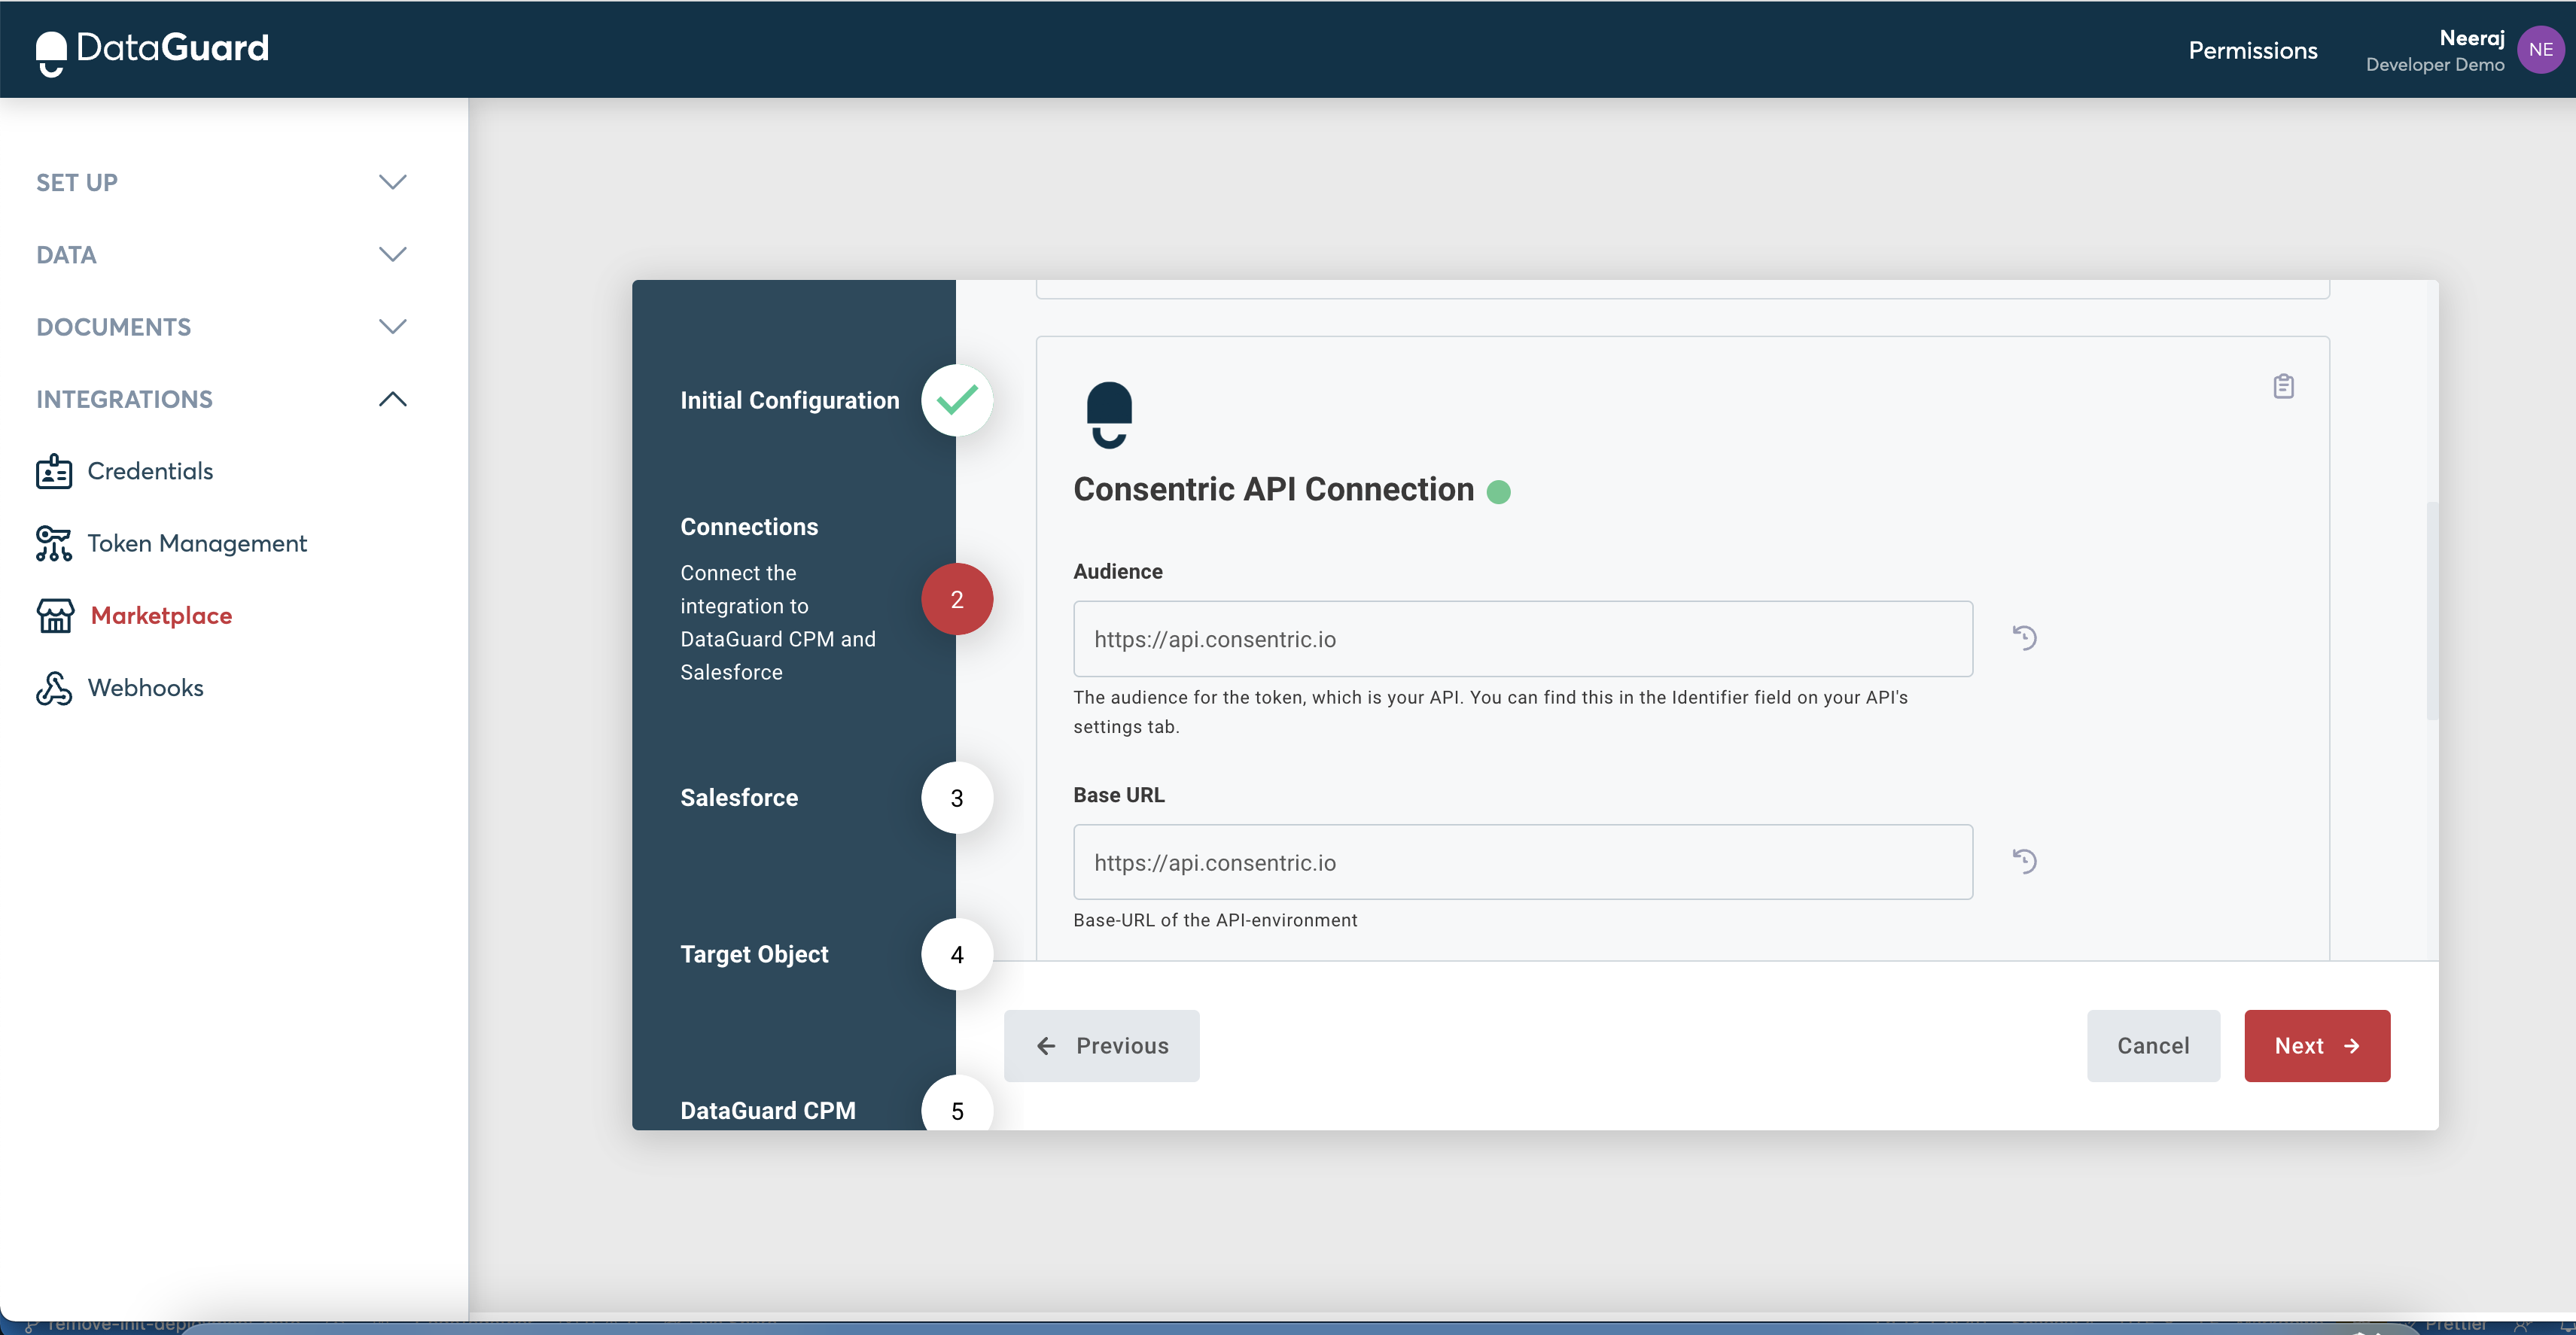
Consentric API Connection
Scroll down to see the section for Concentric API connection and fill up the field details. These details will be provided to you via an email during your initial setup process:
Token URL(required)Audience(required)Client ID(required)Client Secret(required)Base URL(required)Consentric Widget URL(required)
Click on 'Connect' after filling up the details. This will again open a page in a new tab showing that you have successfully connected to DataGuard.
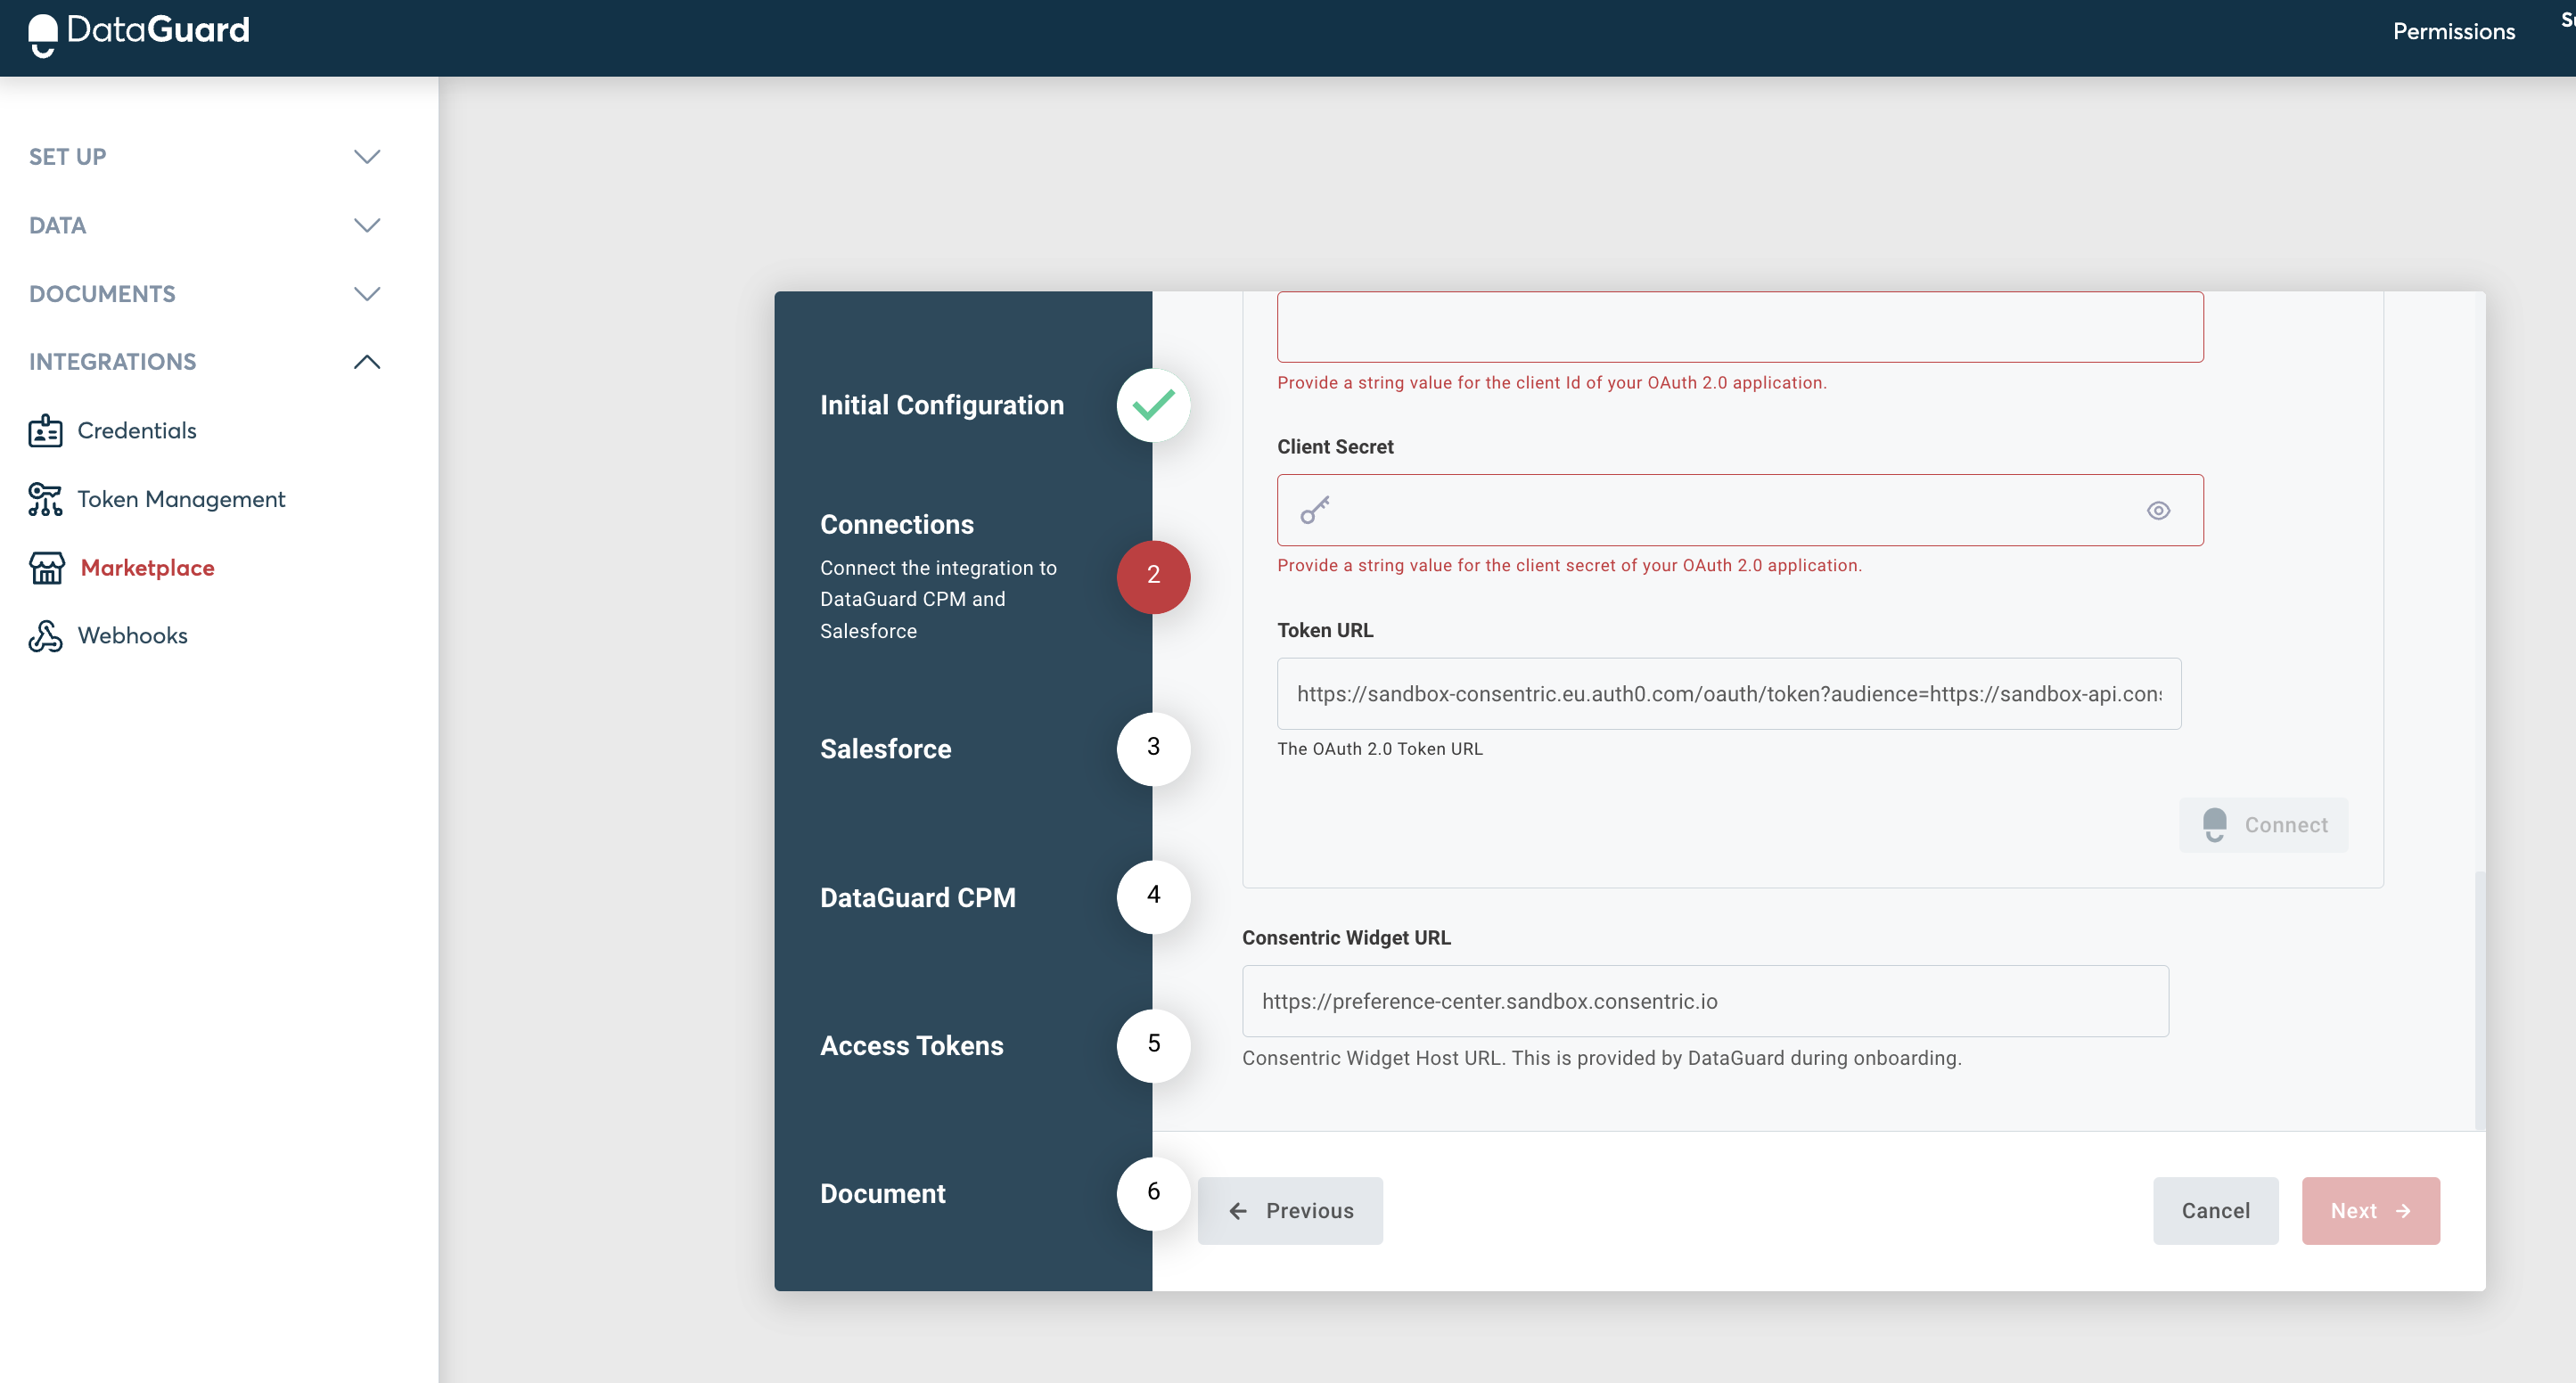
Click on 'Next' to go to the next step.
Step3: Salesforce
Salesforce-profiles
You need to enter the names of the profiles in your Salesforce account, which should be able to see and edit CPM-related data. The predefined value for it in Salesforce is: ‘System Administrator’.
Additionally, you can add all other profiles that you have in your Salesforce account by clicking on the '+ Add value' button.
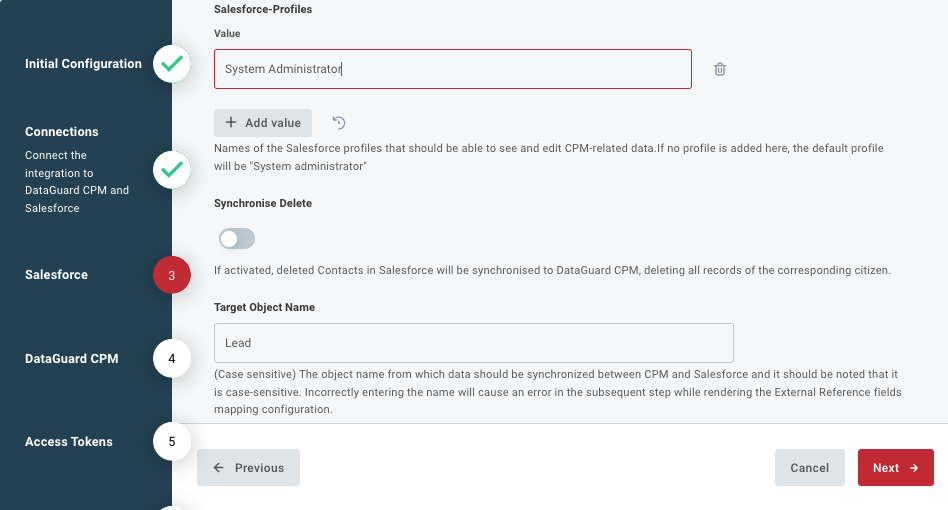
Synchronise Delete
If this feature is enabled, deleted contacts in Salesforce will be synchronized with DataGuard CPM, resulting in the deletion of all records associated with the corresponding citizen.
Target Object Name
The 'Target Object Name' refers to the object name that should be synchronized between CPM and Salesforce. It is important to enter this field accurately, as it is case-sensitive. Entering an incorrect value here will result in an error in the subsequent step, as it will not be able to find the target object with the provided value.
Click on 'Next' to go to the next step.
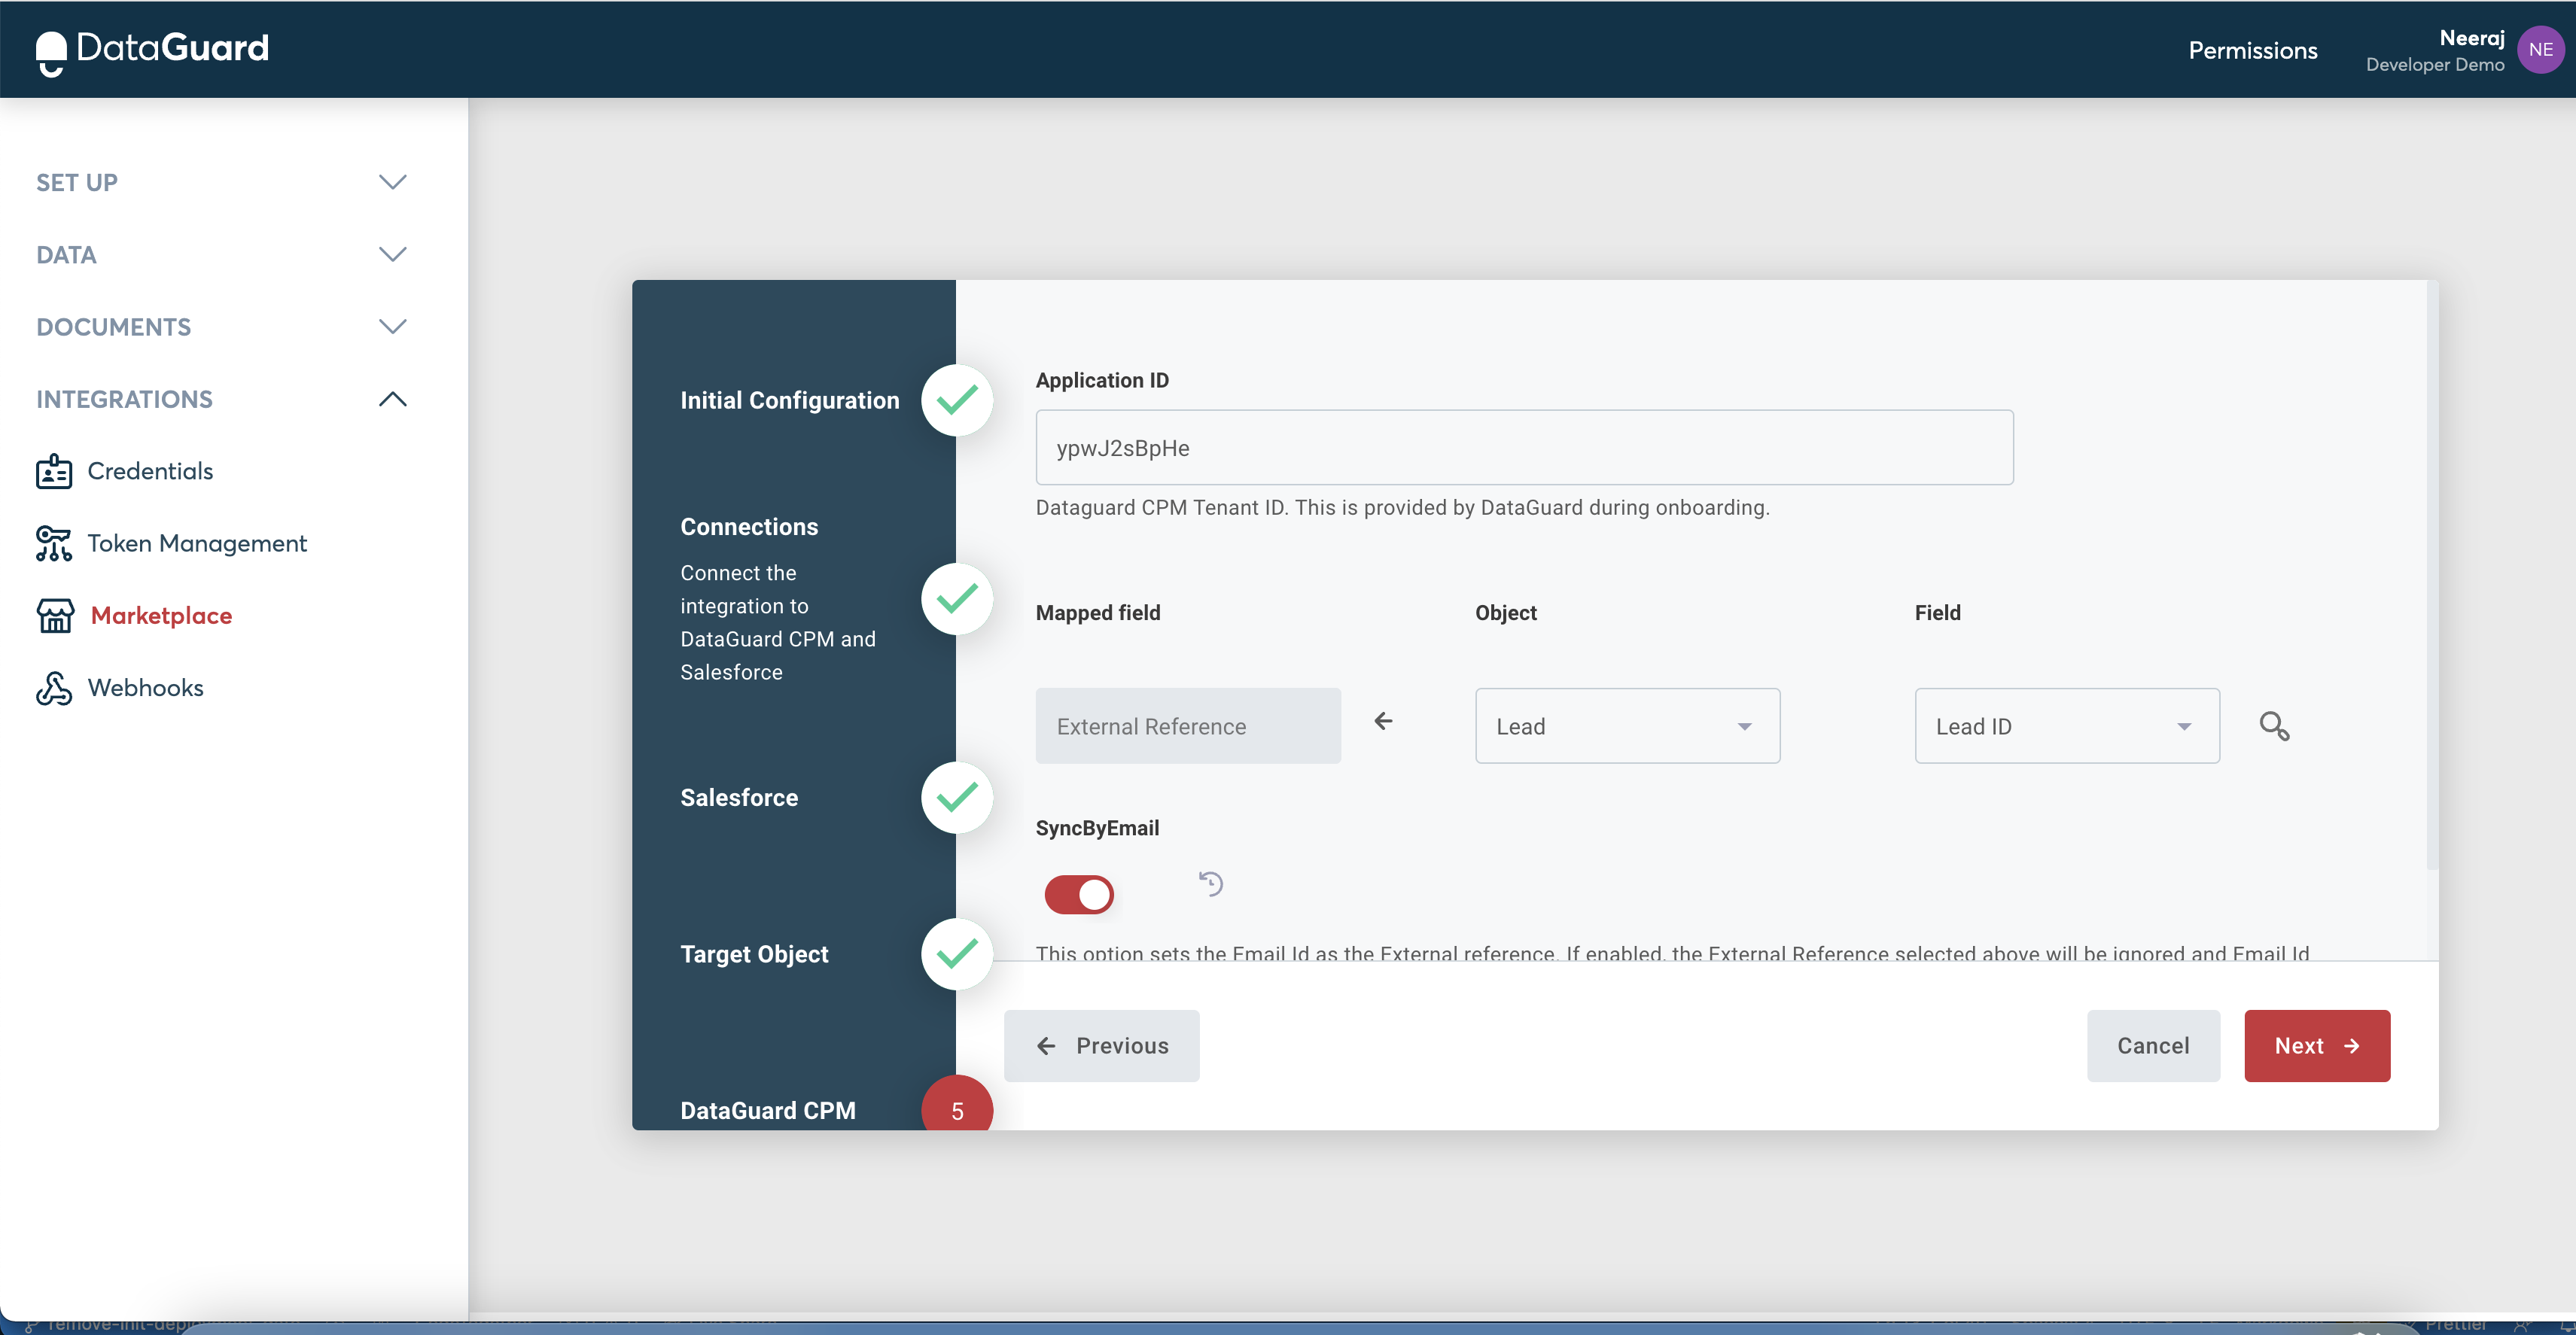
Step 4: Dataguard CPM
Application ID
This is the Dataguard CPM Tenant ID. This is provided by DataGuard in an email during initial setup process.
Click on 'Next' to go to the next step.
External Reference
External Reference value defines the field that will be used as the external reference. On the basis of which you want the data to be synchronised between DataGuard and Salesforce. (i.e., Contact Id If you selected the Contact as the Target Object or Lead Id if you selected Lead.)
Please note that the field selected here should be present for the citizen in both SalesForce and DataGuard to be able to synchronise the data successfully.
Click on 'Next' to go to the next step.
SyncByEmail
This is a specific case for the external reference setting above. This option sets the Email Id as the External reference. If enabled, the External Reference selected earlier will be ignored and the Email Id will be used for synchronising the data between CPM and Salesforce.
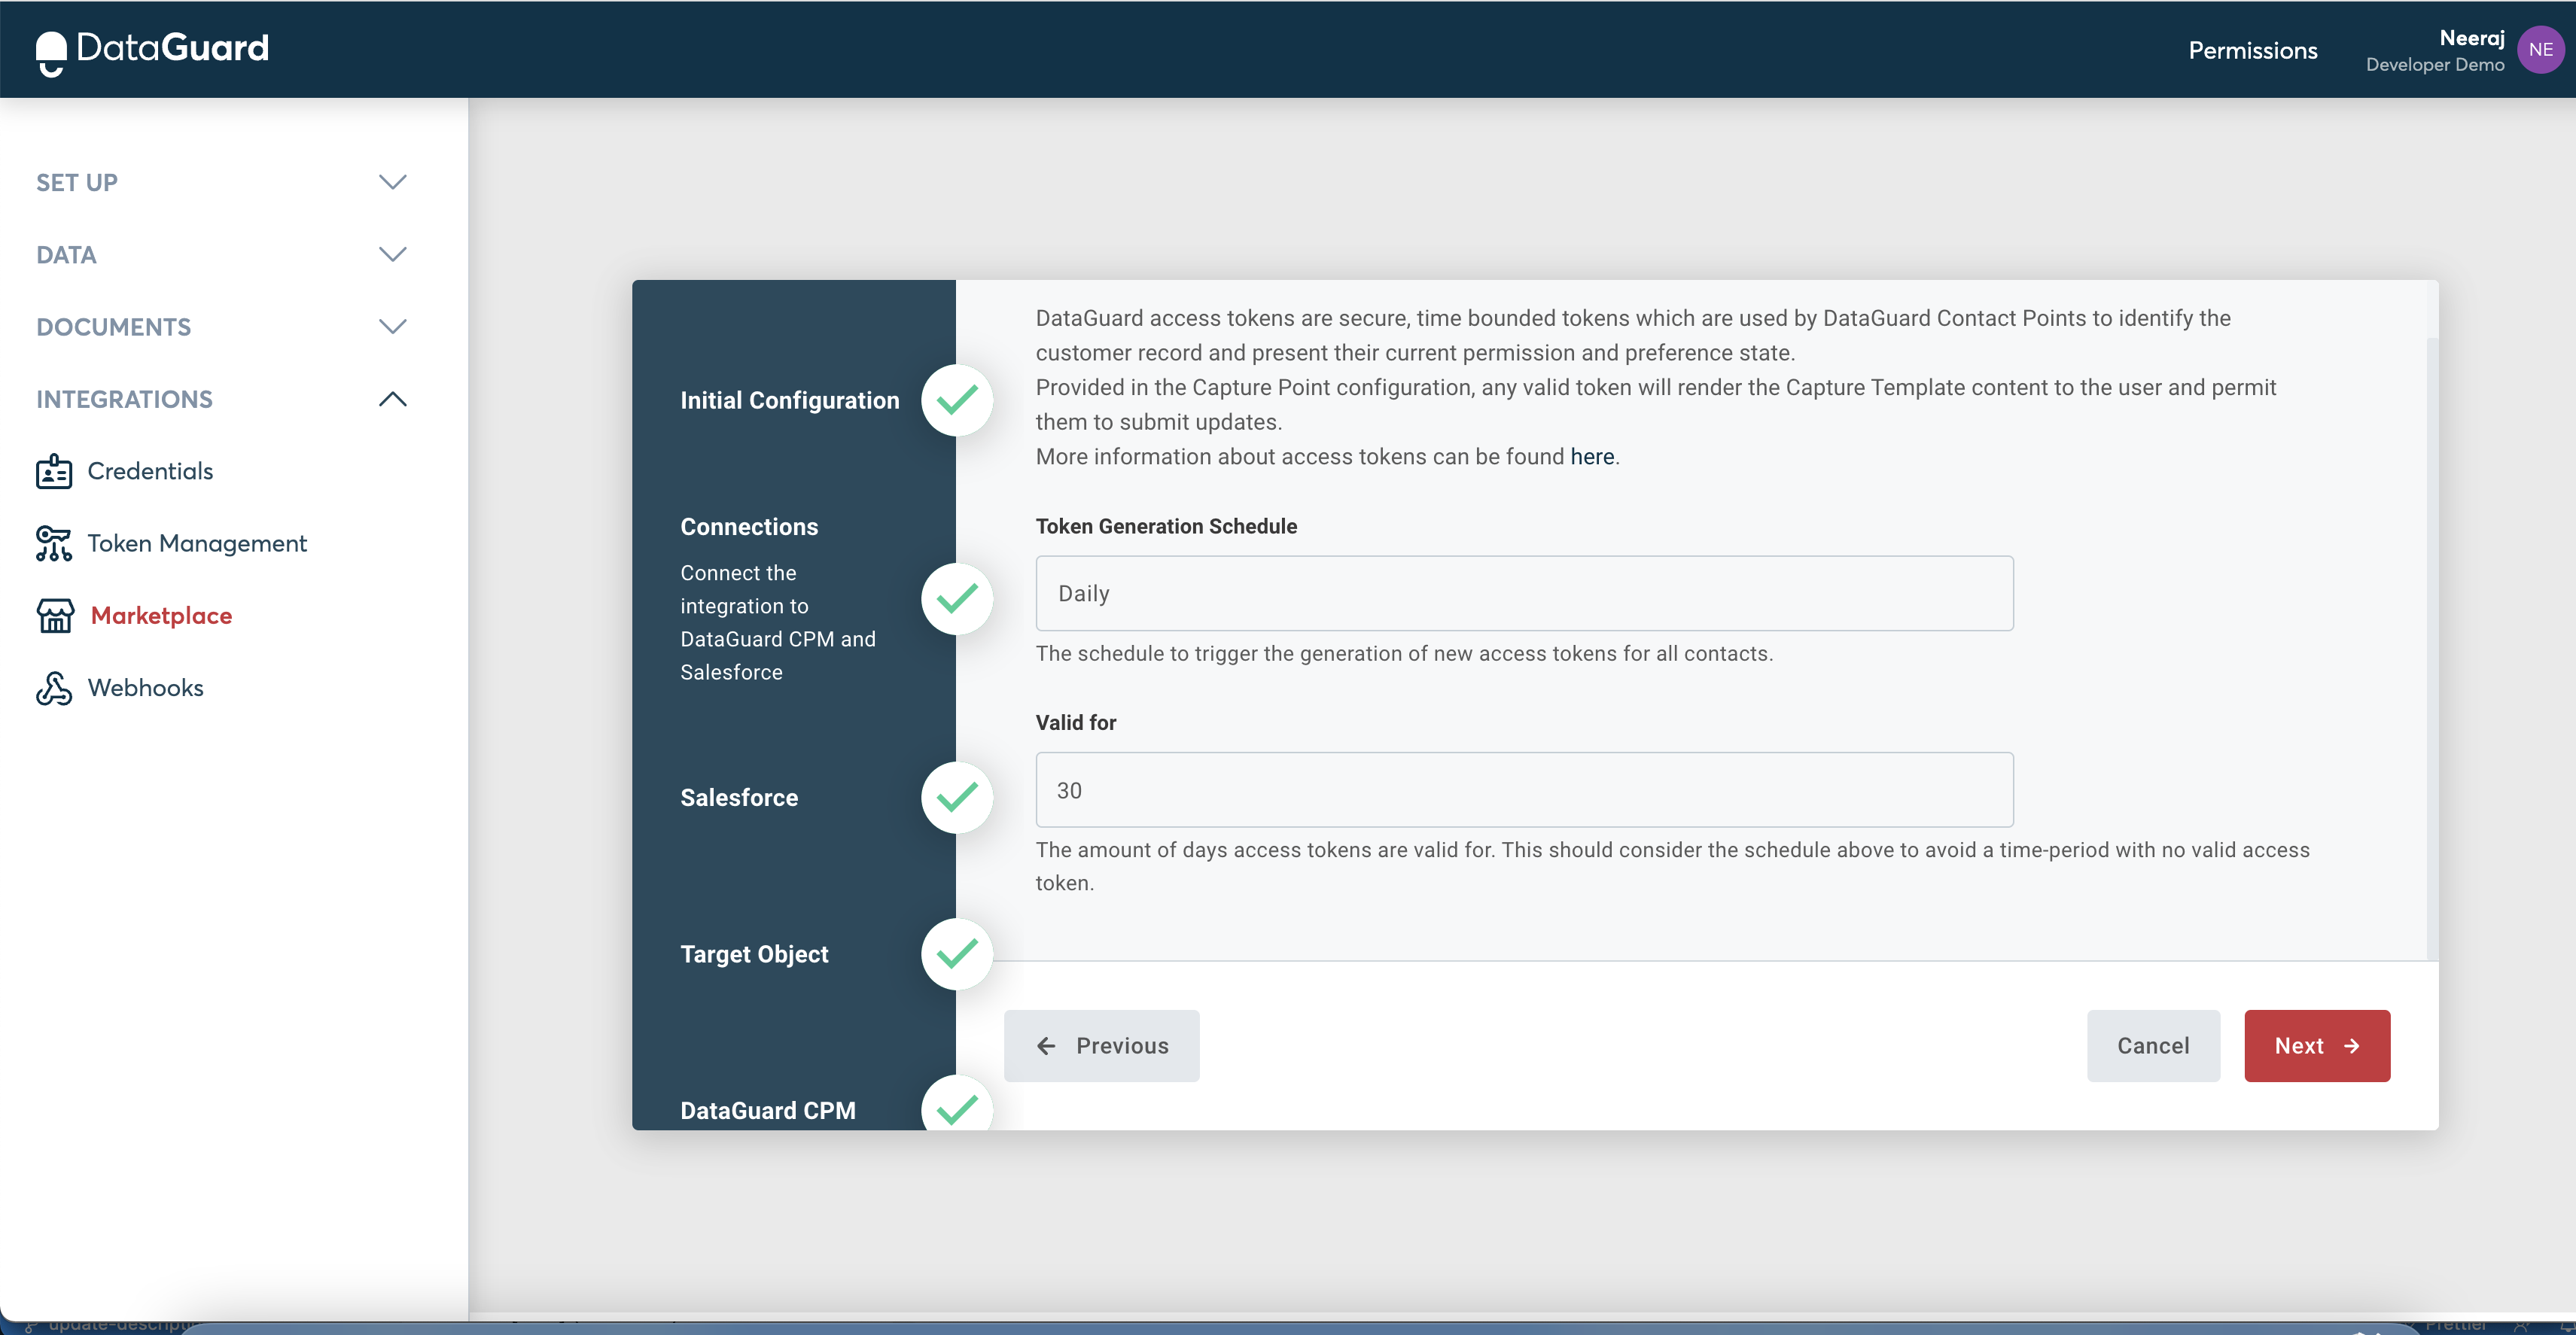
Step5: Access tokens
This step is to set up a schedule for generating access tokens that are used by Dataguard Capture Points.
Step6: Document
This step allows you to select the privacy policy and permission statement that is to be used for capturing new consents.
Each configuration of the Salesforce connector needs to have one privacy policy and permission statement. You can reuse the same or have different ones for multiple configurations.

Click on 'Finish' to finish the configuration.
Target Object view in Salesforce
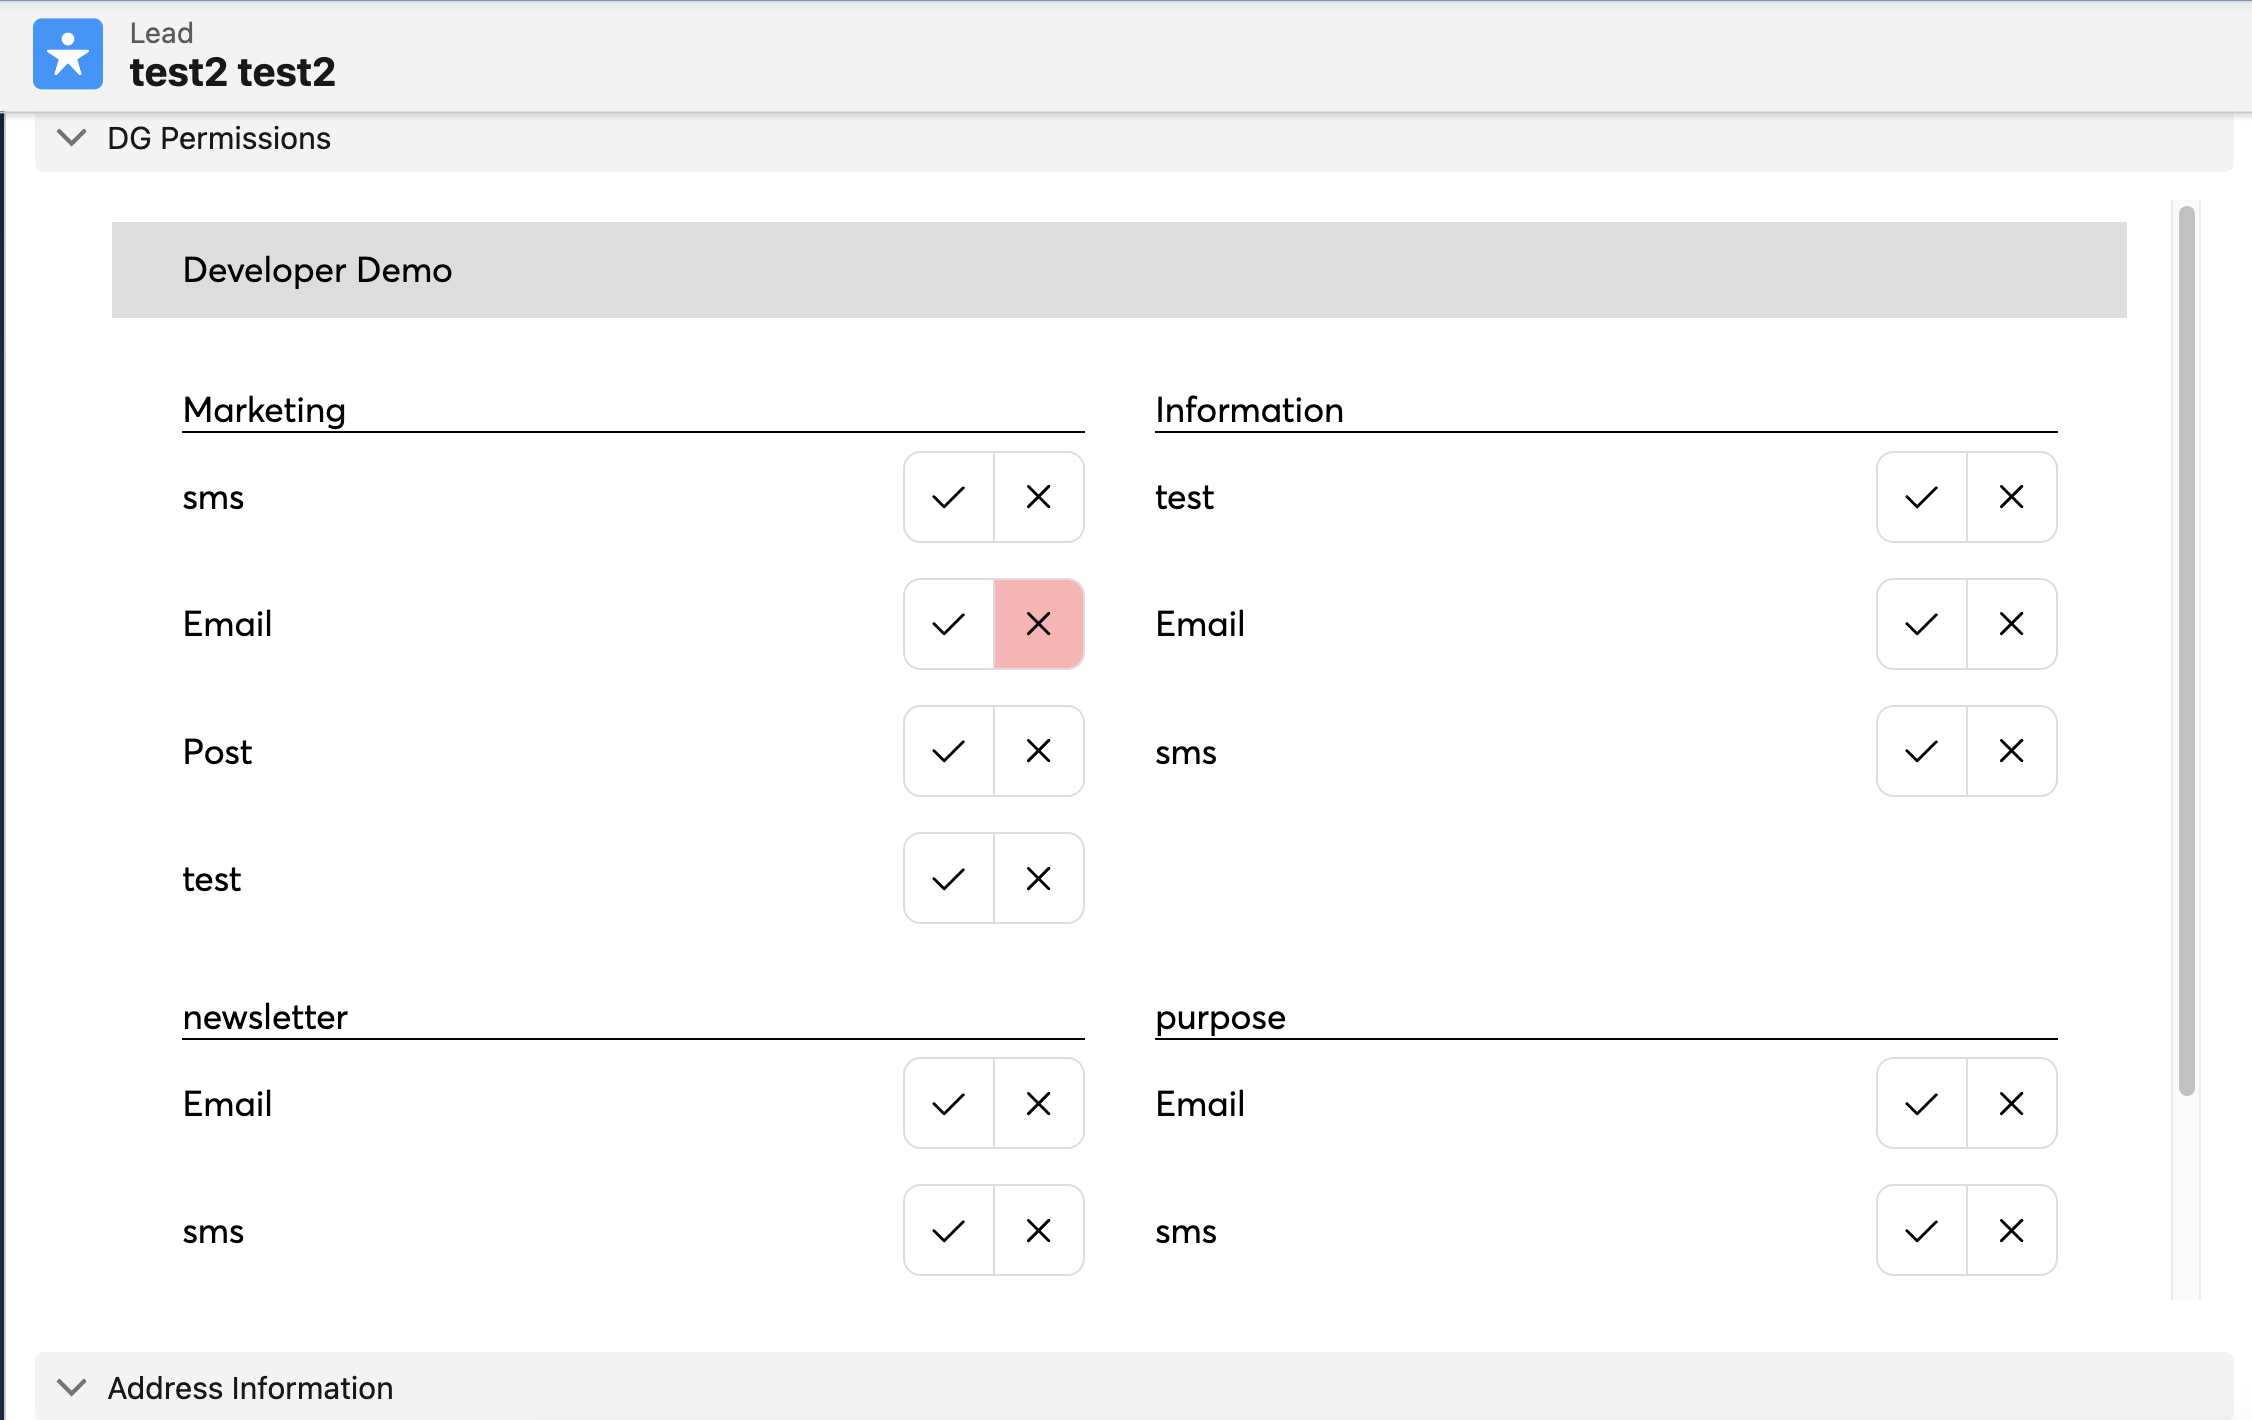
After you have successfully configured the integration instance, you can update the page layout of your TargetObject(Contact /Lead) in your Salesforce account to see the permission options, preferences, or content templates that you had configured in your application.
Citizen consent and preferences can be showcased within the associated target object in two ways: the first method entails adding custom CPM fields to the page layout, while the second involves integrating a visual force page into the page layout.
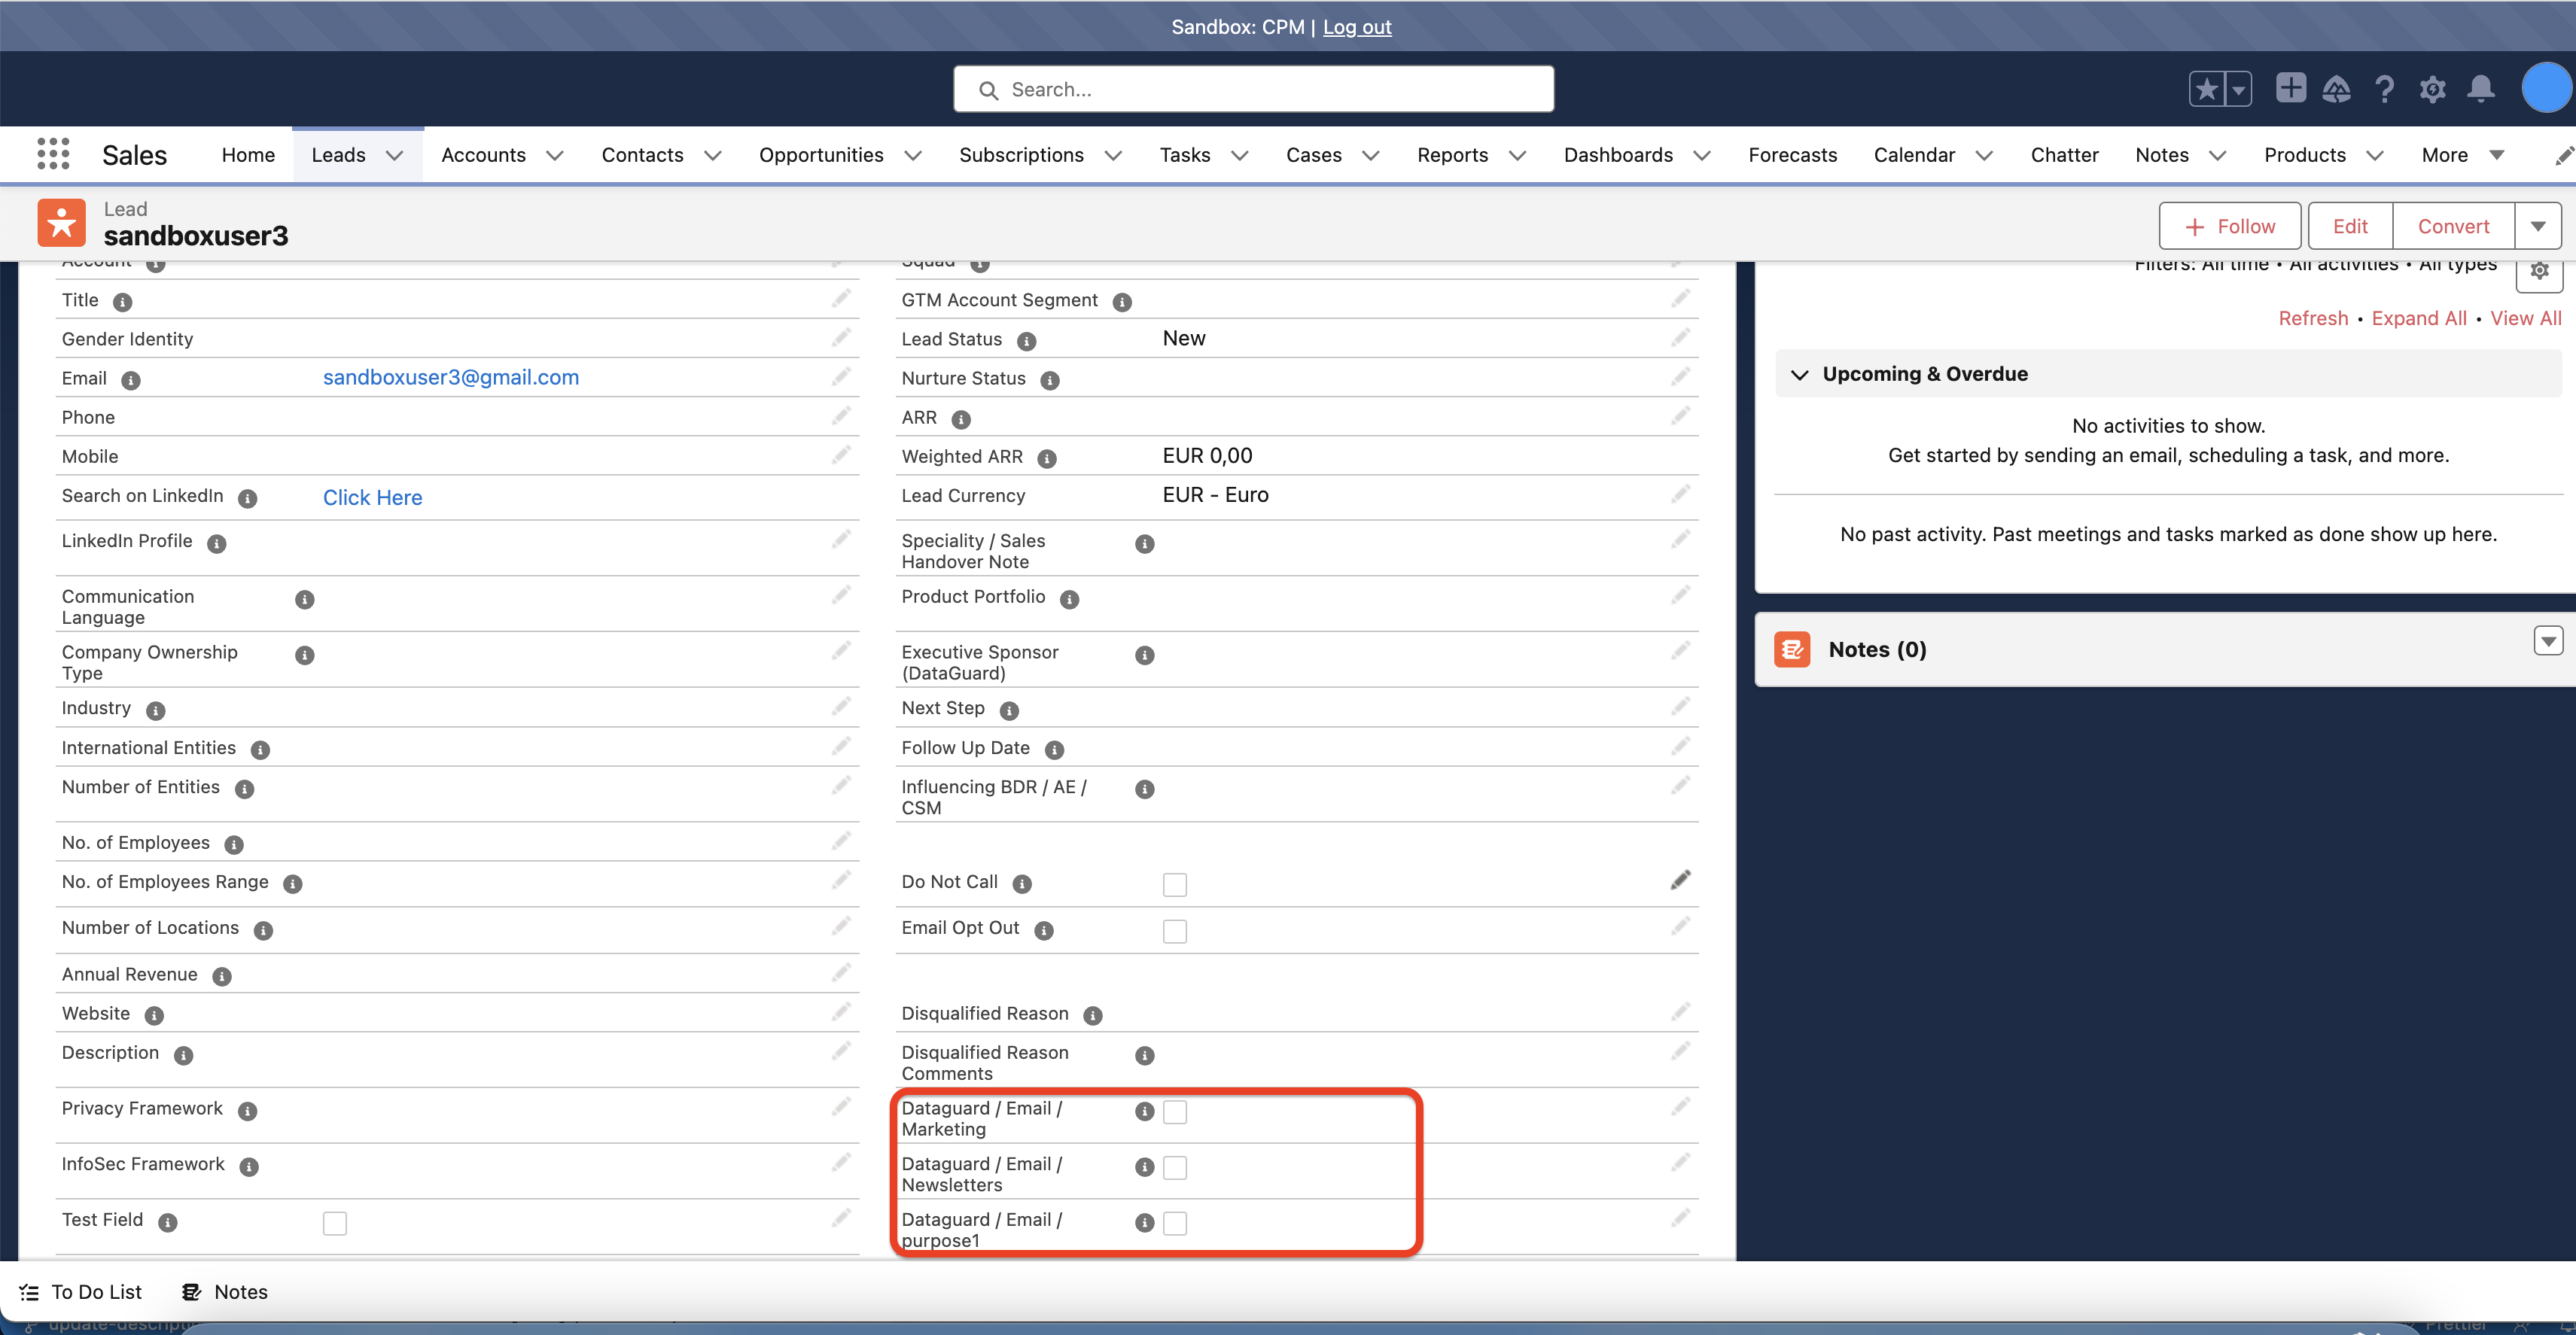
This is an example of a page view for a test user inside the Salesforce 'Lead' object with custom fields created by integration to sync citizen data:
How to add fields to page layout
You might want to view the options being used to collect consent from citizens, in the page layout for the user in your Salesforce Object.
-
After logging in to your Salesforce account, go to the 'Setup'. You should have administrative access.
-
Then navigate to Object Manager->Target Object name(Contact/ Lead etc)-> Page layouts. Then click on the target object's layout.

-
Search for the fields that are being used to contain the consent data from Dataguard
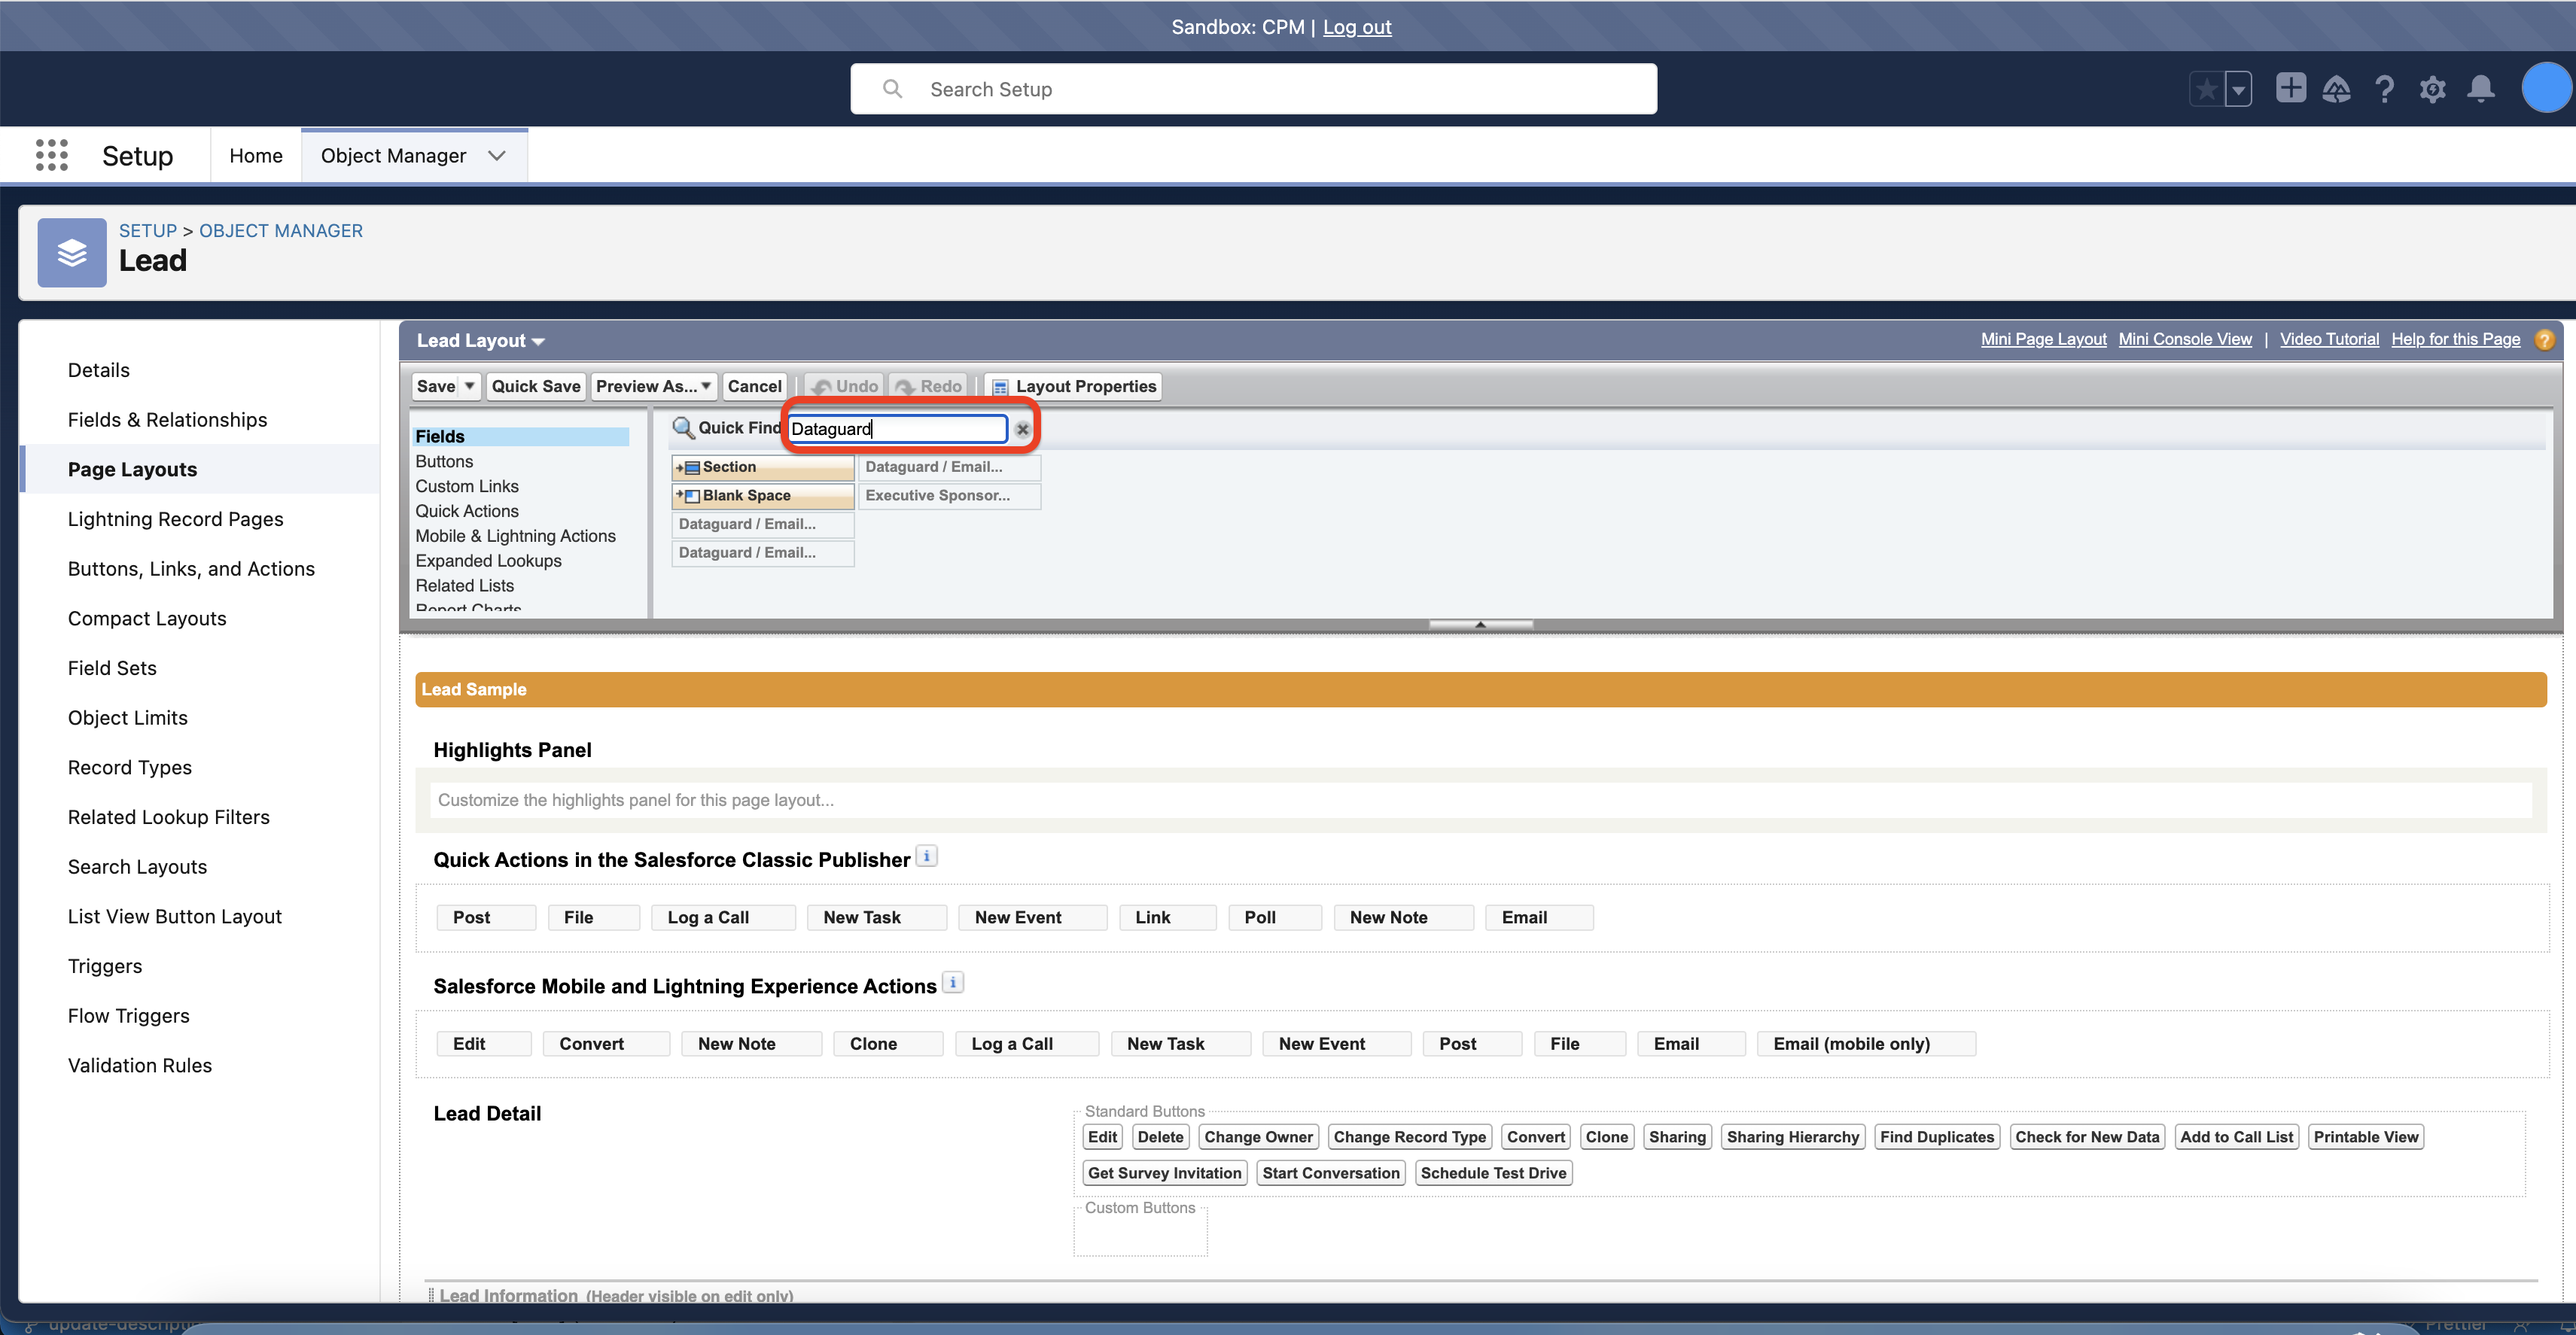
-
Drag and drop the fields that you want to be shown on the object's view, to your preferred location on the page layout and click on Save
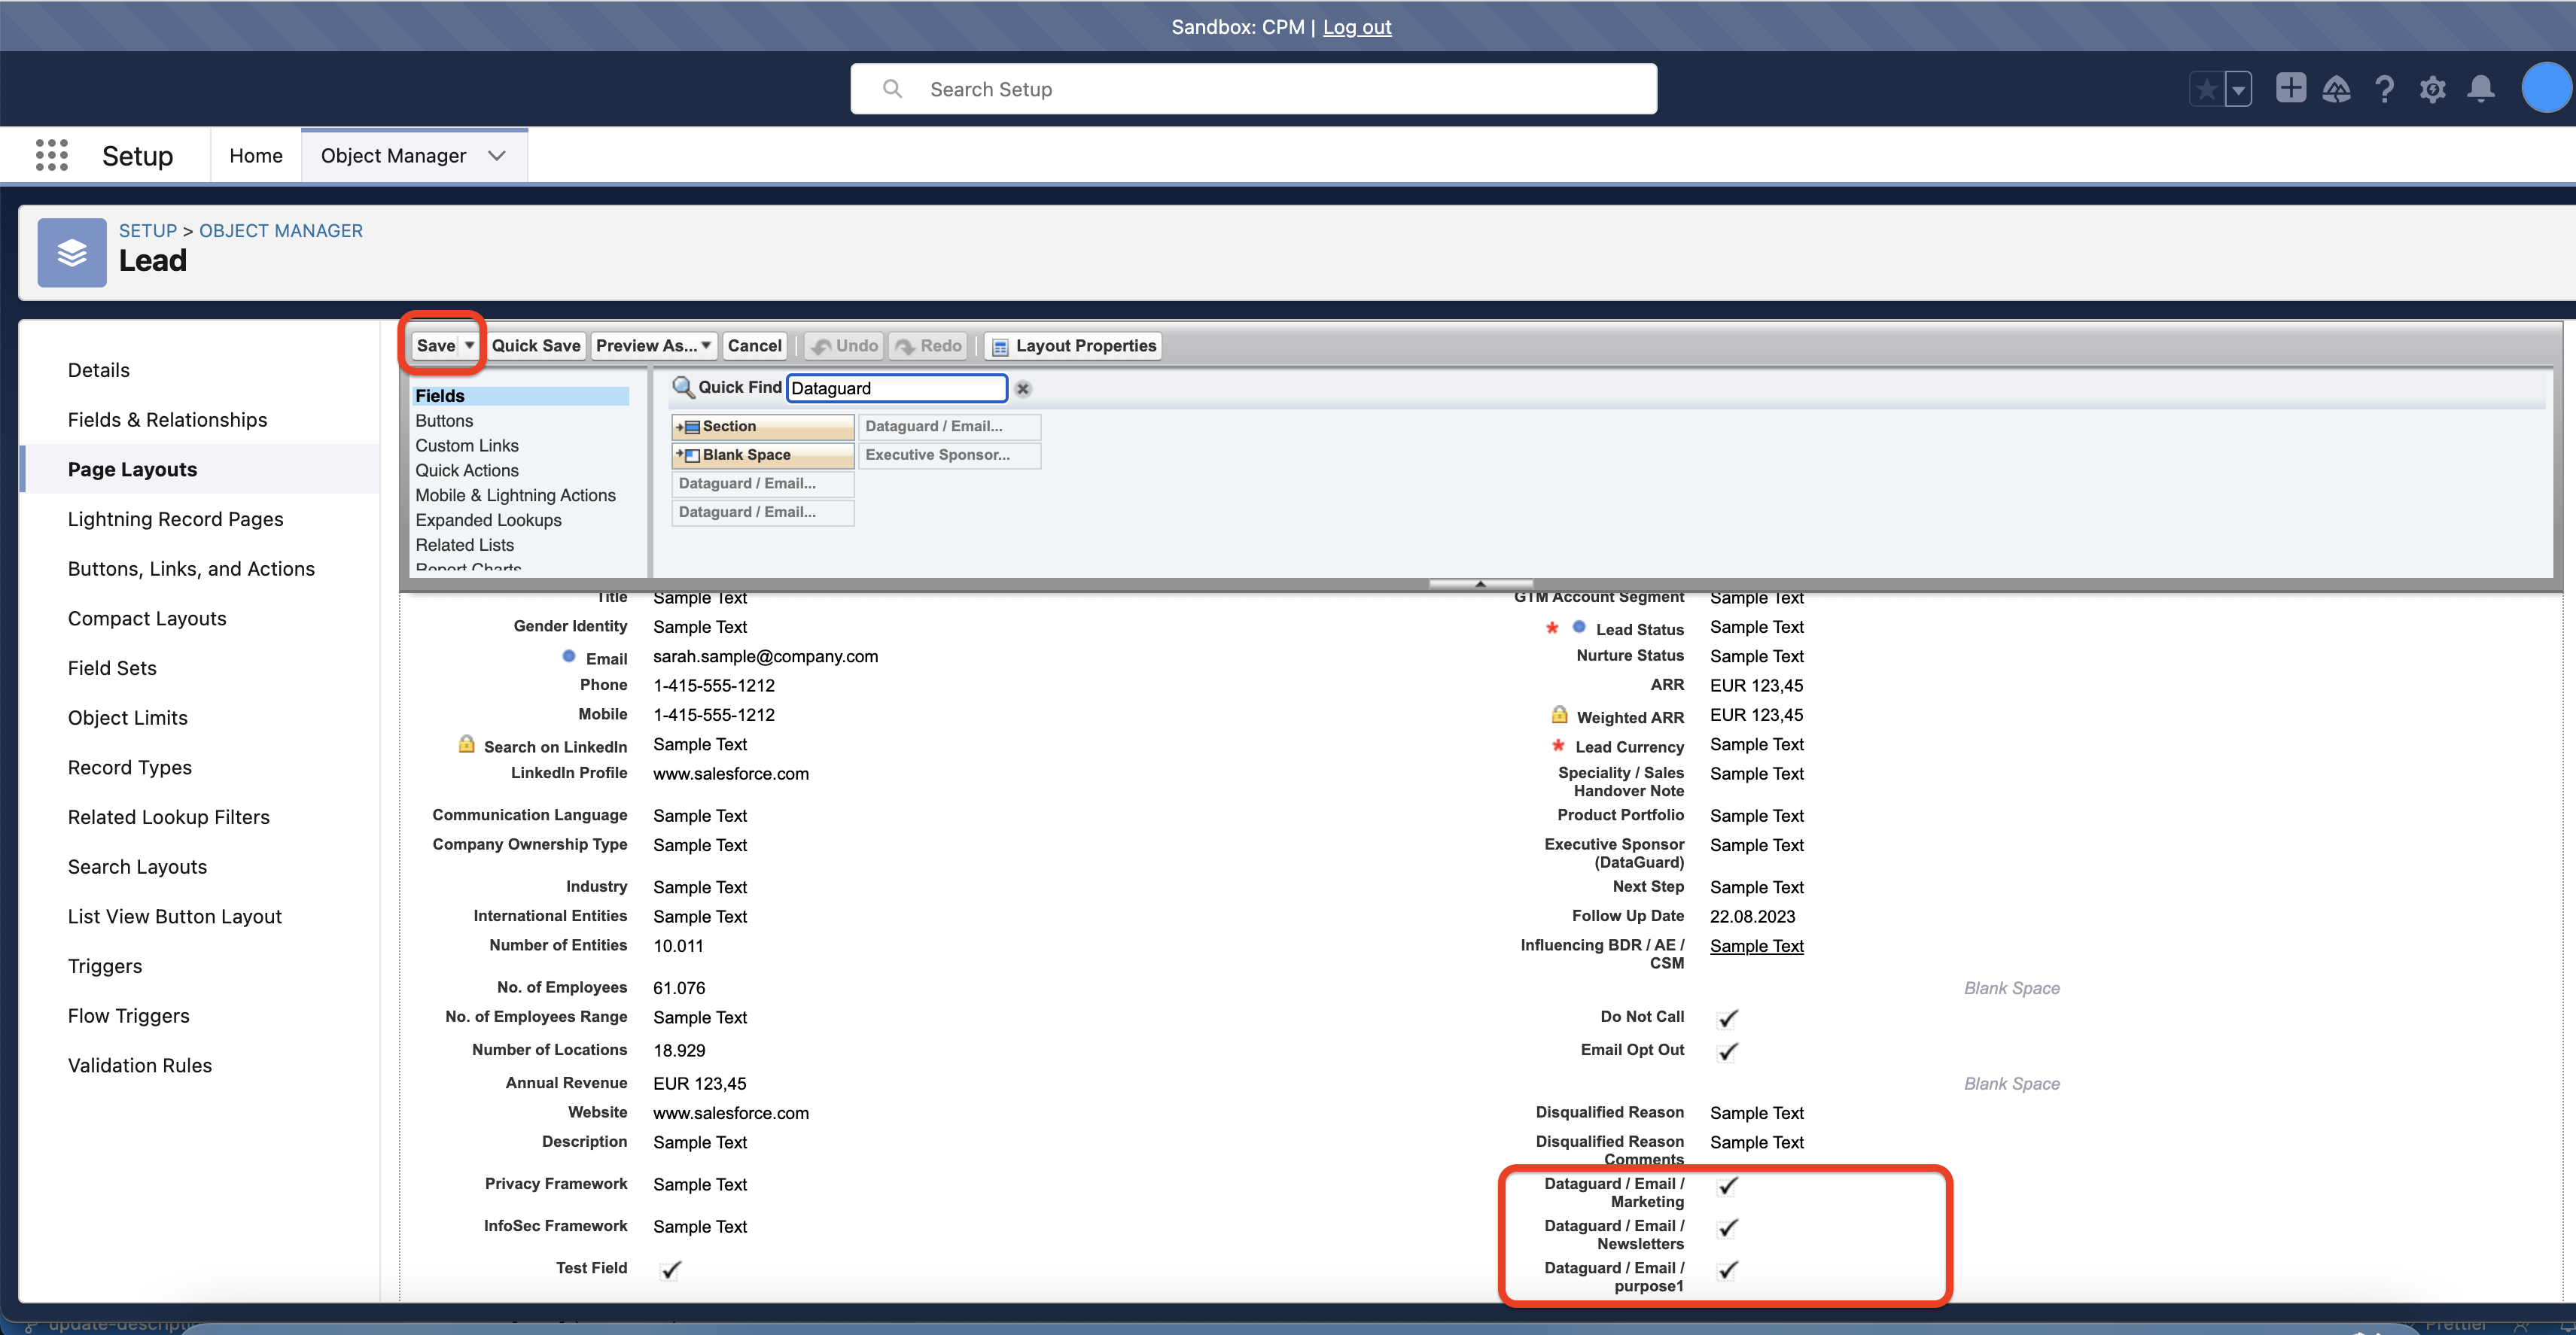
- The added fields will start appearing in your object view in your Salesforce target object (Contact/Lead) after a minor wait time.
How to add CPM related visual force page to page layout
The second option to view the options being used to collect consent from citizens, in the page layout for the user in your Salesforce Object can be done by adding visual page to the page layout.
-
After logging in to your Salesforce account, go to the 'Setup'. You should have administrative access.
-
Then navigate to Object Manager->Target Object name(Contact/ Lead etc)-> Page layouts. Then click on the target object's layout.
-
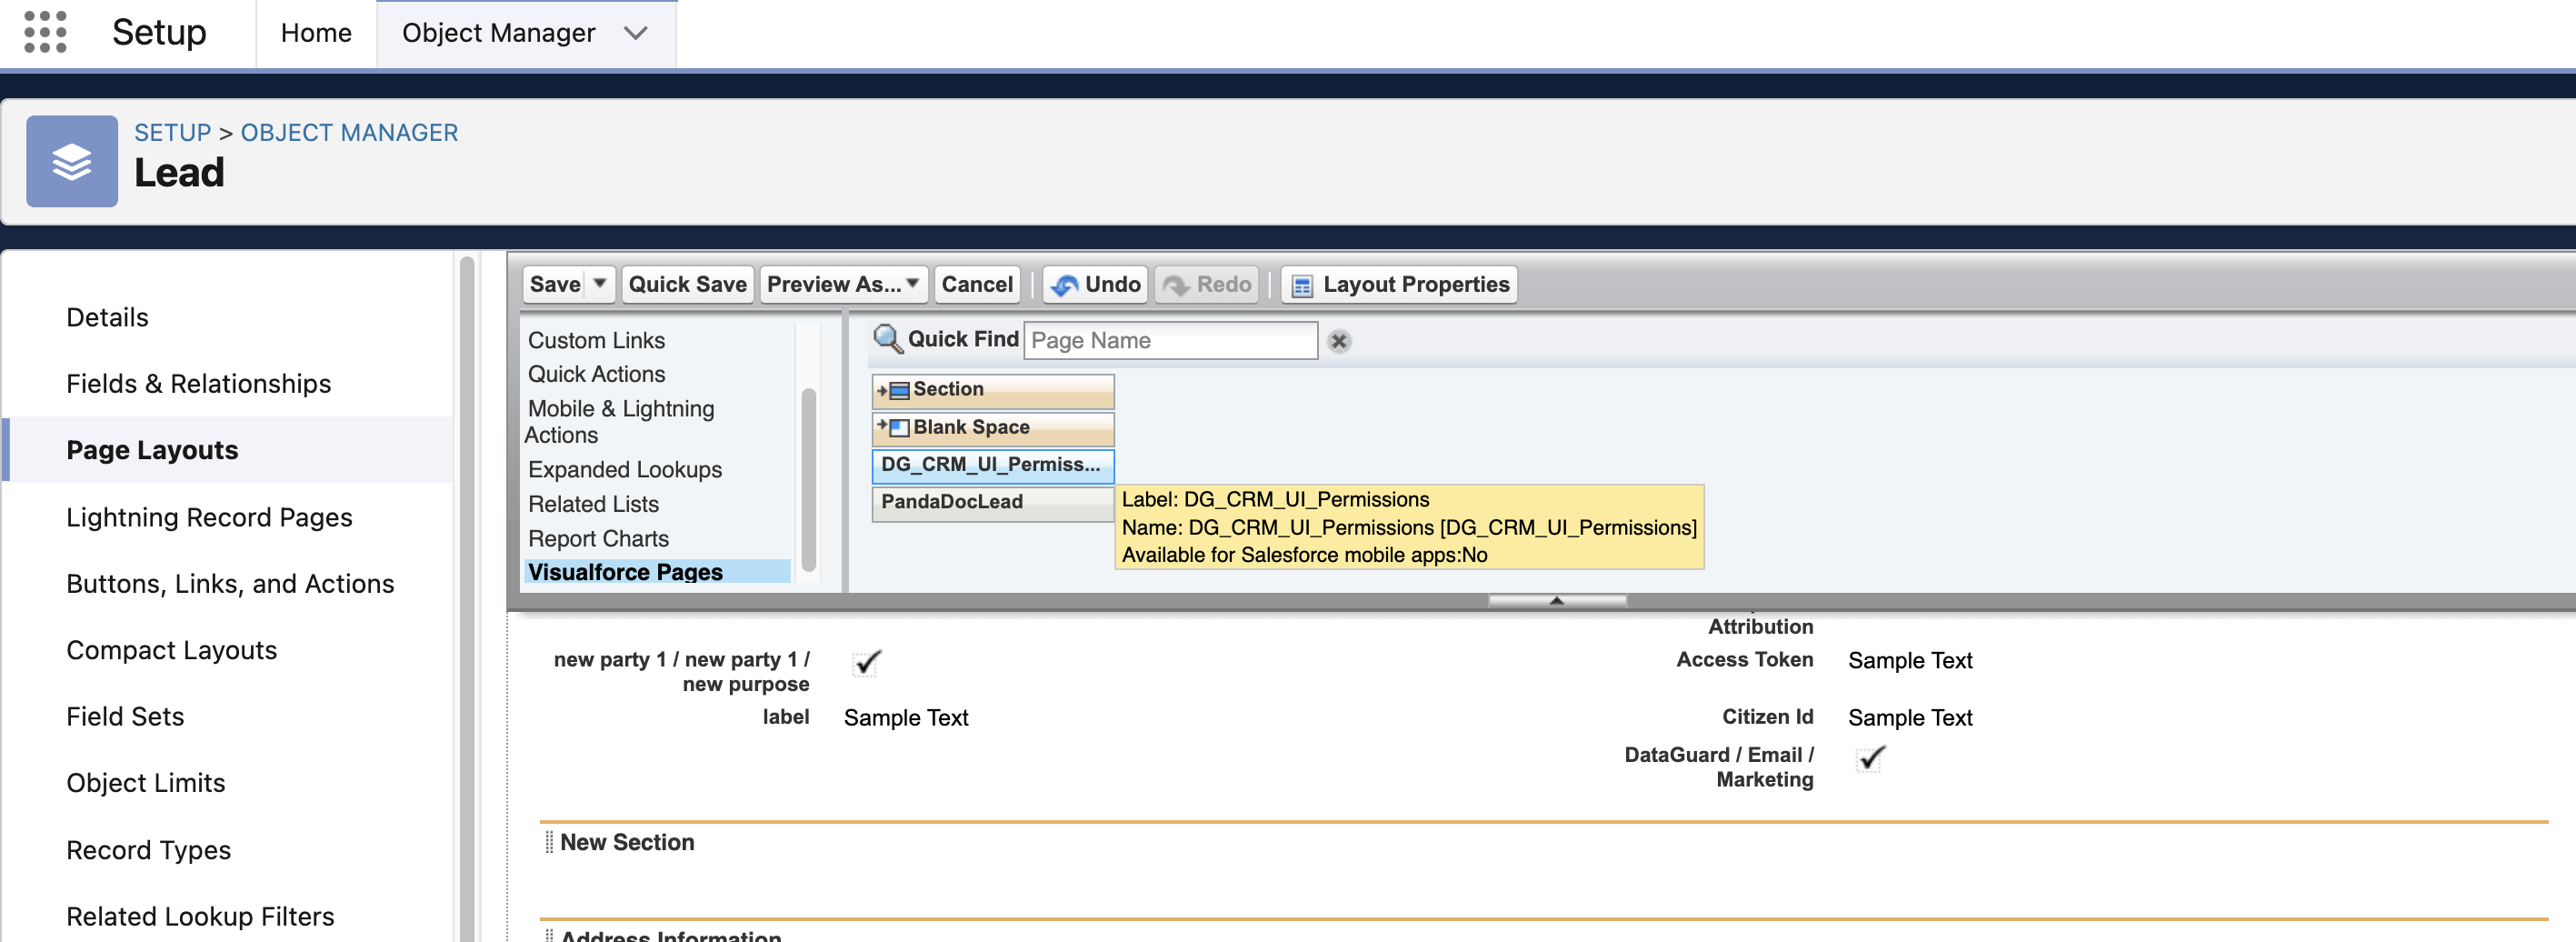
Search for the visual force page that are being used to contain the consent data from Dataguard.
-
Drag and drop Section that you want to be shown on the object's view, to your preferred location on the page layout. While configuring the section component,It is better to choose 1 column and give a name to the section.
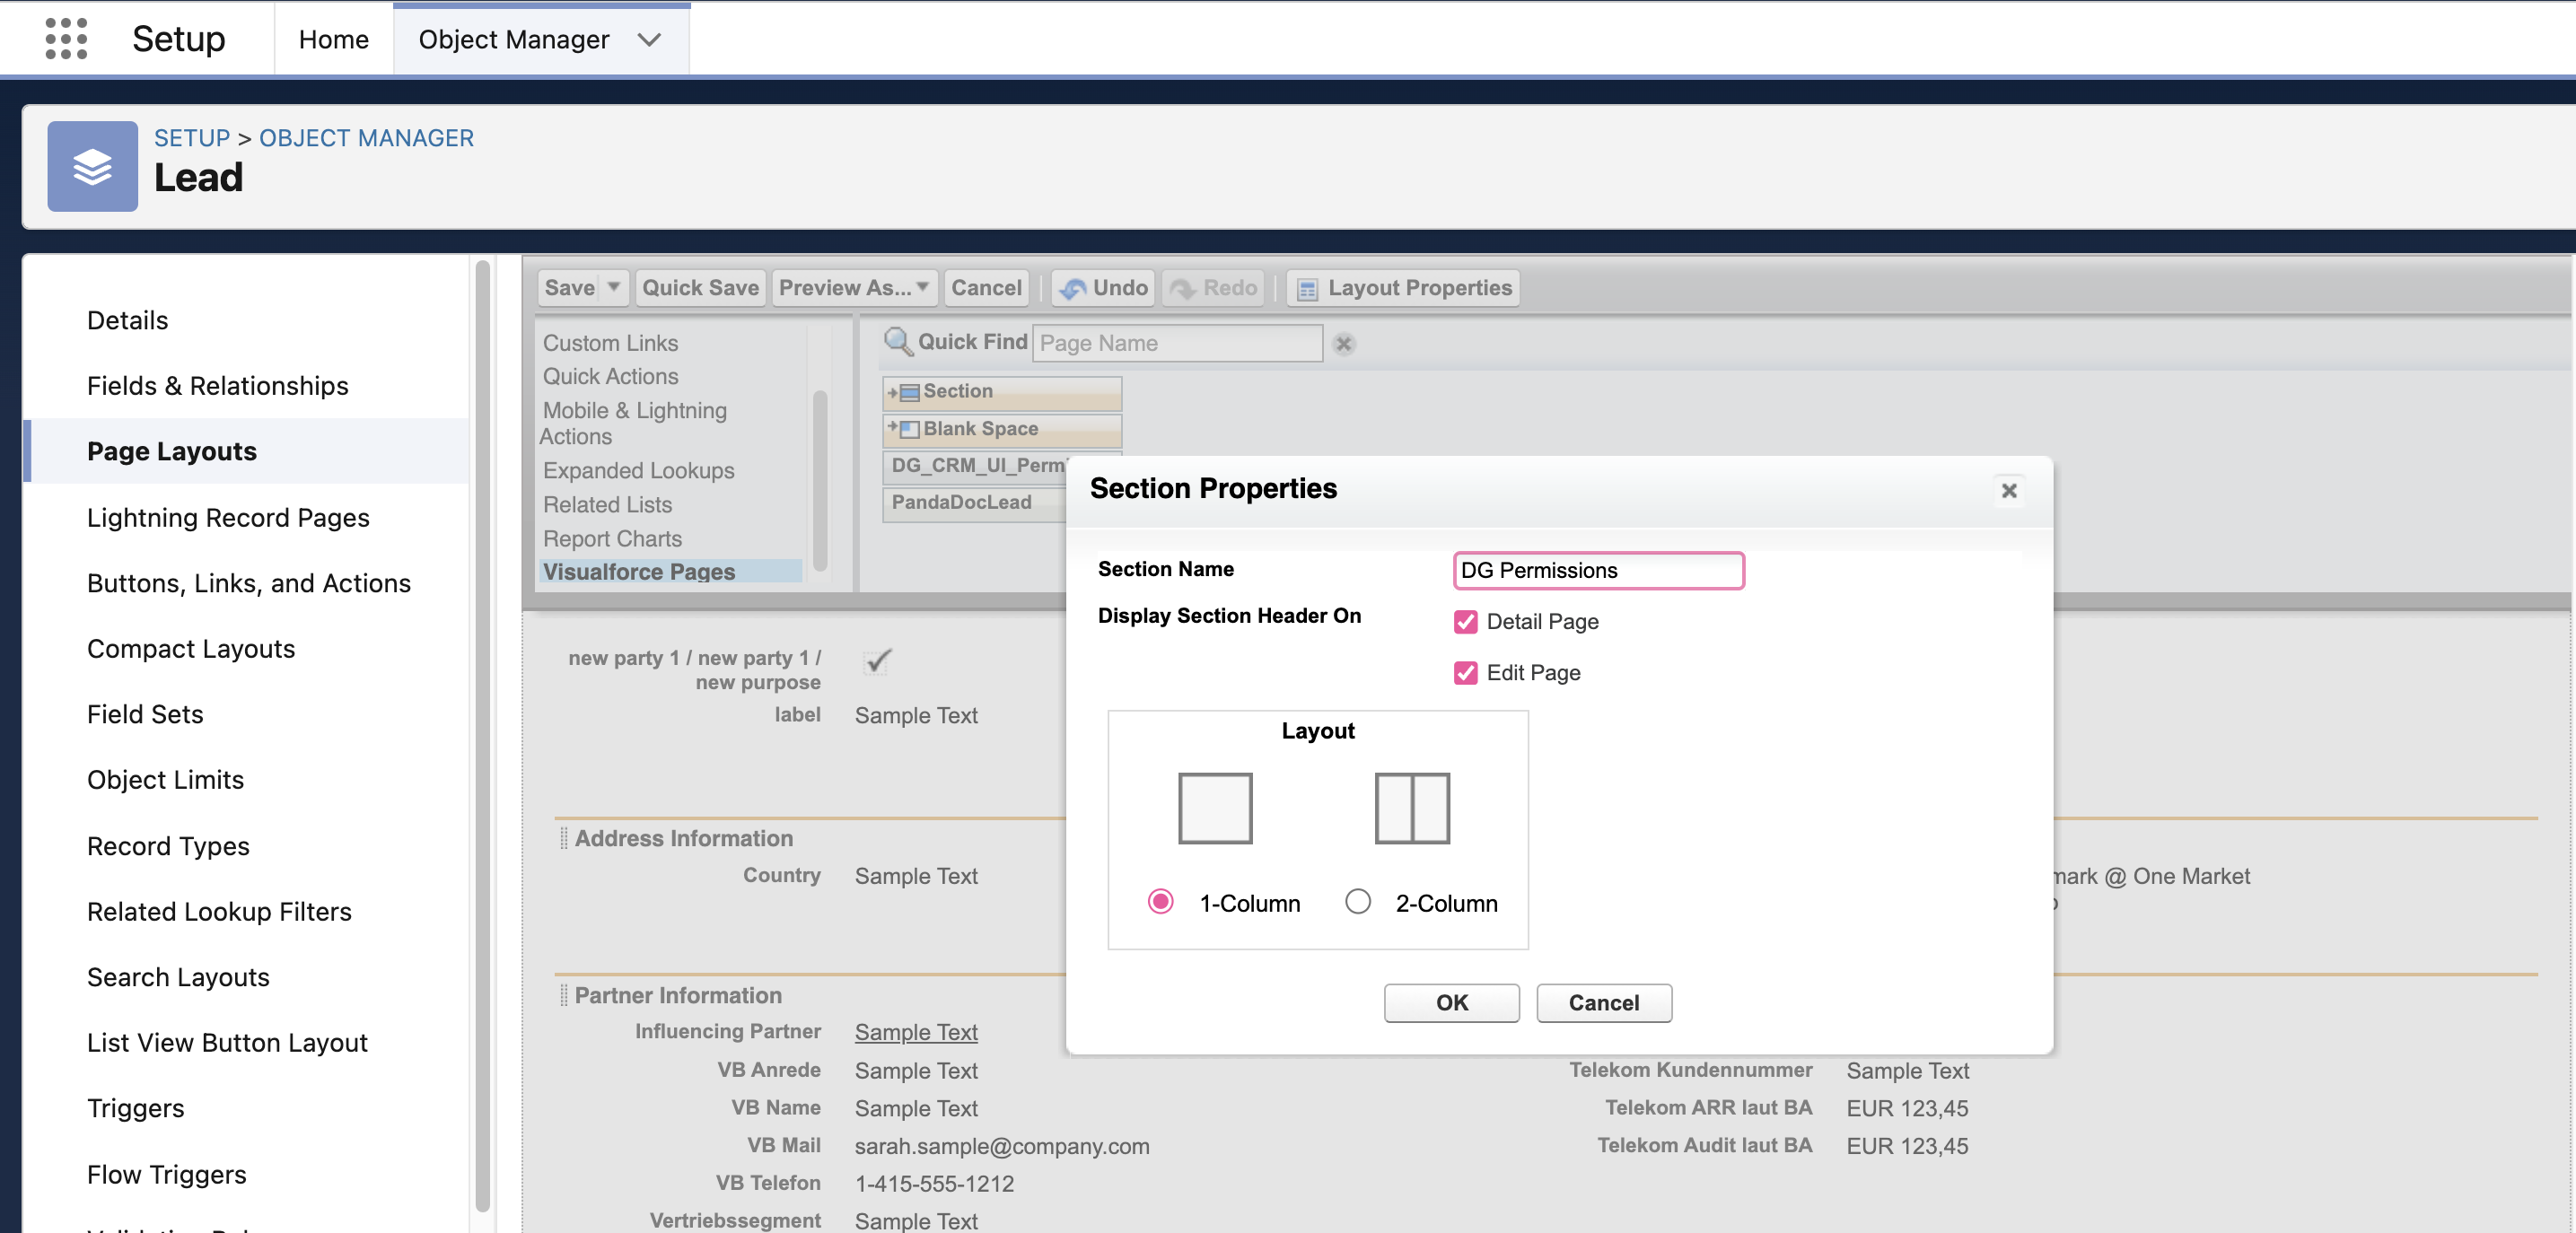
- Drag and drop DG_Permissions_UI visual force page into the section.
-
It is possible to configure specify height ( more than 400 is advisable) and check scrollable.
-
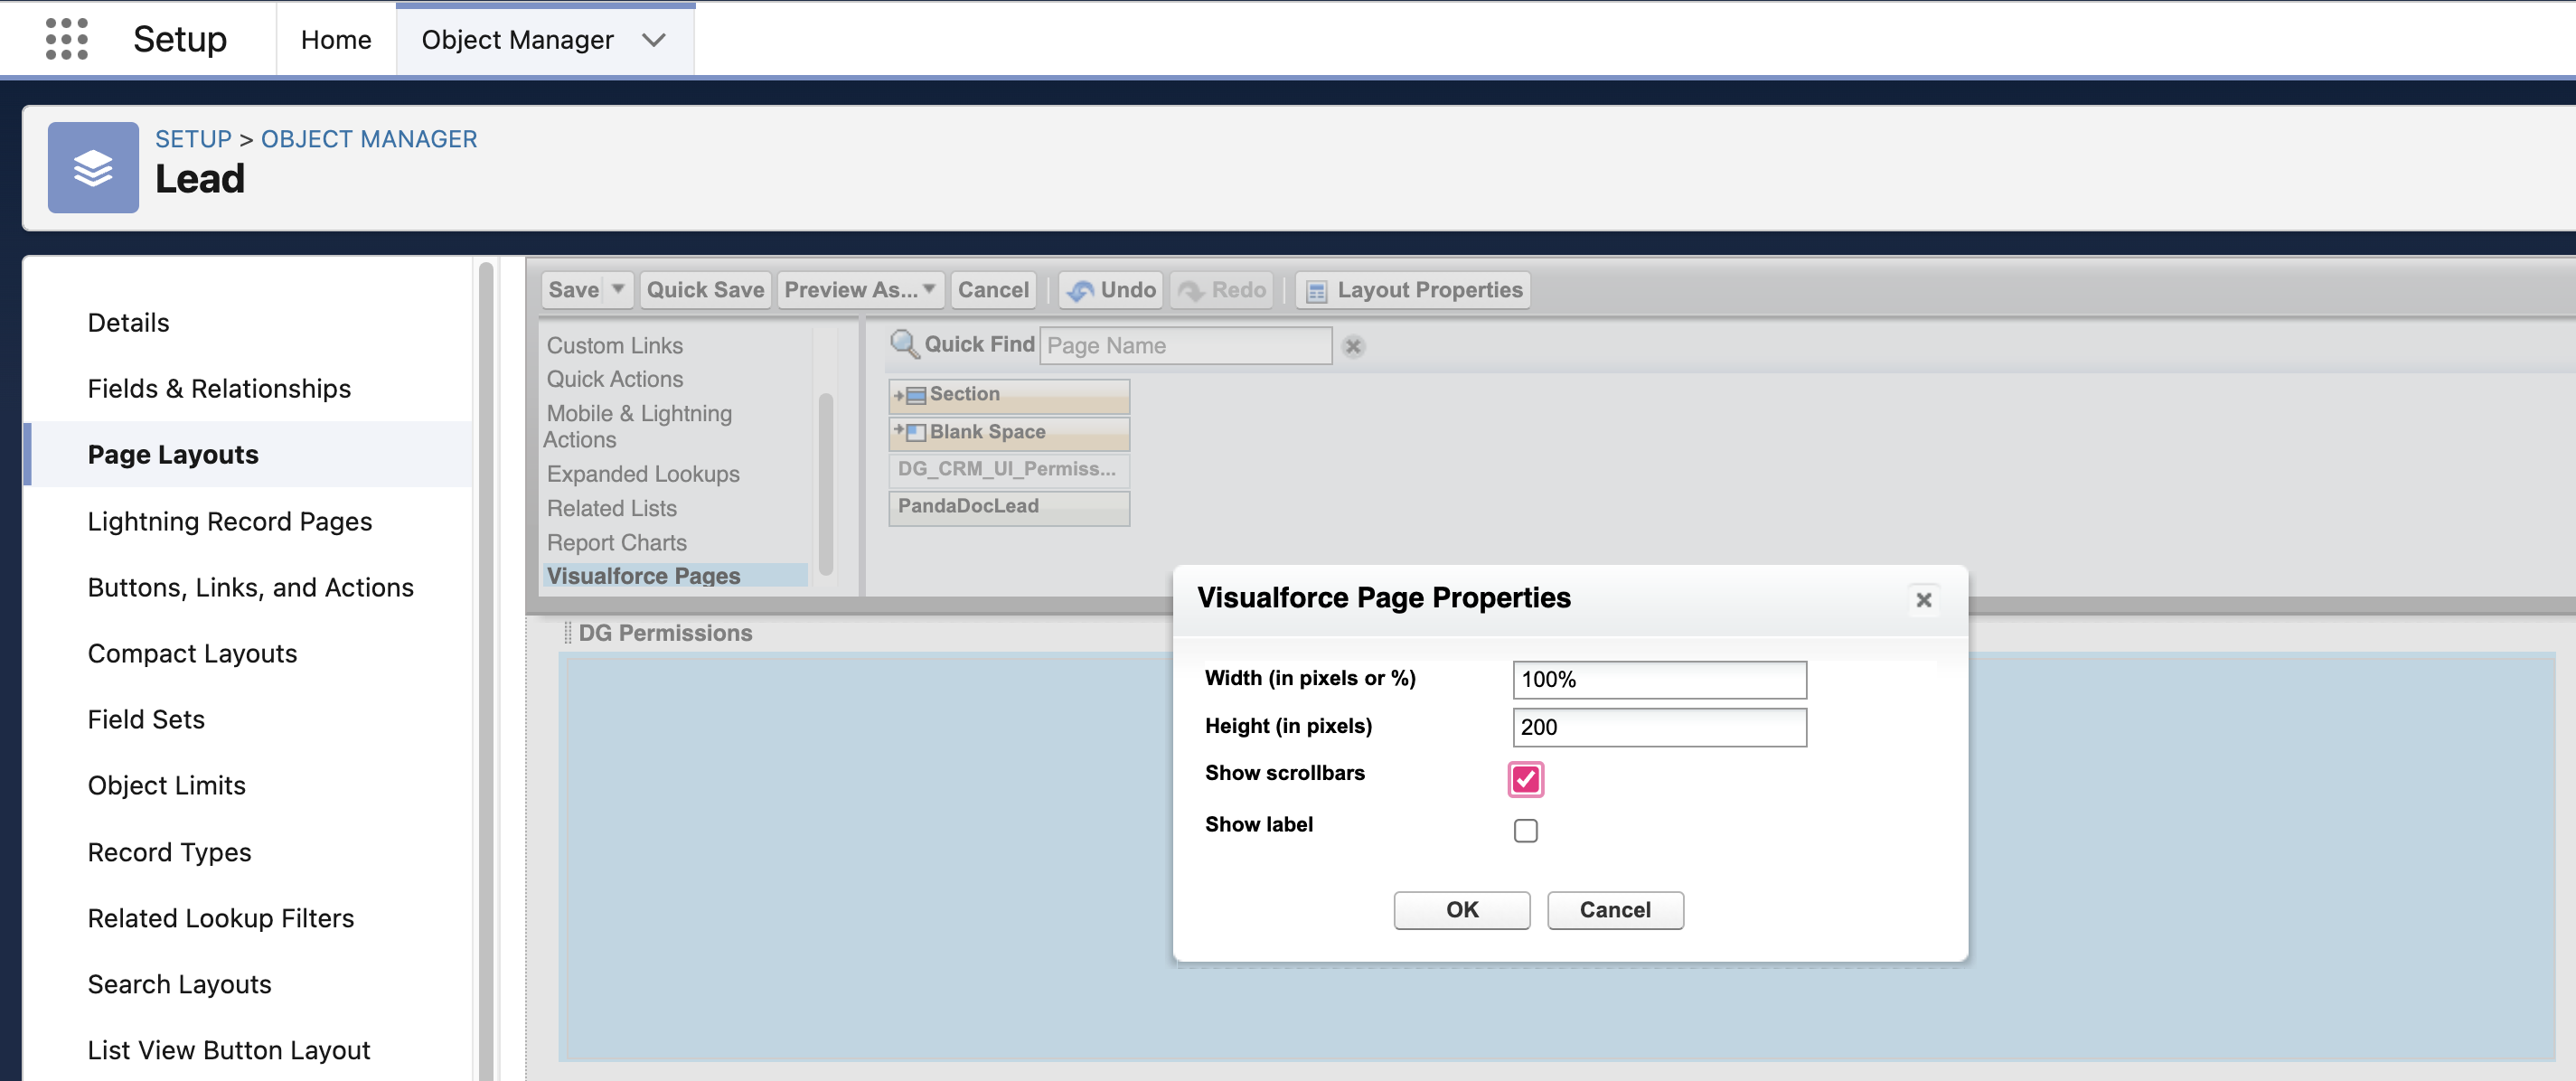
Click on Save to Page Layout.
-
The added visual force page will start appearing in your object view in your Salesforce target object (Contact/Lead) after a minor wait time.
Updated 2 days ago