Auth0 Integration
Dataguard provides an integration to extend Auth0's universal login to include collection of consent as part of the login flow.
Please note DataGuard Consent & Preference Management was formally known as Consentric by MyLife Digital. We are in the process of updating all references to DataGuard in the platform, so you will see both names used inter-changeably until this work is complete.
How It Works
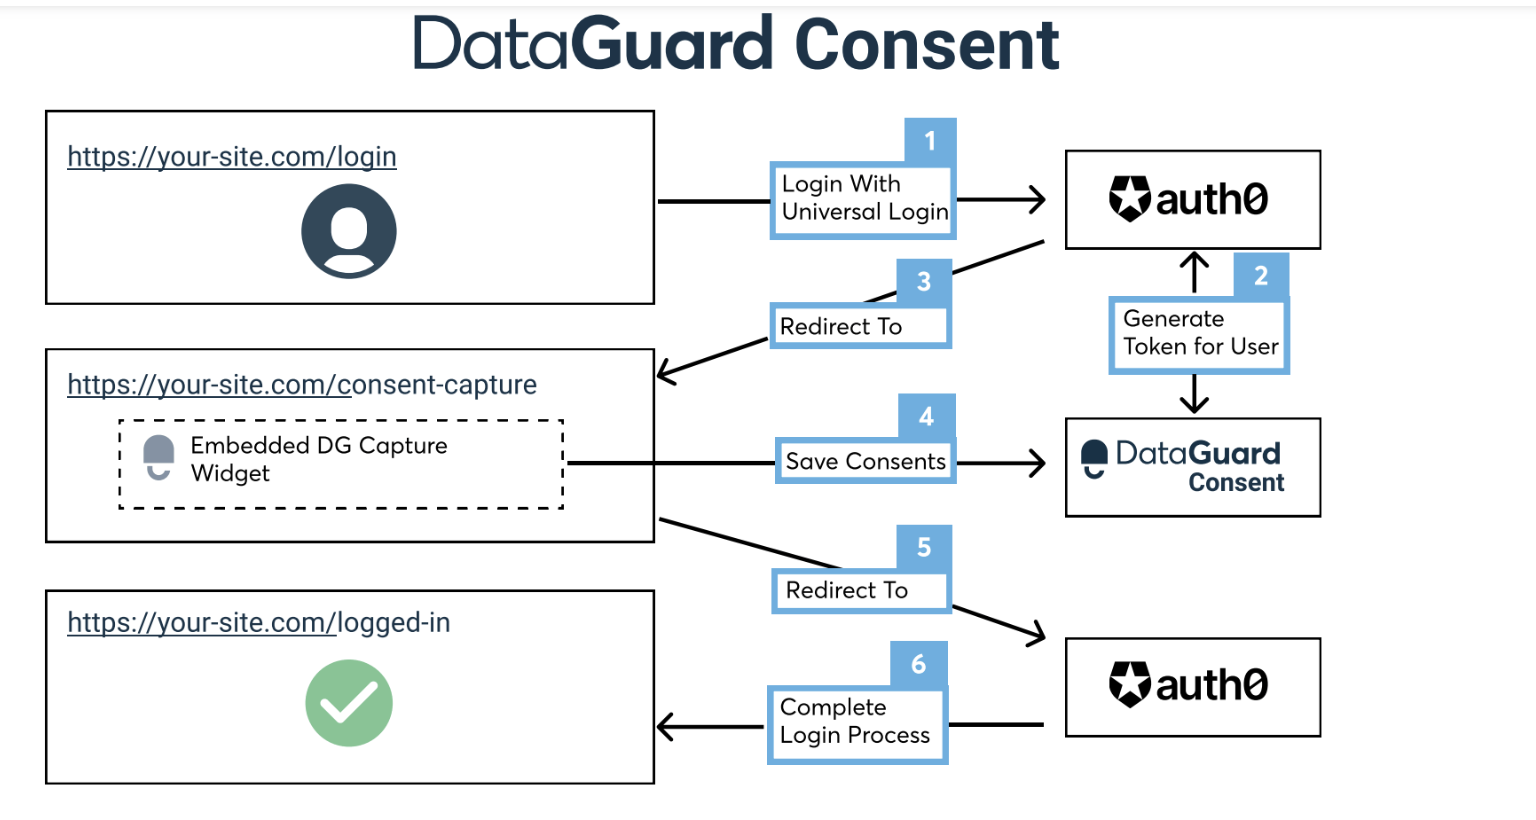
The diagram above shows how authenticating with Auth0 can be extended to include a redirect to a page containing a DataGuard widget.
The authenticating user can then interact with the widget recording their permissions in a progressive manner.
On submission, the Auth0 authentication flow completes.
User app_metadata
app_metadataOnce enabled for a tenant an entry will be created in the user's app_metadata on login.
In order to reflect a user's consents for the login flow, a token is generated and stored for a user on login.
This token is stored in the user's app_metadata under the namespace dataguard.
The integration will then pass this value to the associated web page by appending the value to the URL
https://yoursite.com/consent-capture?token=5cbf86968b08b7f45e454b39bff35e93
The integration will manage all aspects of this for you but adequate space will be needed in app_metadata to accommodate the token and expiry for the user.
Installation
Pre-Requisites
- An active Auth0 account (you can sign up for free here)
- A DataGuard Consent & Preference Management instance. To sign-up, go here and complete the submission form (we will recreate on the DataGuard website shortly).
- A webpage where all users are redirected to at the point of login and where the Progressive Widget can be embedded into. You can use a DataGuard hosted page if you wish, this is created for you at sign-up (the URL is provided in your welcome email).
- DataGuard API Client details (sent to you in your sign up email)
Setup page with progressive widget
The example flow works by redirecting out of Auth0's login flow to a custom webpage containing a Progressive widget. The custom webpage needs to include the following Javascript snippet to support the Auth0 flow.
N.B. Ensure you populate the config object with relevant properties from your DataGuard CPM application and Auth0 tenant.
Config Value
The values of your Dataguard CPM application ID, client ID and client secret will be in your welcome emails. Please contact [email protected] if you have any issues.
<script>
  const urlParams = new URLSearchParams(
    window.location.search,
  );

  const config = {
      elementId: <SELECTOR ID TO BIND THE CONSENTRIC WIDGET TO>,
      templateId: <CONSENTRIC TEMPLATE ID>,
      ruleId: <CONSENTRIC RULE ID>,
      auth0Domain: <ORGANISATION AUTH0 DOMAIN>
  };

  // e.g.
  // const config = {
  //     elementId: 'mld-prog-widg',
  //     templateId: 'SVxfz4fUbnM',
  //     ruleId: 'jMDMcKcV8Th',
  //     auth0Domain: 'lightningenergy.eu.auth0.com'
  // };

  const token = urlParams.get('token');
  const auth0State = urlParams.get('state');
  const returnUrl = 'https://' + config.auth0Domain + '/continue?state=' + auth0State;

  const onEmptyLoad = () => {
    console.log('EMPTYLOAD')
    window.location.href = returnUrl;
    //window.location.replace(returnUrl);
  };

  const onSuccess = () => {
    console.log('SUCCESS')
    //window.location.href = returnUrl;
    window.location.replace(returnUrl);
  };

  const events = {
    onSuccess,
    onEmptyLoad
  }

  window.addEventListener('load', function () {
    ProgressiveWidget.load({
      templateId: config.templateId,
      ruleId: config.ruleId,
      id: config.elementId,
      token,
      consentricLogo: true,
      display: {
        location: 'center',
        closeOnSubmit: false,
        displayCancelButtons: false
      },
      events
    });
  });
</script>
<script src="https://scripts.consentric.io/progressive-consent.min.js"></script>
Add the Auth0 Action
- Select Add Integration (at the top of this page).
- Read the necessary access requirements and click Continue.
- Configure the integration using the following fields:
- Auth Host: The URL to authenticate against for your DataGuard API token, like
https://sandbox-consentric.eu.auth0.com - API Host: The Dataguard API host URL, like
https://sandbox.consentric.io - Audience: The name of the Dataguard API being called, like
https://sandbox.consentric.io - Client ID: The Dataguard ClientId issued to you
- Application ID: The Dataguard ApplicationId issued to you
- Redirect URL: The URL of the page containing the Progressive widget built above
- Client Secret: The Dataguard ClientSecret issued to you
Finally, proceed with the following steps:
- Click Create to add the integration to your Library.
- Click the Add to flow link on the pop-up that appears.
- Drag the Action into the desired location in the flow.
- Click Apply Changes.
Updated 9 months ago