Data Import
Import customer records, and permission and consent state(in progress)
Overview
The DataGuard Data Import UI has been designed to simplify the initial setup and ongoing synchronisation of your customer records alongside their permission and preference transactions. The Import functionality removes the need to create citizens before applying permissions and preferences to them.
Import data
-
Login to the DataGuard consent & preference management platform
-
Go to the "DATA" section-> Click on "Import."
-
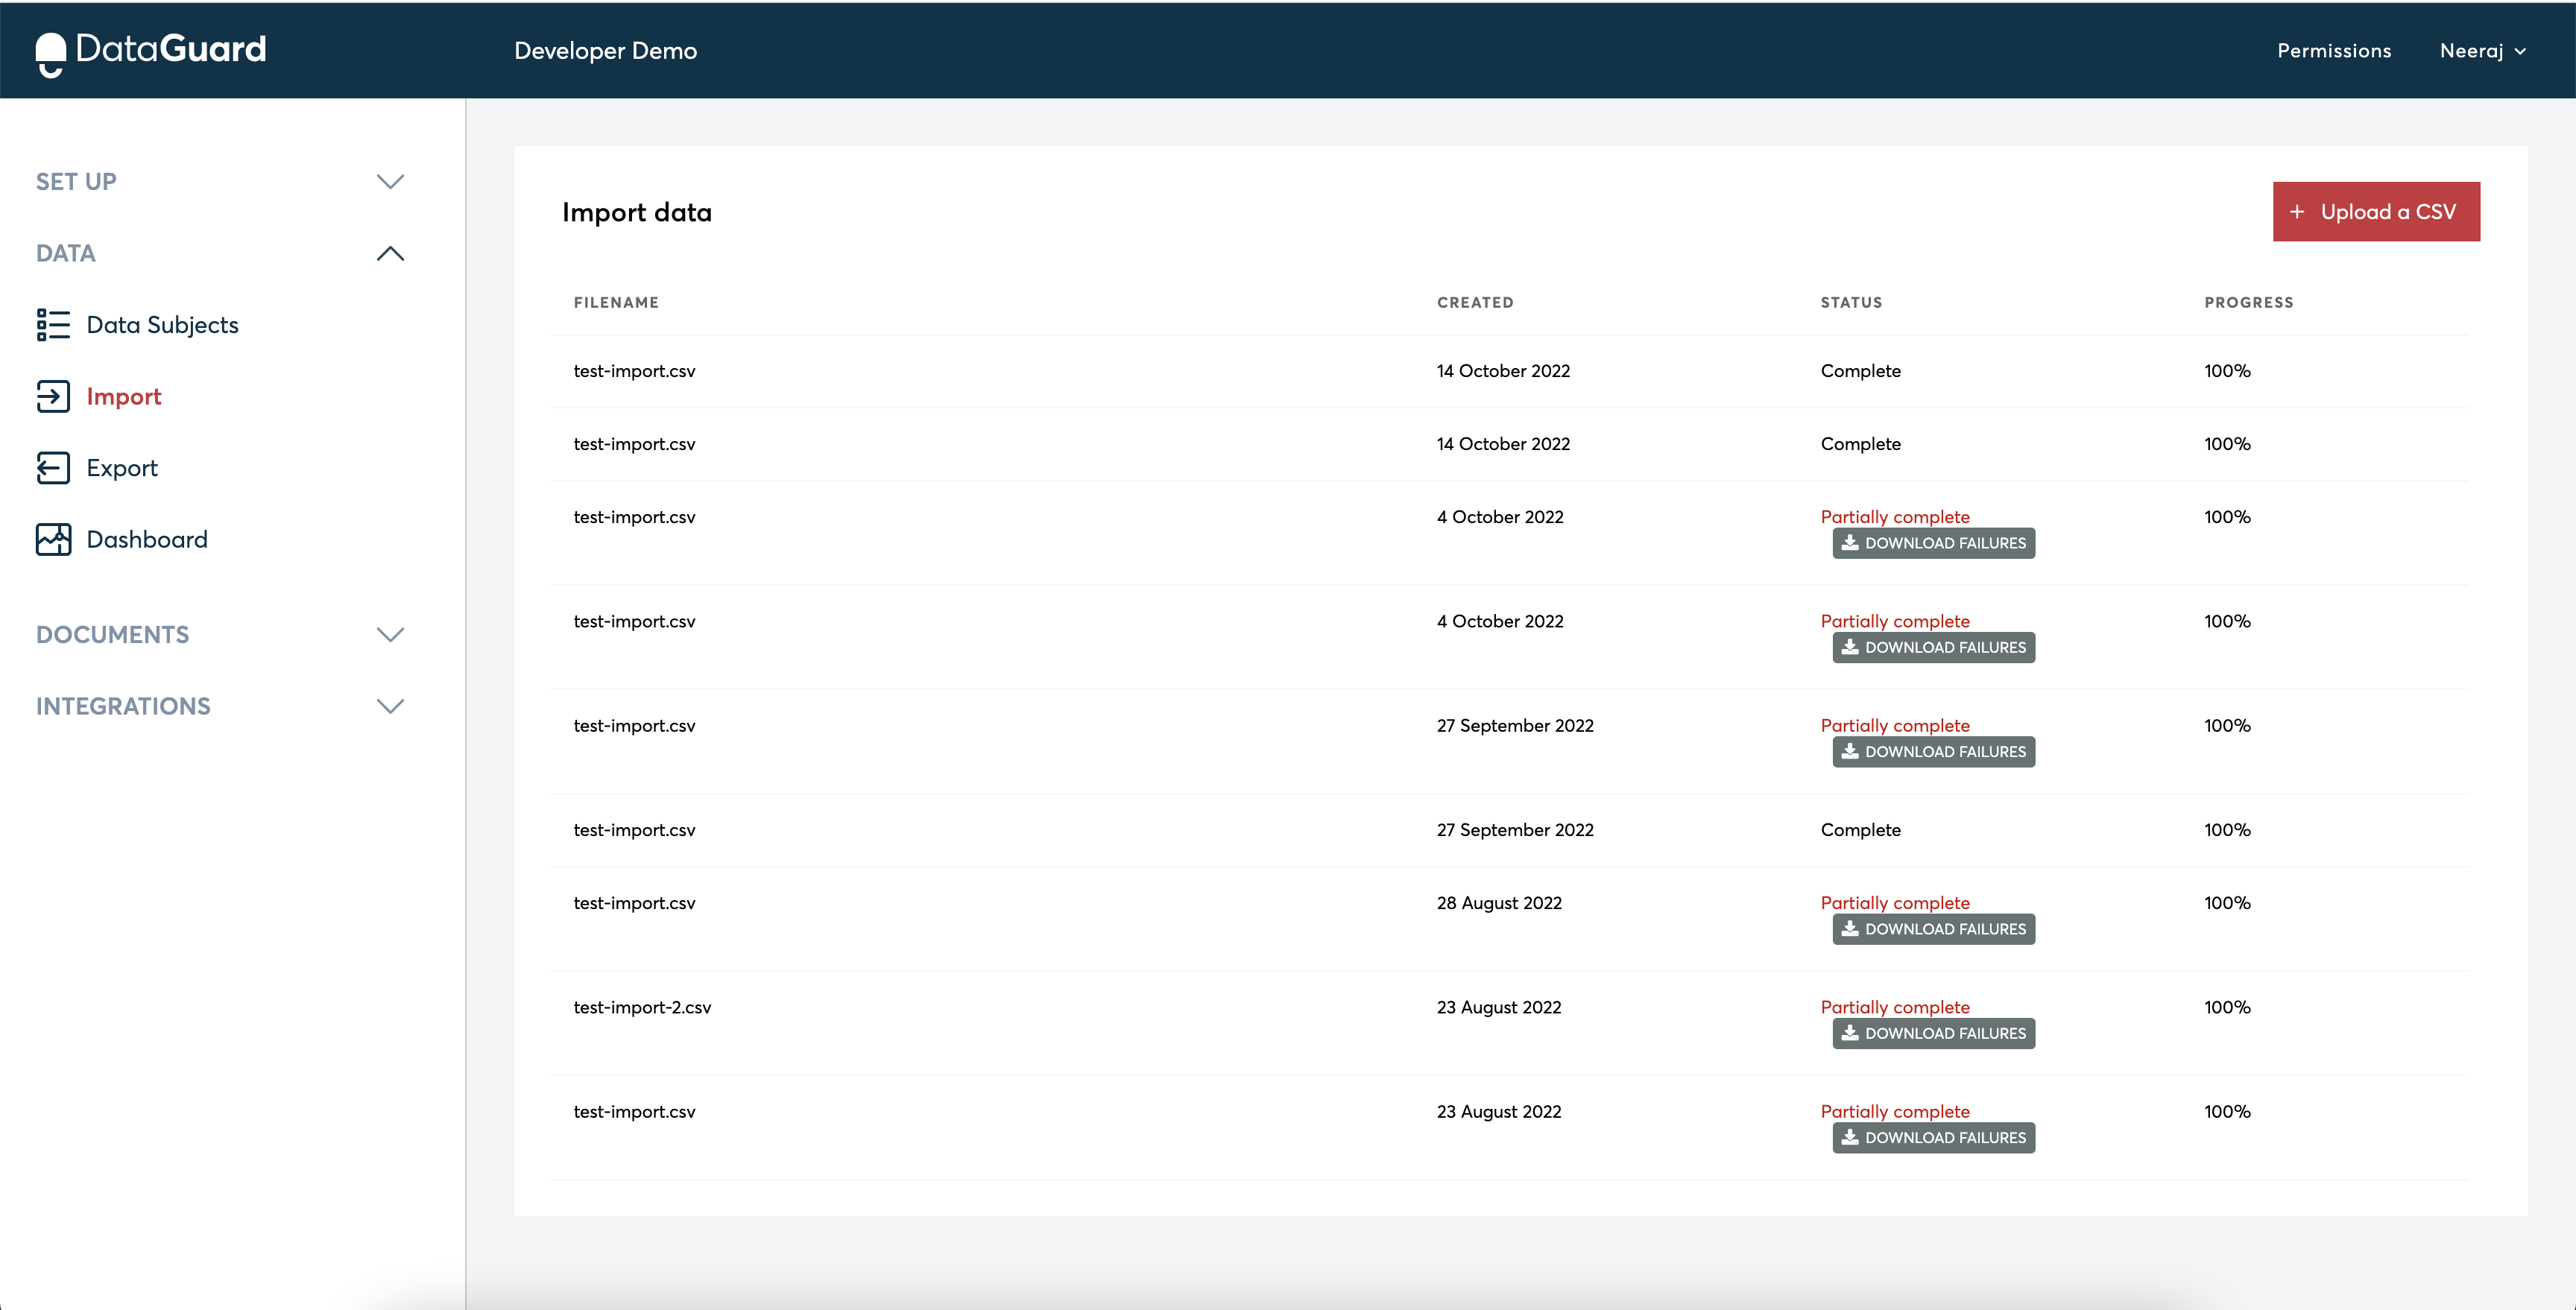
You will land on the page for data import. There, you'll find a table with imports done previously.
-
To create a new data Import, Click on the 'Upload a CSV' button
-
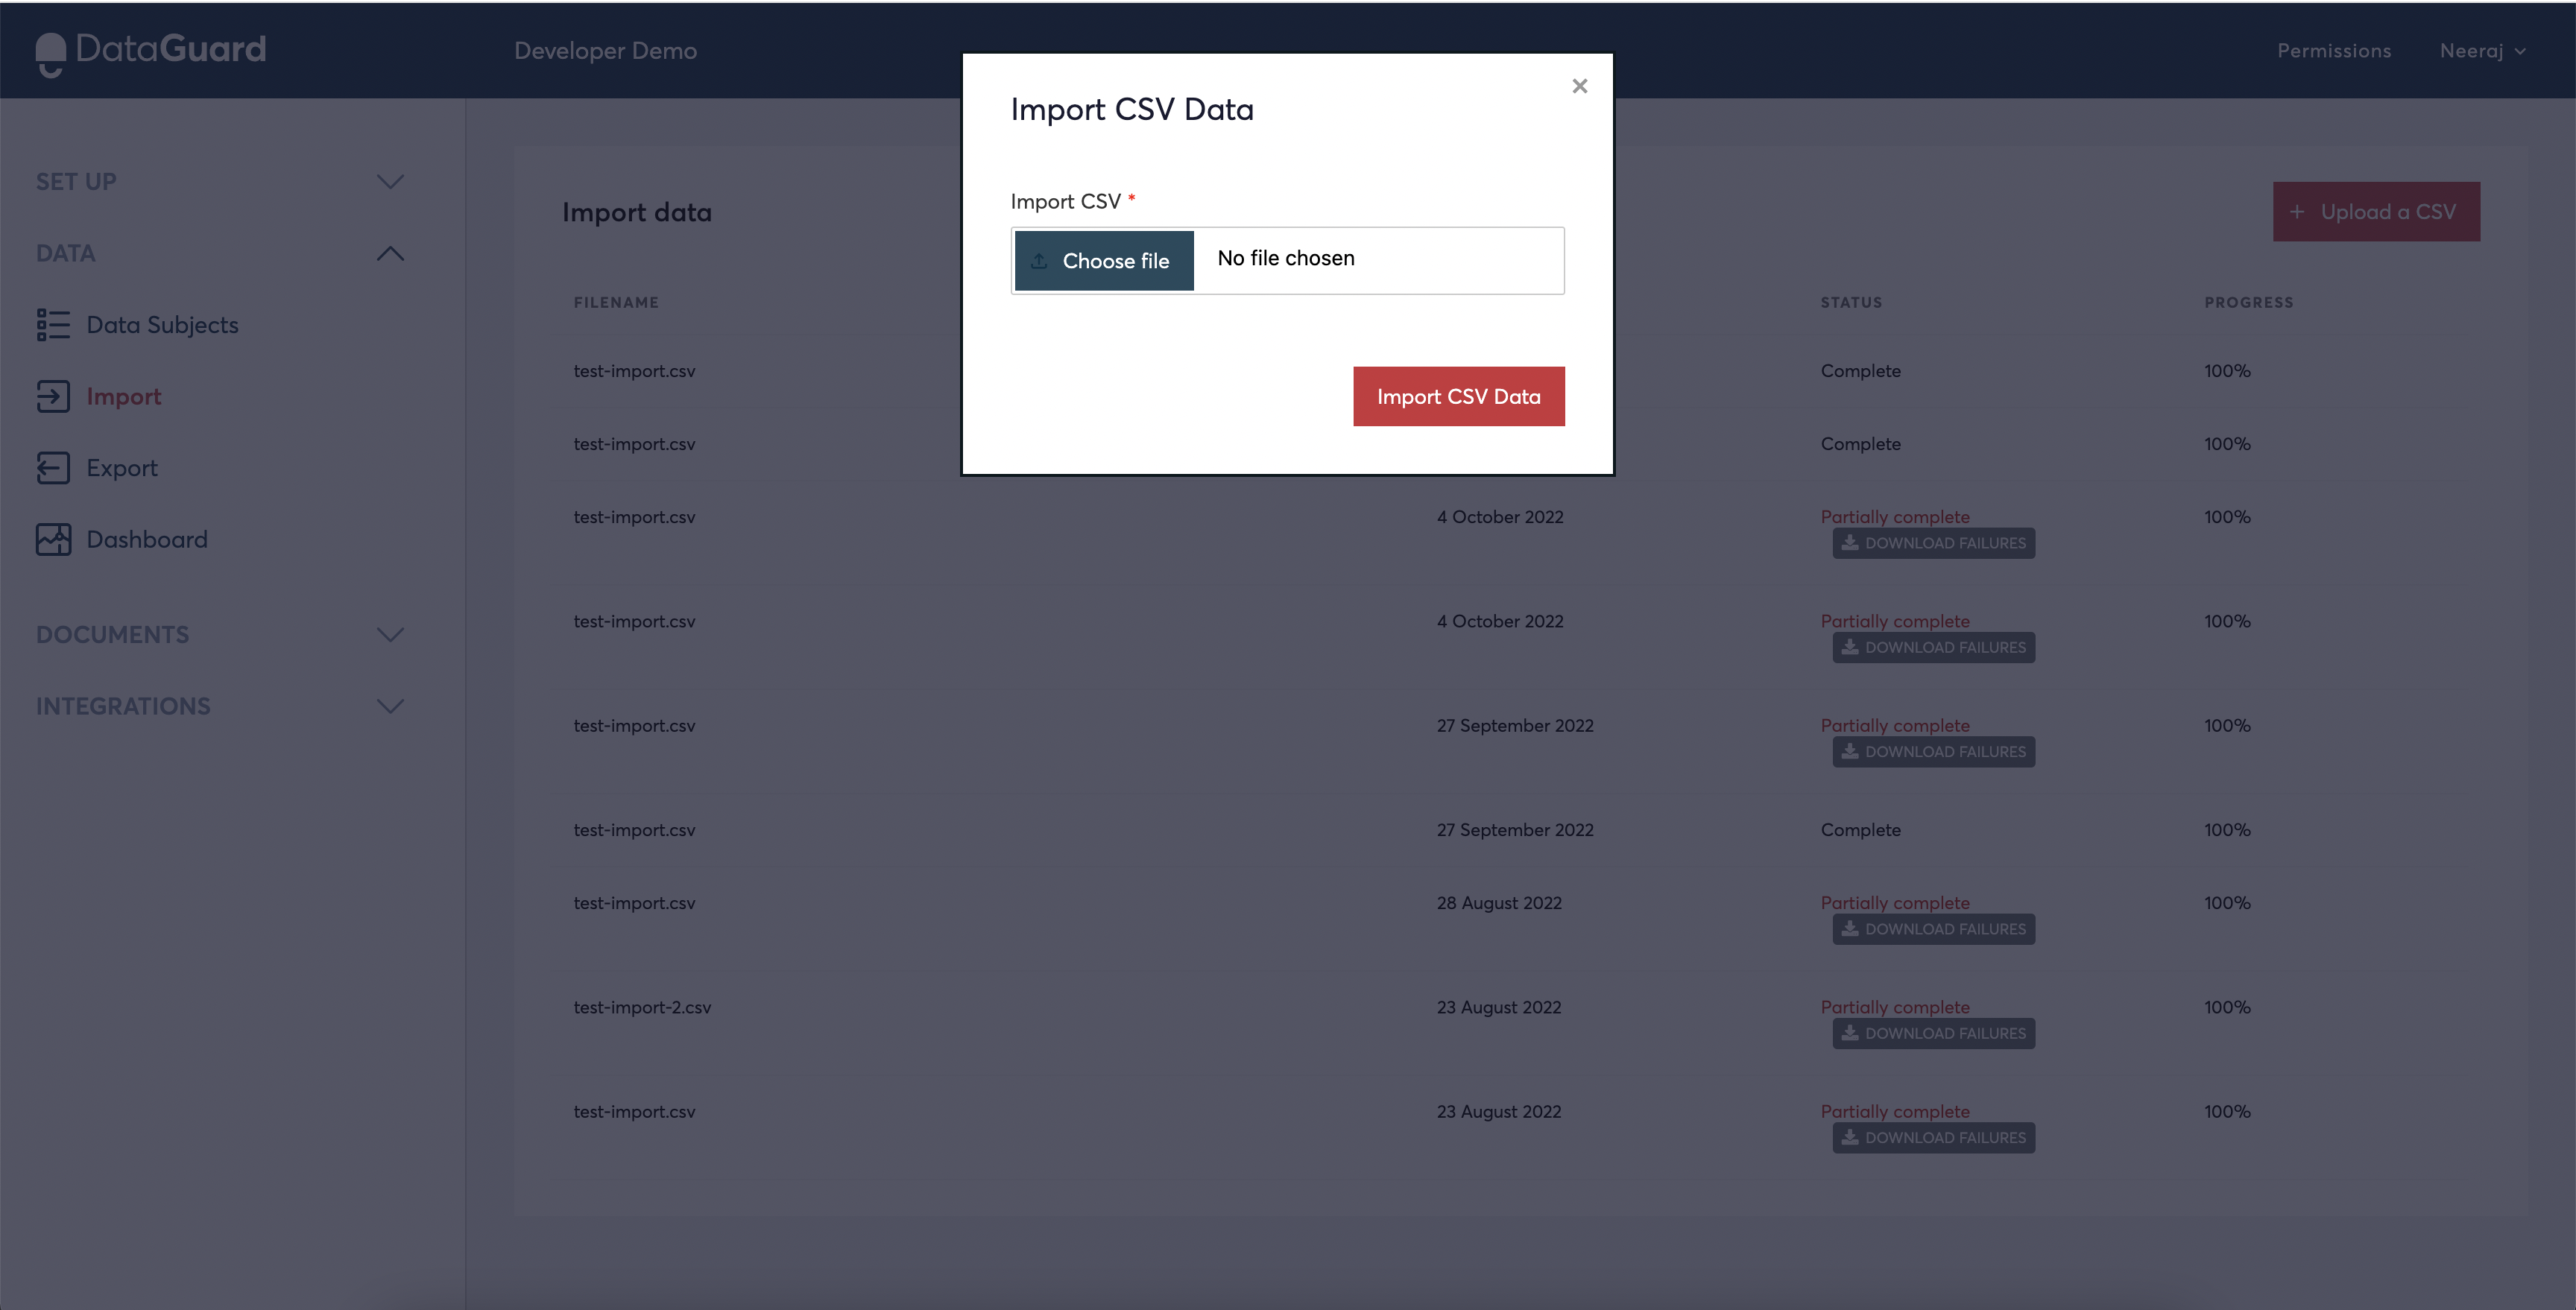
It will open a popup to upload a file
Max File Size
There is a maximum file size of 10MB. Files larger than this will be rejected by the UI, however the API will begin the import and fail when the maximum file size is reached.
- Simply create an Excel file with the
.csvextension, containing your customer's unique reference, along with their permission and preference transaction data. The process will create unique customer IDs also known as citizen "externalRef" in DataGuard terminology. Then it will apply the specified permission and preference transactions, and provide real-time feedback on the progress of each job.
The operation is designed to create transactions if they do not exist, or update the records if they are already present.
Option to import only citizens data
The system allows you to import only citizens' data in case you do not want to import any purposes or preferences.
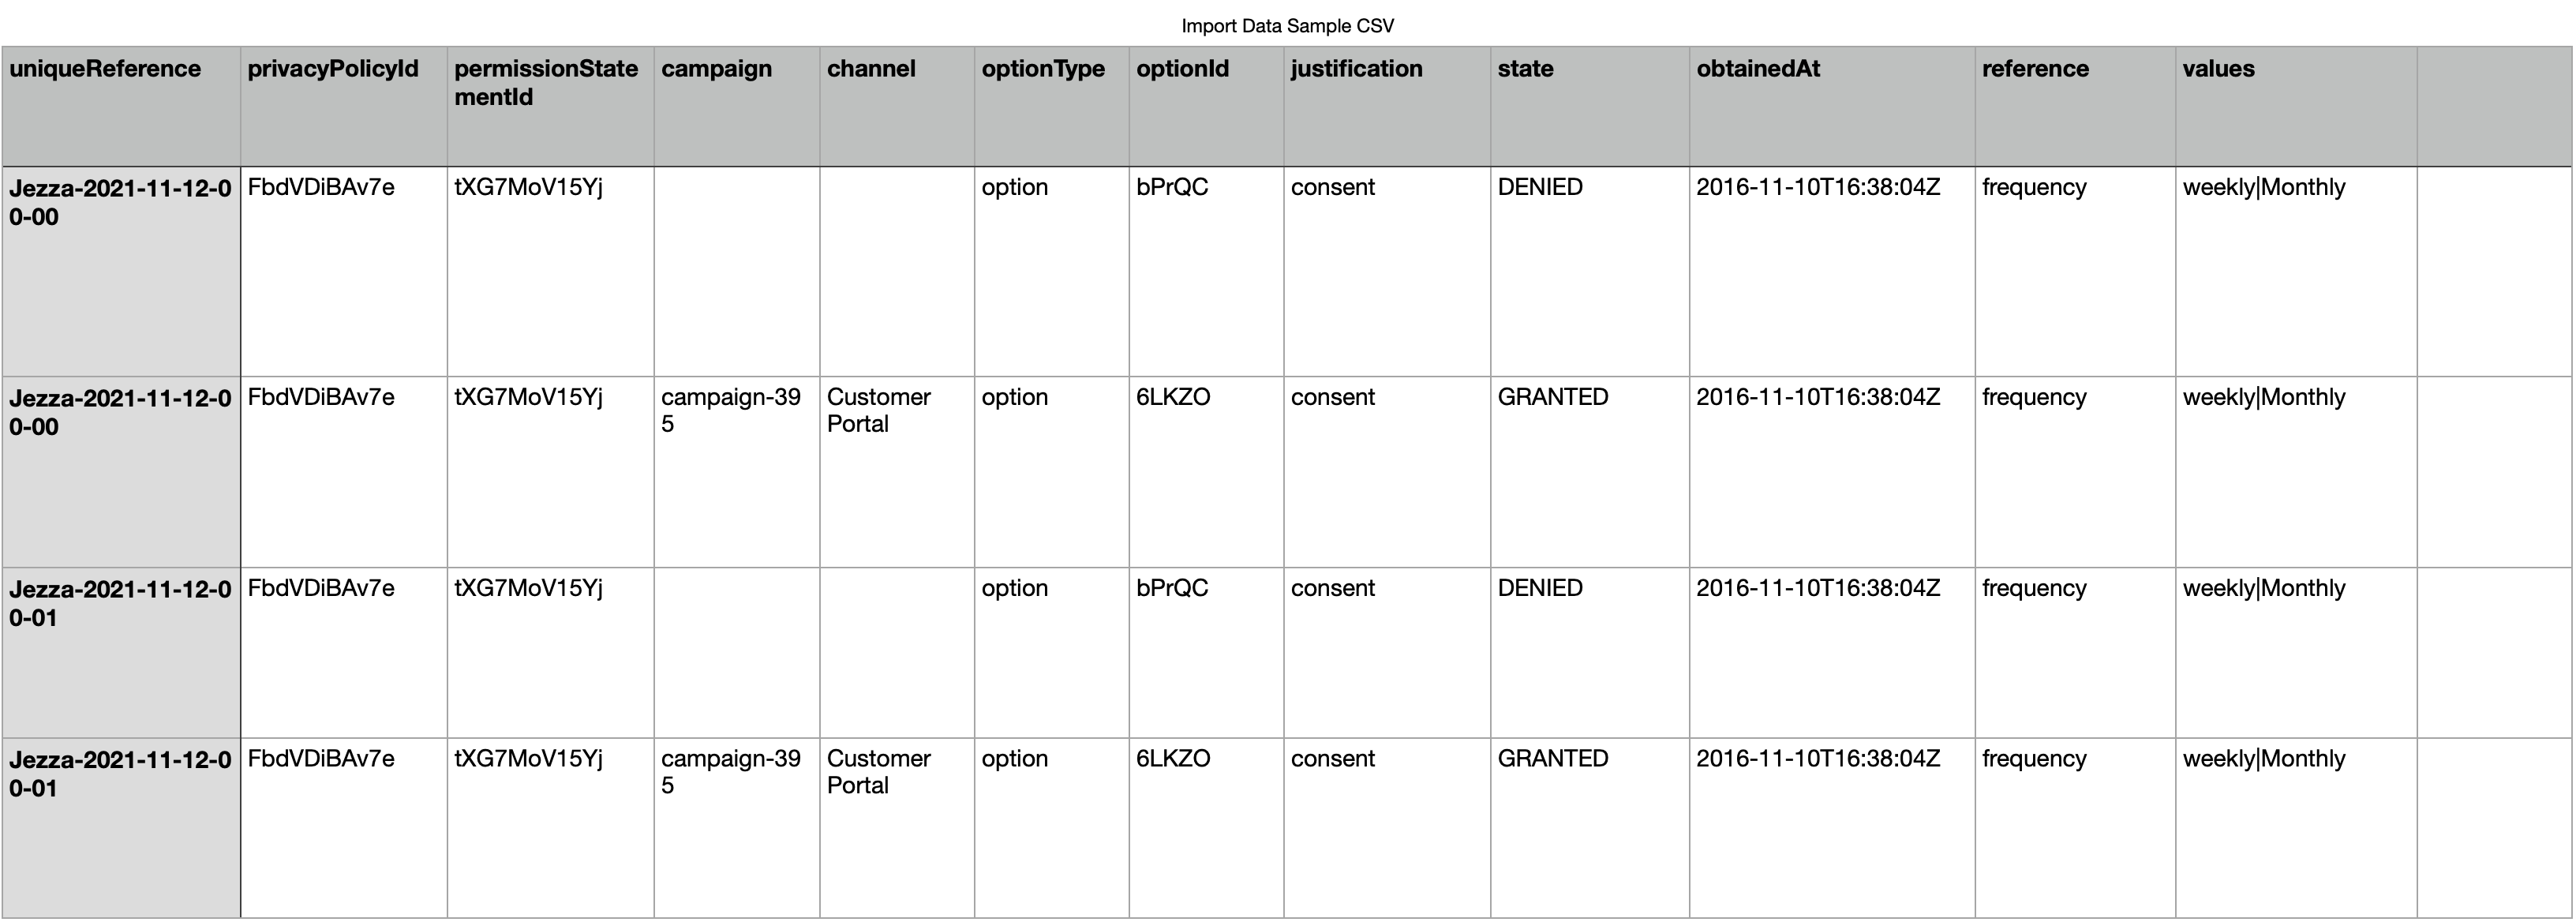
Sample CSV file :
Detailed information about each column can be found in this section.
- Upload this file and if it is successfully uploaded, a job will be added for it in the table with the status "Processing". Once the job is complete the status will be updated to 'Complete'
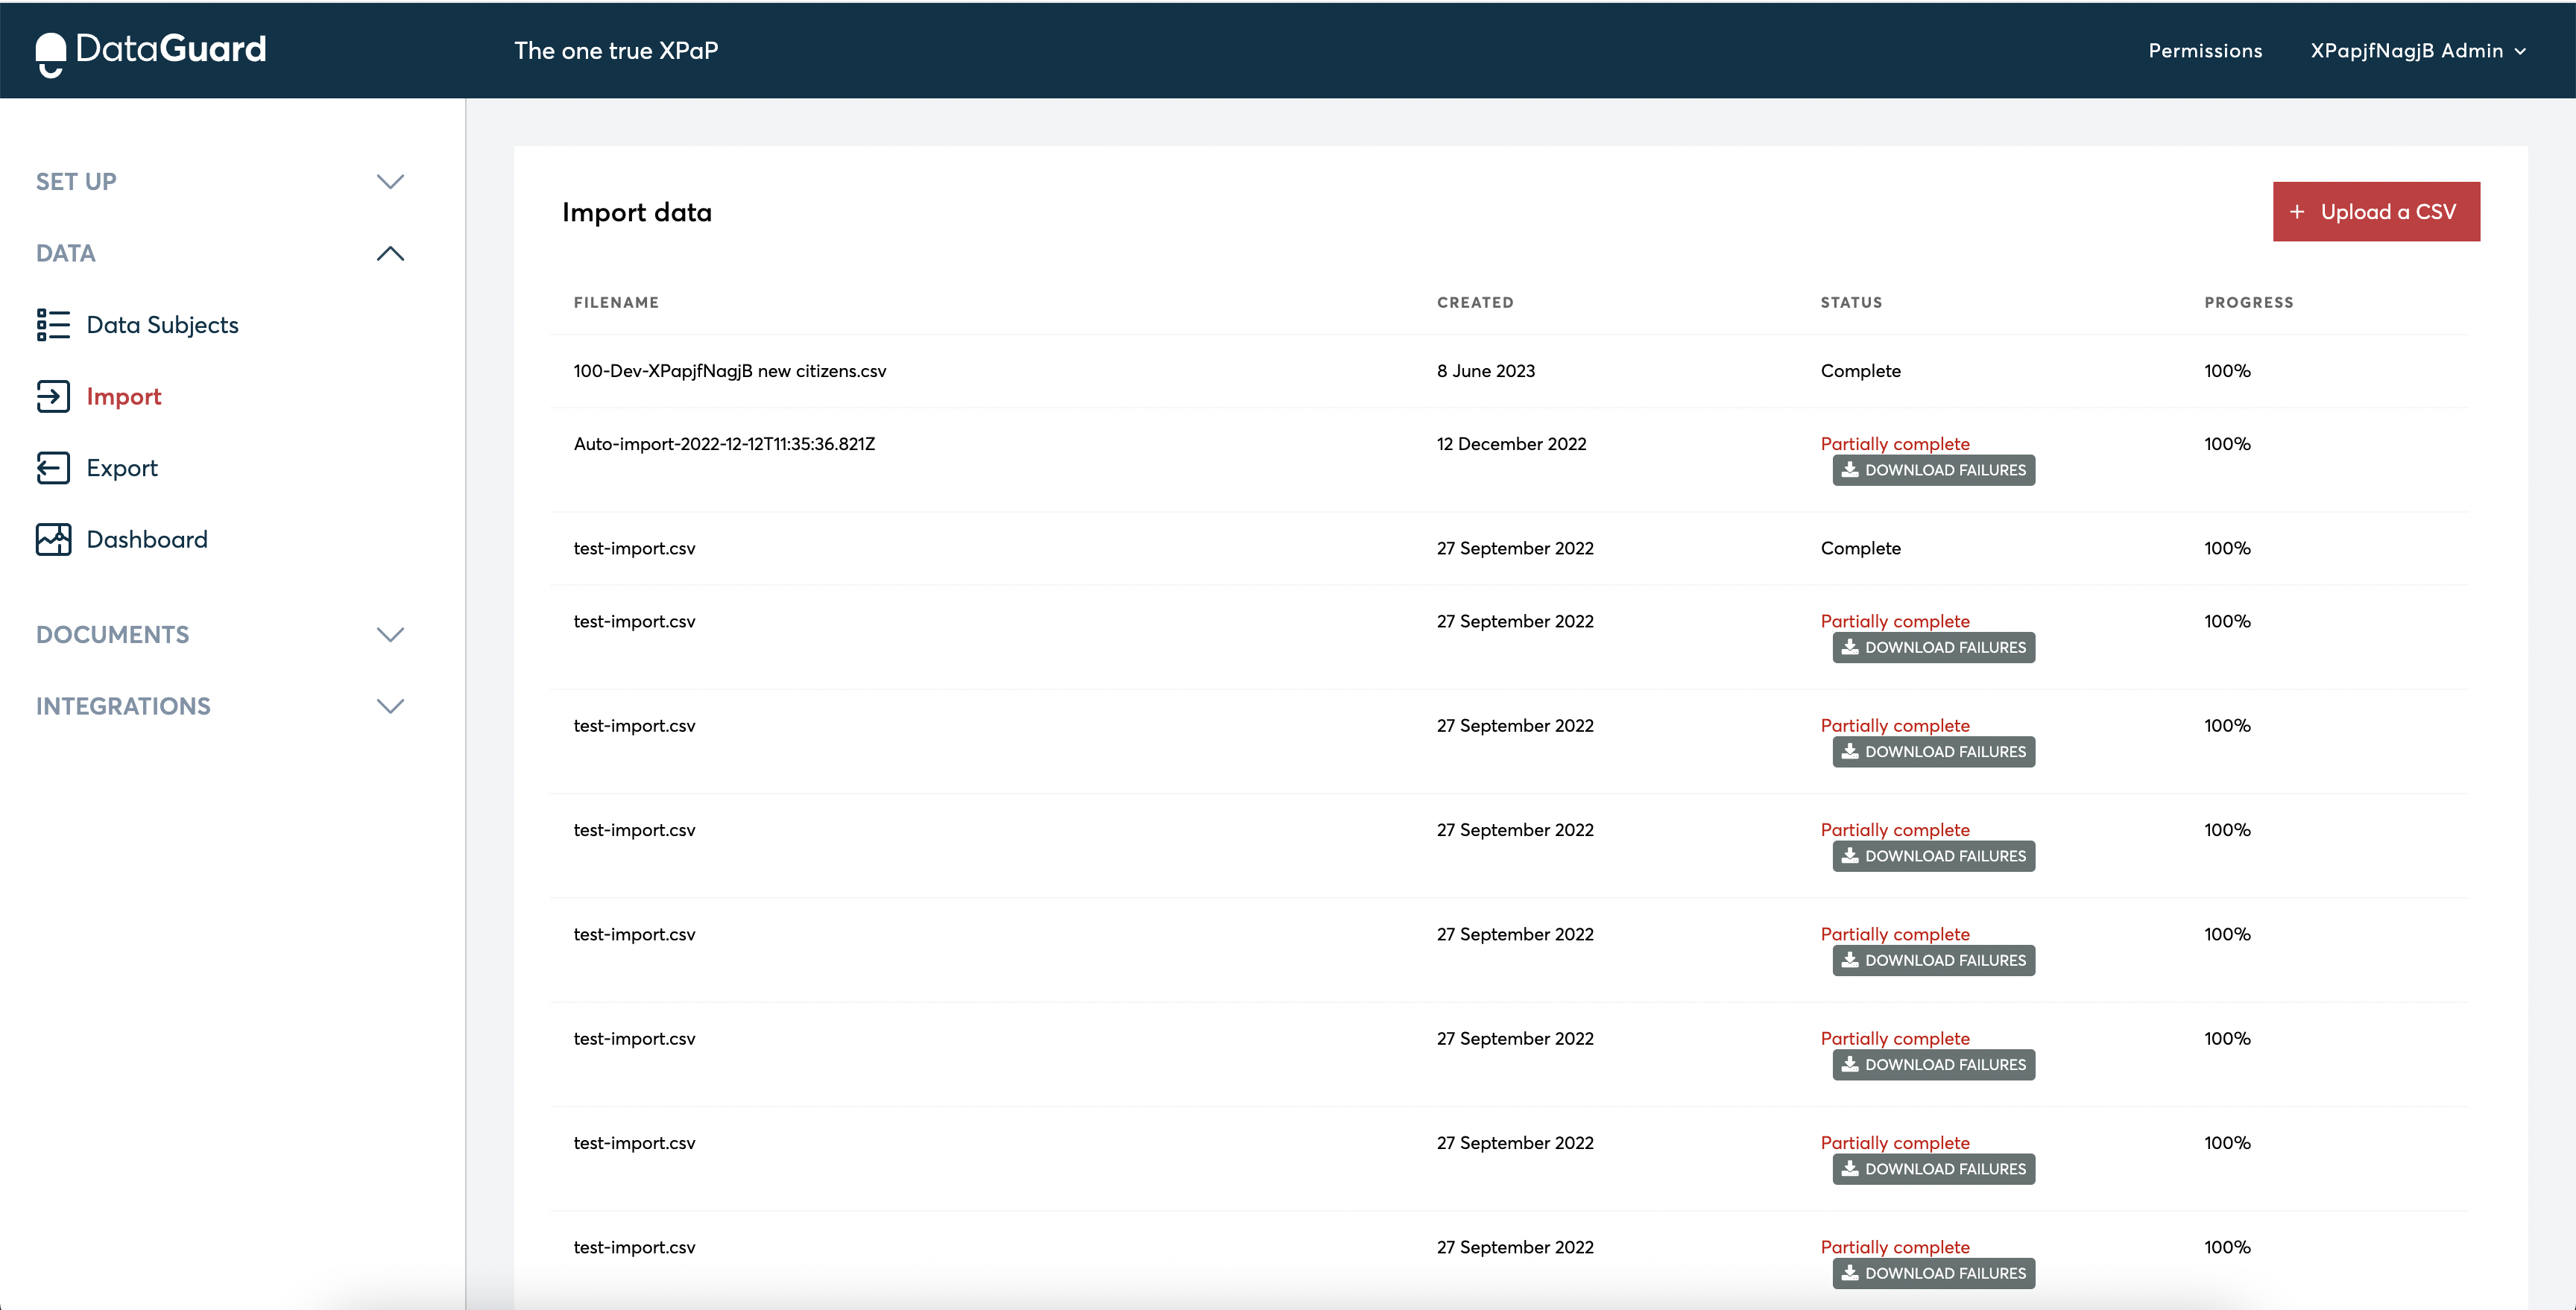
- Otherwise, any errors will be reported within a downloadable .csv file. To rectify these errors, simply download the file, check the source data, correct the errors, and resubmit those that failed for processing in a new .csv. Any which are not reported as failures were successfully imported, so should not be re-imported.
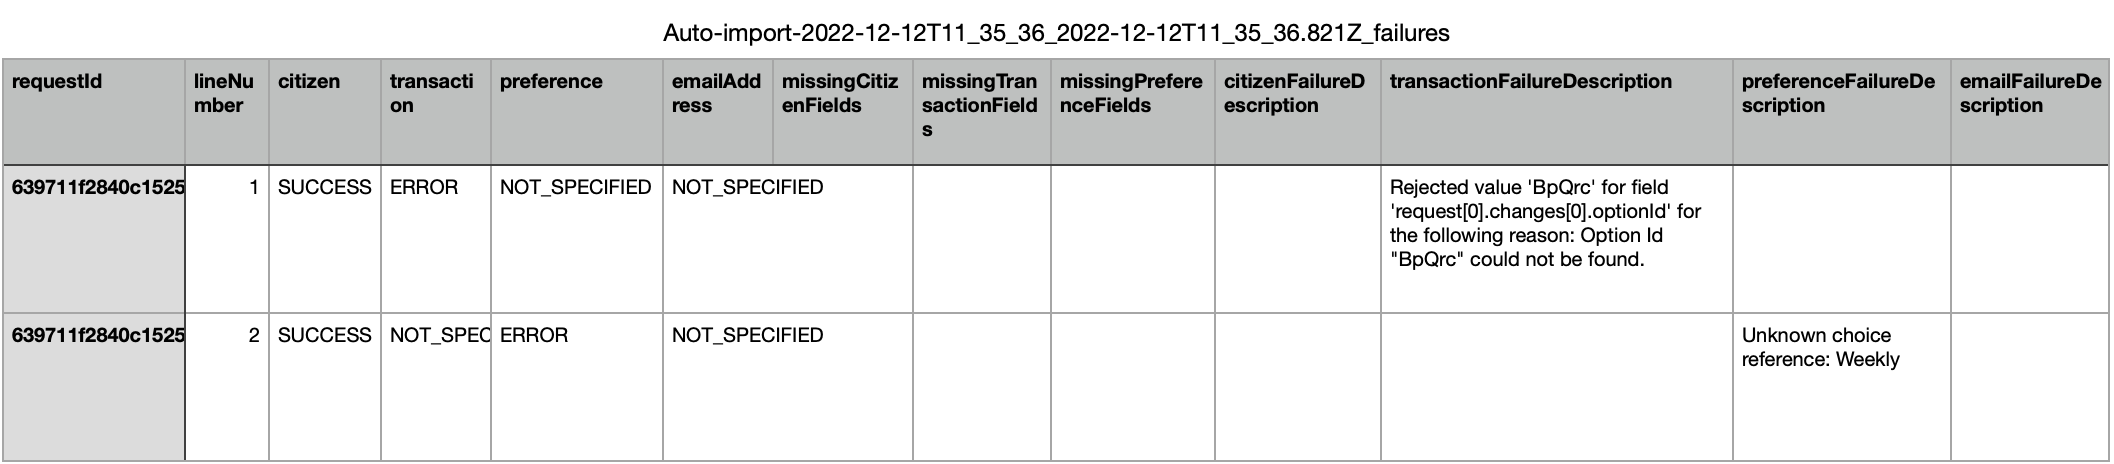
Example of an error CSV file
The API docs relating to data import are available here.
We know from real-world usage, that the most common request after set-up and import of historic/existing state is to pull down the state from DataGuard, in order to seed this back into downstream systems. You may want to team this real-time updates using our webhooks, or pull down daily deltas in a bulk file.
How it Works
Your file must be named with a .csv extension. Please see below for the mandatory columns required for specified results.
Importing only citizens
If you want to import only citizen data without any permissions or preferences, then you can provide just the uniqueReference in the CSV.
- uniqueReference (mandatory) - field required to create a new citizen. It is also called citizen "externalRef" which is a unique customer reference.
Importing citizens along with purposes and preferences
Supports creating new citizens or updating the records for existing citizens
- Creating Permissions
Each consent purpose (permission option) that you want to add or update for a customer, should be a new line in the csv
- uniqueReference (mandatory)- represents the unique customer reference. It is also called citizen "externalRef" in DataGuard terminology. If the citizen record is already present, we avoid duplication by refraining from creating a new one. However, if the record does not exist, a new entry is created. In the case of an existing record, the data is updated accordingly.
- privacyPolicyId (mandatory) - represents the identifier for the privacy policy that is available to the citizen at the point of capturing their permission
- permissionStatementId (mandatory) - the identifier for the consent purpose statement which is the text that accompanies a set of consent purpose options. It is agreed to by the citizen at the point of capturing their purposes.
- optionType (mandatory) - indicates whether it represents a single consent purpose or a collection of consent purposes . The possible values for the column can either be "group" or "option".
- optionId (mandatory) - denotes the DataGuard ID for the particular option, the consent purpose relates to
- justification (mandatory) - represents the lawful basis required to capture the consent. Please refer Lawful basis for more information.
- state (mandatory) - state of the captured consent purpose. possible values for the state are "GRANTED", "PENDING", "DENIED", "CLAIMED", "OBJECTED", "OBJECTION_UPHELD".
- validFrom (optional) - date/time stamp in ISO format that the purpose is valid from. The default if not provided is the time the transaction is recorded.
- validUntil (optional) - date/time stamp in ISO format that the permission is valid until. The default if not provided is to use the stored validity period as held in your configuration to calculate the valid until date
- obtainedAt (optional) - date/time stamp in ISO format that the permission was obtained from the citizen at. Cannot be in the future. The default if not provided is the time the transaction is recorded
- source (optional) - used to indicate where the transaction was captured
- sourceSystem (optional) - used to indicate the system the permission was originally held within
- sourceSystemReference (optional) - used to specify the originating system record's reference/ID
- Creating Preferences
Supports creating new citizen or updating the records for existing citizen
It is possible to add
- uniqueReference (mandatory) - represents the unique customer reference. If the citizen record is already present, we avoid duplication by refraining from creating a new one. However, if the record does not exist, a new entry is created. In the case of an existing record, the data is updated accordingly.
- reference (mandatory) - the stored, human-readable reference of the preference being updated
- values (mandatory - the choice references in DataGuard relating to the selections made by the citizen. If multiple choices are required for a single preference the values should be pipe delimited within the field) as shown in the sample CSV
Finding IDs in the UI
You can find all ID's you need to import data in the relevant DataGuard Admin UI area. Each source table has a copy to clipboard function.
Updated 9 months ago